Summer is quickly coming to an end. So I thought it might be fun to share a list of some of our favorite and easy summer activities for kids.

I don’t know about you guys but we’ve really had to dig deep and get creative this summer. Turns out, you can only stick your kiddos on educational apps for so long. Some of these may be ideas you’ve already come up with and tried. I’m not trying to reinvent the wheel here. Sometimes it’s just nice to have a quick list when you’re coming up with something on the fly. That’s why I’ve come up with these (cheap) summer activities to do with your kids before school starts back.
*This post contains affiliate links. That means that if you make a purchase after clicking on a link, I may earn a small commission at no extra cost to you.
Our 6 Favorite Activities
- Tie Dye – Being a kid of the 90’s, this one was an obvious choice for me. We took a package of white undershirts and transformed them into groovy perfection! The kids loved it! They literally have tried to Tie Dye everything in the house. Chad and I ended up dying a few shirts for ourselves too! We managed to dye all of the shirts with very minimal mess. That’s a huge bonus when finding summer activities to survive boredom.


- Grow a Garden – This one has been such a learning experience for all of us. It has taught us a lot about the importance of taking care of our environment, responsibility and hard work. The kids really look forward to going out and caring for the garden each day. It’s even more exciting when there are things ready for us to pick! Even if you don’t have space for a garden like ours, an herb garden in the kitchen would still do the trick. There is something so special about watching things grow!


- Summer Restaurant – I’ll be honest, this was precious and I loved it, but it did take more time and prep compared to some of the other activities. Luke was away on a sleepover so the girls decided to treat their daddy to a special dinner. They looked up recipes in one of my cookbooks, checked for ingredients and made their own grocery list. They even took requests. I assisted with the cooking but they made a menu, set the table and served the food all by themselves. They even asked Alexa to play “Lady and the Tramp” music to set the mood for the evening. Such sweet memories were made and their daddy was smitten.


- Nature Scavenger Hunt – We have done several of these. I have created most of them myself or printed off free ones that I found on the internet. This last one was actually a nature hunt bingo. I found these cute little cards at the Target dollar spot. Evidently it’s way more fun to slide the tab when you find something. I’ve also found a similar bingo set with dry erase markers. We really had fun with these around the house. They could totally be played at the park or around town too.


- Book Clubs – Ok, so I may have totally tricked the kids on this one. Being a reading teacher makes me a little bit of a crazy person when it comes to summer reading. I want my kids reading all summer and I want them to actually enjoy it. Each kiddo picks their favorite book each week. Then that’s the one that either they or I will read to everyone. When it’s their turn, they get to share their favorite parts, dress like a character or maybe even help us make a craft that goes along with it. This might not work if your kids are older but mine feel so important when it’s their turn to lead our book club. We also listen to the Stories Podcast in the car sometimes. I’m a huge fan of podcasts and this one has a new story every week. They’re so engaging and the kids love them.


- Movie Night – Classic! We try to only do this a few times a month so that it still feels like a special treat. We clear out the living room to make a giant pallet on the floor. Pop some popcorn and add in some M&Ms and you’re set! We have Disney+ so Chad and I love picking our own childhood favorites for the kids to watch. Movie nights are always my favorite!


Summer Activities We Want to Try
We still have a few more weeks before school to soak up as much family time as we can. Here are a few more summer activities that we still want to try out or maybe do again.
- Make Your Own Bubbles – Everyone loves bubbles! Making your own just adds to the fun and they last longer! All you need is water, dish soap and little corn syrup.
- Create a Water Park – By water park, I mean get creative with the water hose and sprinklers. It’s too hot in Texas to not include water in our outdoor activities.
- Freeze Dance Party – Ask Alexa to play “Freeze Dance Party” and see how many toys your kids can pick up before they freeze. They’re cleaning and having fun! Suckas!
- Flashlight Hide and Seek – Because why not?!
- Make Ice Cream in a Bag – I haven’t done this since Girl Scouts but I’m sure it would still be a big hit!
I loved creating this list of summer activities for kids almost as much as I enjoyed participating in them. What other creative activities has your family come up with this summer? I’d love to hear them so we can try those out too!
Subscribe at the bottom of the page and follow us on Facebook, Instagram and Pinterest to keep up with what’s going on at The Yellow Rose Farmhouse.
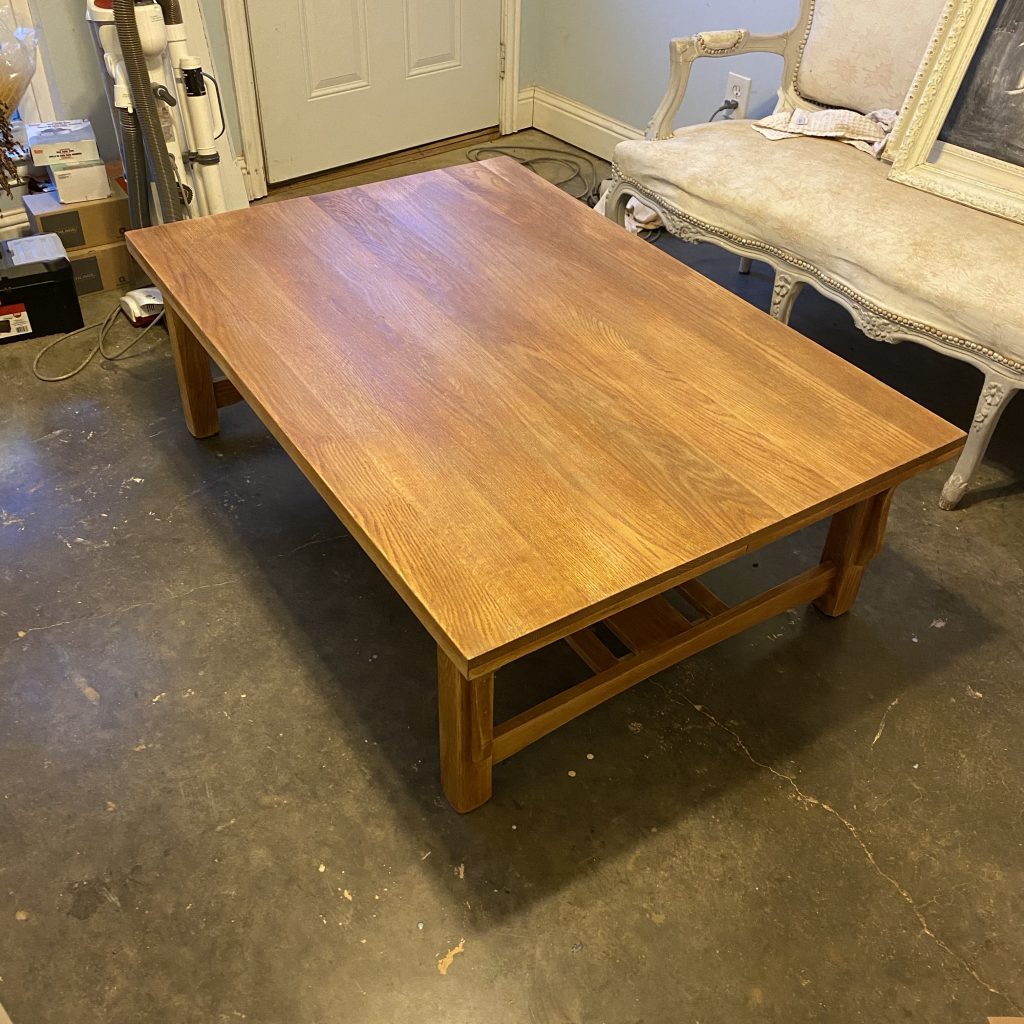
I’m so excited to share this DIY natural raw wood coffee table project with you guys!

*This post contains affiliate links. That means that if you make a purchase after clicking on a link, I may earn a small commission at no extra cost to you. You can even shop some of my decor at the bottom of the page.
I love a good DIY project. Especially when they turn out the way I want them to which is always a 50/50 shot for me. I think I may be the reason we have those “Nailed it” memes. Either way, I enjoy them. Lately I’ve been seeing so many pins, insta posts and home decor blogs with beautiful natural raw wood furniture pieces. I love this style and I’ve been dying to find a piece for my own home. After a quick internet search, I realized I’m not the only one into this style right now because everything I found was either really pricey or sold out. I convinced myself that it couldn’t be that difficult to do and thus my DIY natural raw wood project was born!
I have flexible seating in my classroom and I used this coffee table that I found off Facebook Marketplace my first few years of teaching. After having to repaint it every year because of all the student graffiti and damage, I decided to retire it and take it home. I didn’t have the heart to get rid of it because I knew the bones were still good. I had hoped there might be an opportunity such as this in it’s future. I’m so glad I kept it.


I researched and read what felt like a million different articles on how to create the natural raw wood style that I was looking for. So. Much. Information. There were so many great articles out there and they all had different ways of doing it. I felt a little overwhelmed. I’ll admit that I’m a bit of a lazy DIYer. If the project starts looking too complicated, I’ll typically ditch the project and save up for it instead. This time, I stuck to my guns. I decided to try a mix of everything I had learned and hoped for the best.
5 DIY Steps to a Natural Raw Wood Finish
Here’s a quick look at the 5 steps I took to get the natural raw wood look I wanted.
- Strip It
- Scrape It
- Sand It
- Seal It
- Wax It
Step 1: Strip It
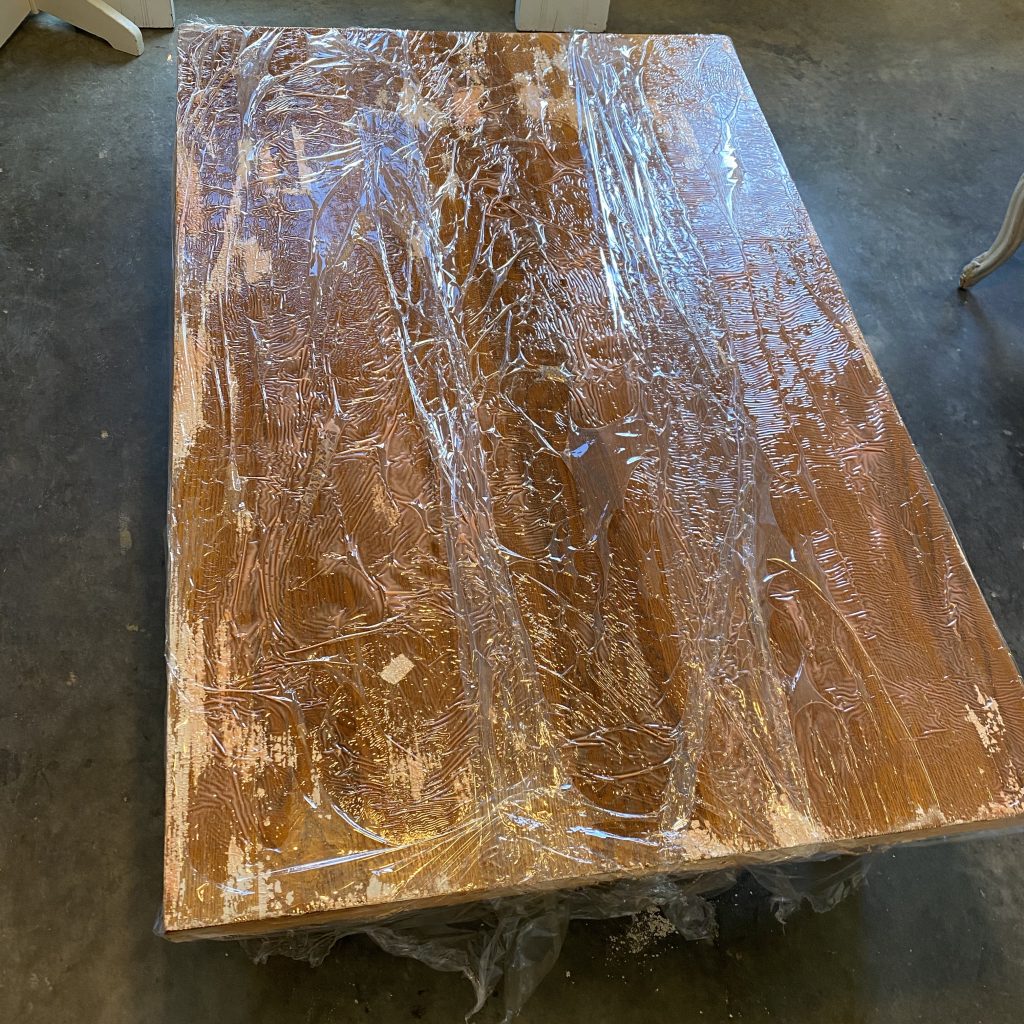
As I mentioned previously, the coffee table had several paint layers because I just spray painted over any flaws the table had and called it good. I knew sanding it at this stage would take forever so I decided to start with a stripper instead. I’ve never used a stripper before but I loved this one that I found at Home Depot. You can also find it on Amazon here. It did the job and the smell wasn’t unbearable. I coated every inch of the table with a thick layer of stripper. For this I used a cheap paint brush that I happened to find in our shop. I actually started out using one of those cheap craft foam brushes but the stripper melted it. Oops.
One of the articles I read said to cover the furniture with saran wrap. A friend of mine confirmed that it would allow the stripper to work a little longer without drying out too fast. I used moving wrap for this. It was actually meant for packing up my classroom. The handle on the ends make it super easy to wrap around larger pieces. I let the table sit overnight and removed the wrap the next afternoon. I was impressed with how well the stripper worked. Some of the paint even came off with the wrap as I was peeling it off.
Step 2: Scrape It
I scraped the remainder of the paint off with plastic scrapers so I wouldn’t scratch the wood. This part was pretty messy. I’m thankful for the concrete floors in our shop. I wouldn’t recommend doing this inside if you can help it. If you do, place some trash bags or newspapers on the floor before you start. The paint was super sticky and I had to clean the gunk off my scraper a few times before I could finish. I also moved one of the used strips of saran wrap on the ground below where I was scraping so that I could scrape the paint directly onto it. This was a game changer and made cleaning up much quicker.
Although I was pleased with the outcome, I decided to paint the stripper on once more because the table was still covered in some of the original golden stain. I repeated this entire step but in hindsight I’m not sure I really needed to.
The next day I finished scraping the last bit of paint and stain. There were still a few spots in the corners and the hard to reach places that had some paint left over but I decided to not worry about it (because lazy DIYer). I think it adds a little character and tells a story. At least that’s how I’m justifying it. The table was pretty tacky so using mineral spirits and the rough side of a dish sponge to wipe it down really helped. This stuff was pretty strong and really soaked into the wood so I let it sit for another day to dry before I started sanding.


Please note that this project took ME a couple days to complete but I honestly don’t think it needed to. With four kiddos, I don’t always have loads of free-time to work on projects. Hopefully that explains my leisurely pace.

Step 3: Sand It
This was probably my least favorite part of this DIY natural raw wood project. It wasn’t difficult, it was just tedious. I used our sander with 220 grit paper to sand down most of the table. Then I used a fine/medium grit sanding sponge for the corners and places that were difficult to reach with the sander. I vacuumed as much of the dust as I could and then wiped down the rest with a microfiber rag. Tedious or not, this step was a must and so worth it! It looked AMAZING!
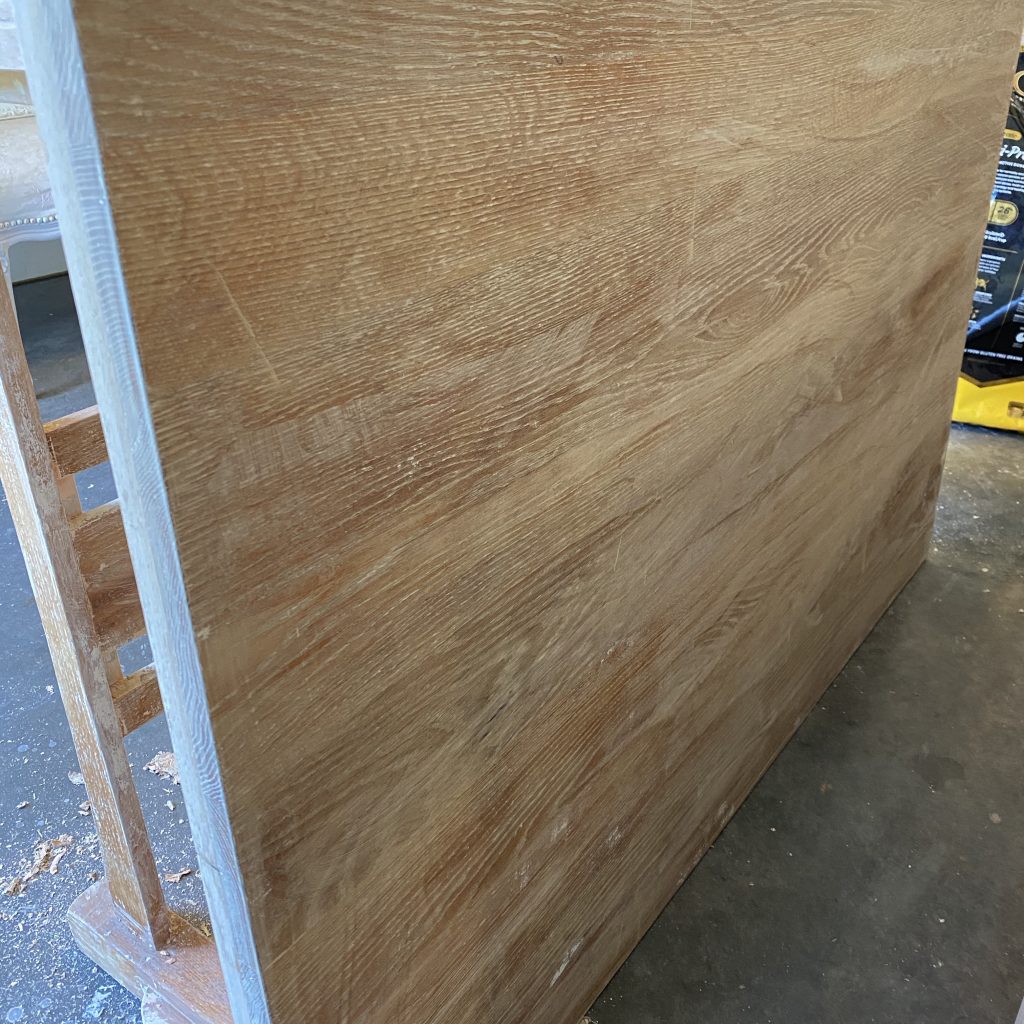
Step 4: Seal It
No more golden yellow color! This was the actual natural raw wood of the table! I probably could’ve left it like this but since it was going in our house with my kids, I thought it best to seal it. I purchased a clear satin finish poly for this. Then, I applied 2 coats of it with a new, higher quality paint brush. I read that spraying the poly would give it a more even coat but because I was in a small room, I chose not to. It appeared well covered after 2 coats to me, but it’s actually recommended by the professionals that you do more. Even though the poly was clear, after drying, I noticed some of the original golden color reappearing. Don’t PANIC! Let the magic liming wax do it’s thang!
Step 5: Wax it
This step was the most important one in getting the natural raw wood look I wanted for my coffee table. I was familiar with liming wax but had never used it before. THIS STUFF IS AWESOME and super easy to work with. I used an old cotton t-shirt to rub the wax over the table. You can also use a waxing brush to get a more grainy look. I applied a thin layer on and then wiped off any excess with the dry side of the shirt. I waited maybe an hour or so for it to dry and then repeated this process twice.


Some of the articles I read said to seal the wood again after you’ve applied the liming wax but I didn’t. Now that the table has been in use for a few months, I see why I probably should have. There are a few places on the table where little hands constantly touching the table have taken some of the wax off. I can see a little bit of that golden color coming through again. However, reapplying some wax and a coat of sealer will be an easy task later on to preserve this beauty.
I love how our DIY natural raw wood coffee table turned out. It has that beautiful natural raw wood look that I was going for. I’m so glad I stuck with this project and I can’t wait to do this to other pieces I have around the house!


Let me know what you think. I’d love to hear about pieces that you’ve redone. What process worked well for you? Leave me a comment below. Don’t forget to subscribe and follow us on Facebook, Instagram and Pinterest to keep up with our day to day. Thanks for stopping by!
Sources
*Click the items below to shop affiliate links
Stripper | Paint Brush | Moving Wrap | Plastic Scrapers | Mineral Spirits | Orbit Sander | 220 Grit Sand Paper | Sanding Block | Microfiber Rags | Clear Satin Finish Polyurethane | Liming Wax | Wax brush | Poly/Paint Sprayer | Wood Beads | Flameless Candles | Chicken Wire Basket | Fern Plant | Area Rug | Amber Vase | Farmhouse Throw | Pillow Covers |
Welcome to our farmhouse master bathroom renovation!


*This post contains affiliate links. That means that if you make a purchase after clicking on a link, I may earn a small commission at no extra cost to you.
Our farmhouse had more than a few quirks when we first bought it. The family that lived here before us believed this would be their forever home. They had made custom adjustments to the house to suit their family and their needs. No problem there except it is now our forever home. Some of those adjustments didn’t necessarily work for us. This was especially true for our master bathroom.
Farmhouse Master Bathroom : Before

It was narrow and the placement of the sink felt a little awkward to me. I wanted to figure out a way to add more space while also finding a better place for the toilet instead of right across from the sink. I also really wanted to have two sinks rather than one. With just the vision of what I wanted for our farmhouse master bathroom, we got to work on the renovations.

It turns out, this project was more complicated than I thought. Half of the bathroom space was actually a closet. The master bedroom already had a closet but Chad and I didn’t really feel like it was big enough for us to share. See the problem… If we took out the closet to add more space for the bathroom, then Chad would be without a closet (Obviously, I need a closet more than he does and I was not about to share 😜).
After much debate, we were able to find a solution where we get more space for the bathroom and we both get a closet of our own. It was a Win/Win! Chad’s aunt and uncle are carpenters and renovating geniuses! They were actually the ones that found a way for us to add another closet in our bedroom without taking any space away from the master bath.
One obstacle down and now on to the next one. Once we were able to knock out the wall for the closet, we had to figure out the layout we wanted. I had a pretty good vision of where I wanted everything placed but we had to work around the plumbing and electric. Luckily, because the master bathroom is upstairs, it made it easier to rearrange the plumbing. I was thrilled to get a space for the shower and bath, two sinks and a separate pooper room (I’m positive that’s the technical term).

I also really wanted a free standing tub and a separate shower. Remember how I told you that the bathroom was upstairs. Getting the existing cast iron tub out of that space was one of the most nerve racking experiences ever! I’m talking about life or death! That was a bit dramatic but Chad did almost knock me off of our balcony in the process. Near death experience or not, It was totally worth it.
Farmhouse Master Bathroom : After
I’m obsessed with our tub now. I think it totally changes the entire feel of the bathroom and It’s one of my favorite places to unwind.

After getting the plumbing and electric done, it all seemed to go by super fast. Before I knew it, our cabinets, counter tops, fixtures and sinks were all in.
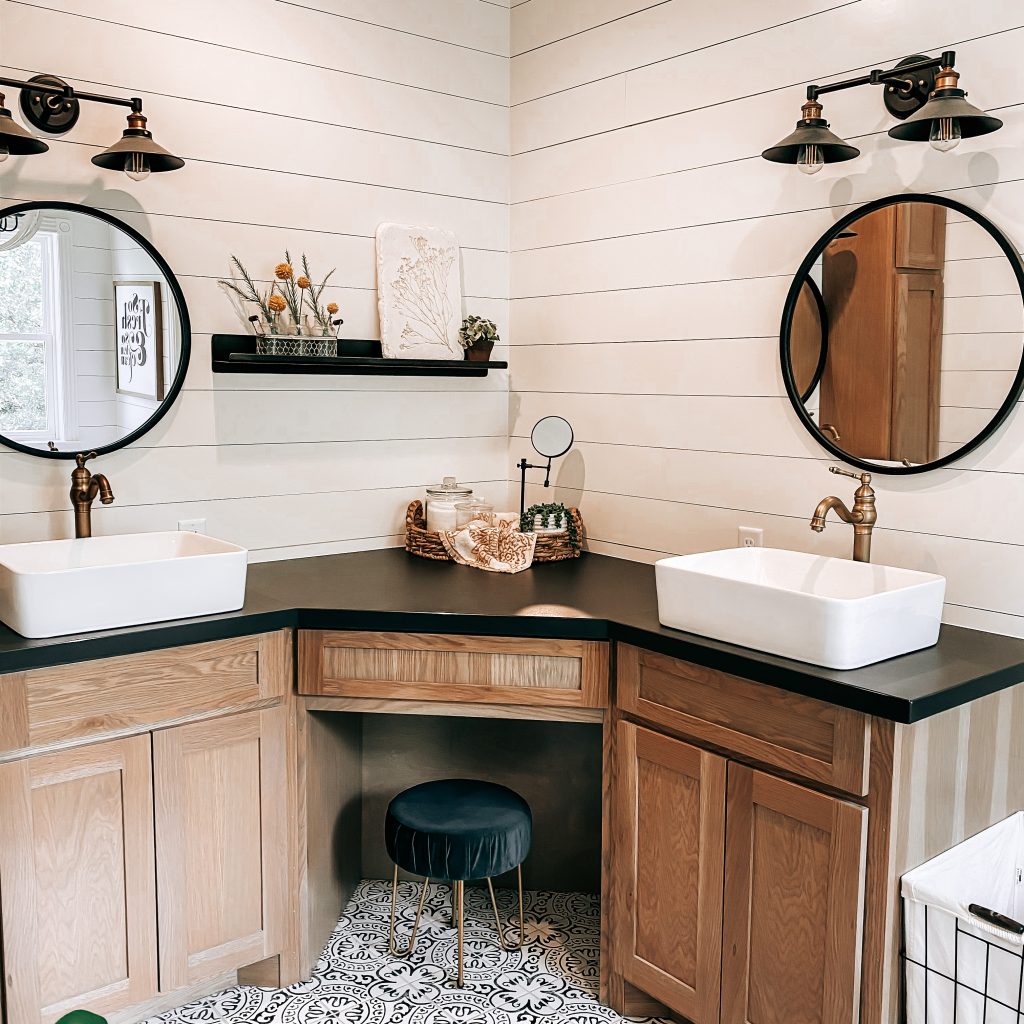
The last part is my favorite and it was the most fun. The details and decor!


We were living in the apartment in our shop during renovations so I picked out most of the fixtures and finishing touches online. This was a little bit scary since it wasn’t tangible and everything came in at different times. I really wanted to know what it would look like all together but I just had to be patient.


There were definitely some stresses along the way but I love how our farmhouse master bathroom renovation turned out.
I’d love to hear from you! What are some of your most rewarding renovations or what are you wanting to start? What obstacles are getting in your way? Leave me a comment below. Don’t forget to subscribe and follow us on Facebook, Instagram and Pinterest to keep up with our day to day. Thanks for stopping by!
Sources
*Click the items below to shop affiliate links
Floor Tile | Shower Tile | Bath Tub | Sinks | Sink Faucets | Lighting | Chandelier | Countertops | Round Mirrors | Tub Faucet | Wall Sign | Bath Towels | Fiddle Leaf Plant | Vanity Stool | Hanging Basket | Vanity Mirror |