I knew I wanted to start a DIY peg shelf project for my laundry room for a while. What I had just wasn’t functional and I was totally prepared to start a full blown, from scratch, DIY Peg Shelf project.


*This post contains affiliate links. That means that if you make a purchase after clicking on a link, I may earn a small commission at no extra cost to you.
Luckily, this lazy DIYer stumbled across this precious piece at Round Top so I only had to do half of the work. I love Round Top and easy DIY projects so it was a win/win for me!

*This post contains affiliate links. That means that if you make a purchase after clicking on a link, I may earn a small commission at no extra cost to you.
Here is a list of the materials I used for this DIY peg shelf:
- ½ inch dowel rod
- Small level
- Metal ruler and/or measuring tape (I used both but you could just use measuring tape if you didn’t have a ruler and be just fine)
- Wood glue
- Frog tape
- Wood Screws
- Wood filler
- 120 grit sandpaper
- Gator finishing micro tool (this is optional but it made the sanding those small, in between spaces super easy)
- ½ inch forstner drill bit
- Cordless drill
- Rubber mallet
- Tack cloth
- Small angled brush
- Latex primer & paint (I used Valspar Oyster Bar)
- Stud finder ( I did not have one but I could have totally used it. We found the studs the old fashion way, by knocking on the wall 😜)
Step 1: Measure
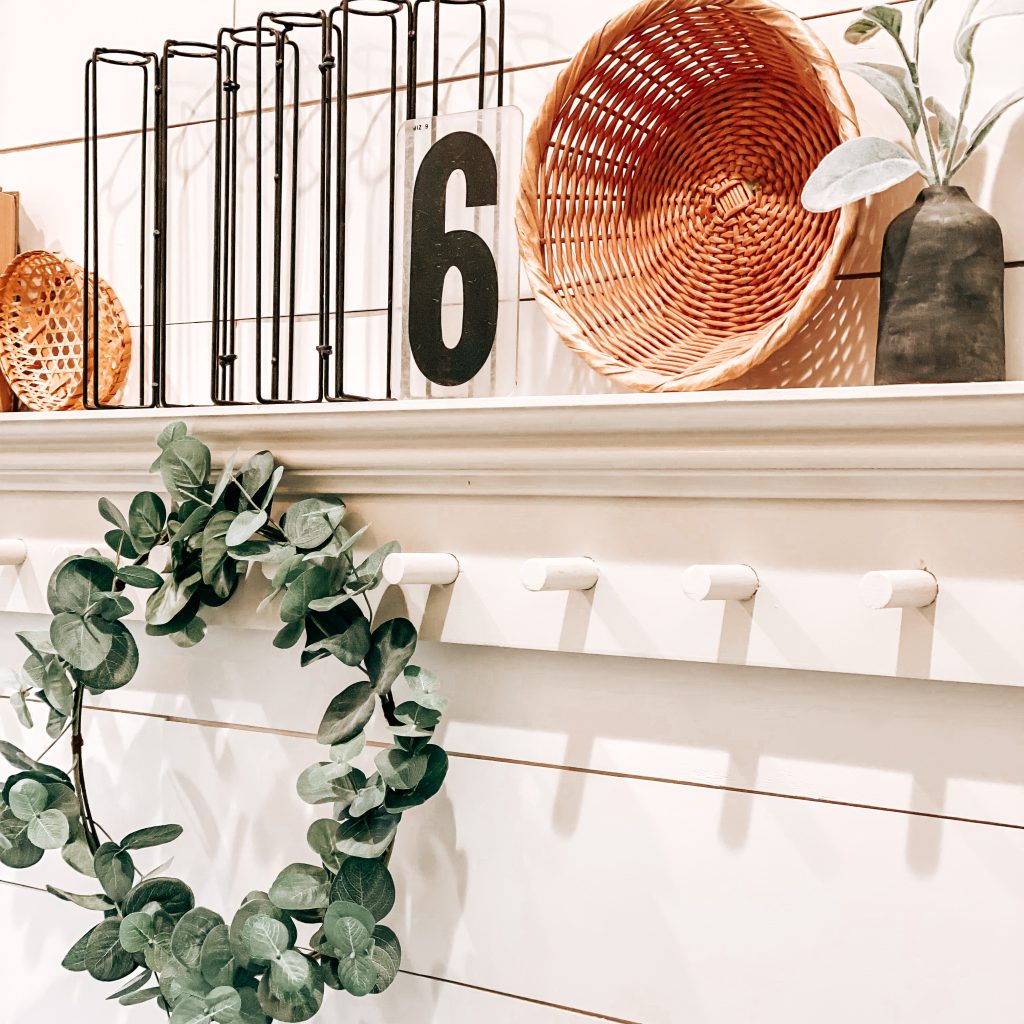
The first thing I needed to do was determine the placement of the pegs. To do this I laid out the shelf, measured the full length and then marked the center point with a pencil. From there, you can either draw a line down the length of the rail or you could use tape to mark it, which is what I did. The spacing of your pegs is really up to you and what you’re using it for. You will need to make sure that they are spaced evenly and the length from the last peg and the edge are the same on both ends. For example, I spaced each of my pegs 4 ½ inches apart with the last pegs 3 inches from each end.
Step 2: Drill & Cut
The measuring was probably the hardest part of this whole project. Once that was done, I used a cordless drill with the ½ inch Forstner drill bit to bore the holes for each peg. I drilled all the way through my rail but you could also use a backing to make sure they were the same depth.
Next I used the miter saw to cut the individual pegs. I set up a jig to ensure that all the pegs were the same length and to speed up the process a little. They all measured 3 inches long. This length could be longer, if desired, depending on the depth of your shelf. My shelf only stuck out 3 inches so it would have looked odd if the pegs were sticking out further.
Step 3: Paint & Glue
I lightly sanded the rail with 120 grit sandpaper to ensure the paint would go on smooth. Once I finished sanding, I wiped it down with my tack cloth to remove any dust and some of the wood chips from drilling. I painted the first coat before putting the pegs in. I really don’t know why. There is absolutely no logical reason for this but it all worked out so….let’s blame it on my mom brain and move on.
Once the first coat dried, I added a little wood glue to the inside edges of each hole. Then I used a rubber mallet to hammer in each peg until it was flush with the back of my shelf. Make sure to wipe off any excess glue that comes up around the edges of the peg with a cloth and then let dry completely. If you notice any dried glue around the edges, you can quickly sand it using the gator micro tool and wipe away the dust before starting your second coat.
I painted a total of 3 coats of paint. I used Valspar’s Oyster bar and I love it. It looks great in my laundry room with my color scheme. My walls are Sherwin Williams’ Alabaster and I didn’t want the shelf to completely blend into the wall. Oyster bar is the perfect, subtle contrast I was looking for.
Step 4: Hanging the Peg Shelf
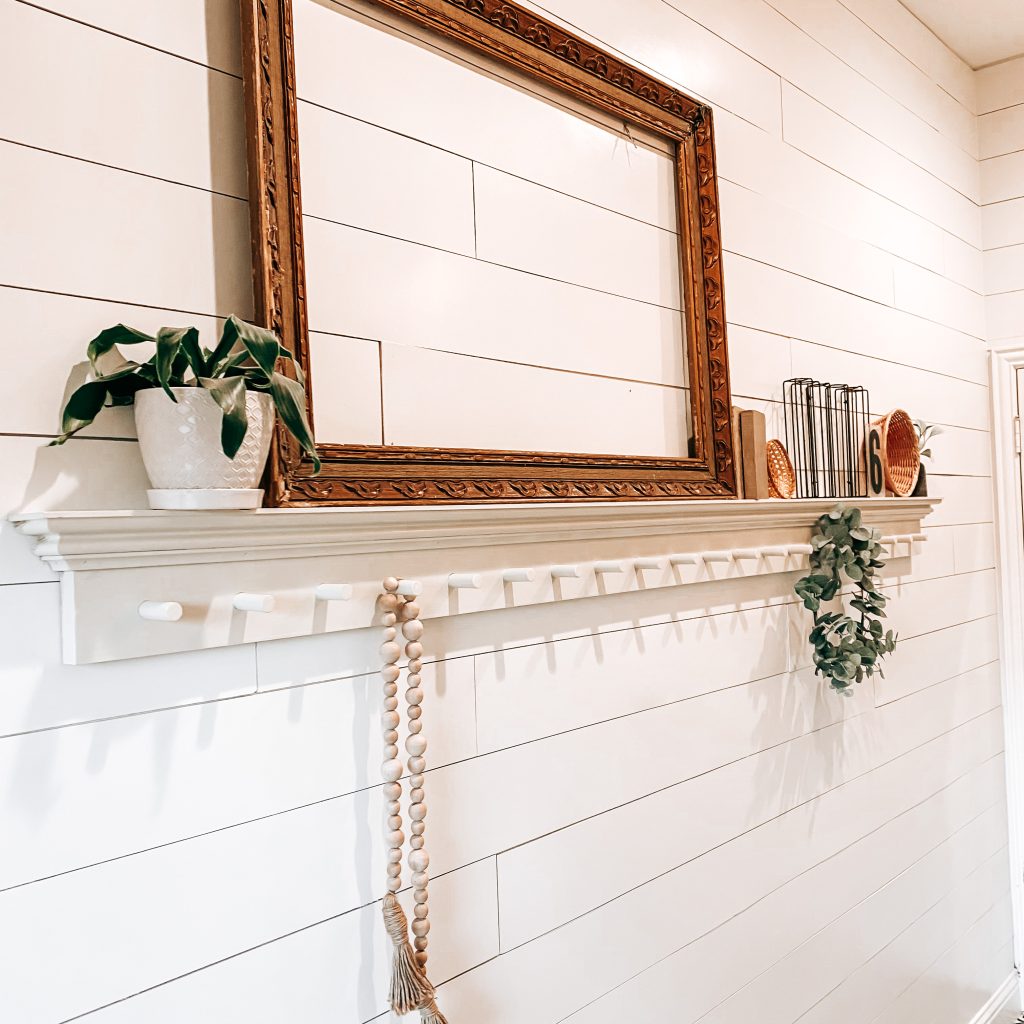
Start by measuring the wall and finding the center point and then match the center point of your shelf with the center point of the wall. Next, you will need to find the studs in the wall either using a stud finder or the knocking method (this works about 85% of the time and didn’t fail me this time! Woohoo!). Starting with the center stud, I screwed in the first wood screw through my shelf into the stud. I placed my level on top of the shelf to ensure that the shelf stayed in position while I was fixing it to the wall. I only used 3 wood screws and my shelf is very sturdy but you may want to use more or less depending on the size of your shelf.
After I had the shelf in place, it was time to fill the screw holes and touch up the paint. I used Minwax wood filler. Let it dry completely, sand lightly and then touch up the paint. I have read many tutorials where people wait to paint their shelf after it is hung. This would mean you could skip the touch up but it really didn’t add that much time. I probably won’t be changing this step but you do you!
Step 5: Decorate your Peg Shelf
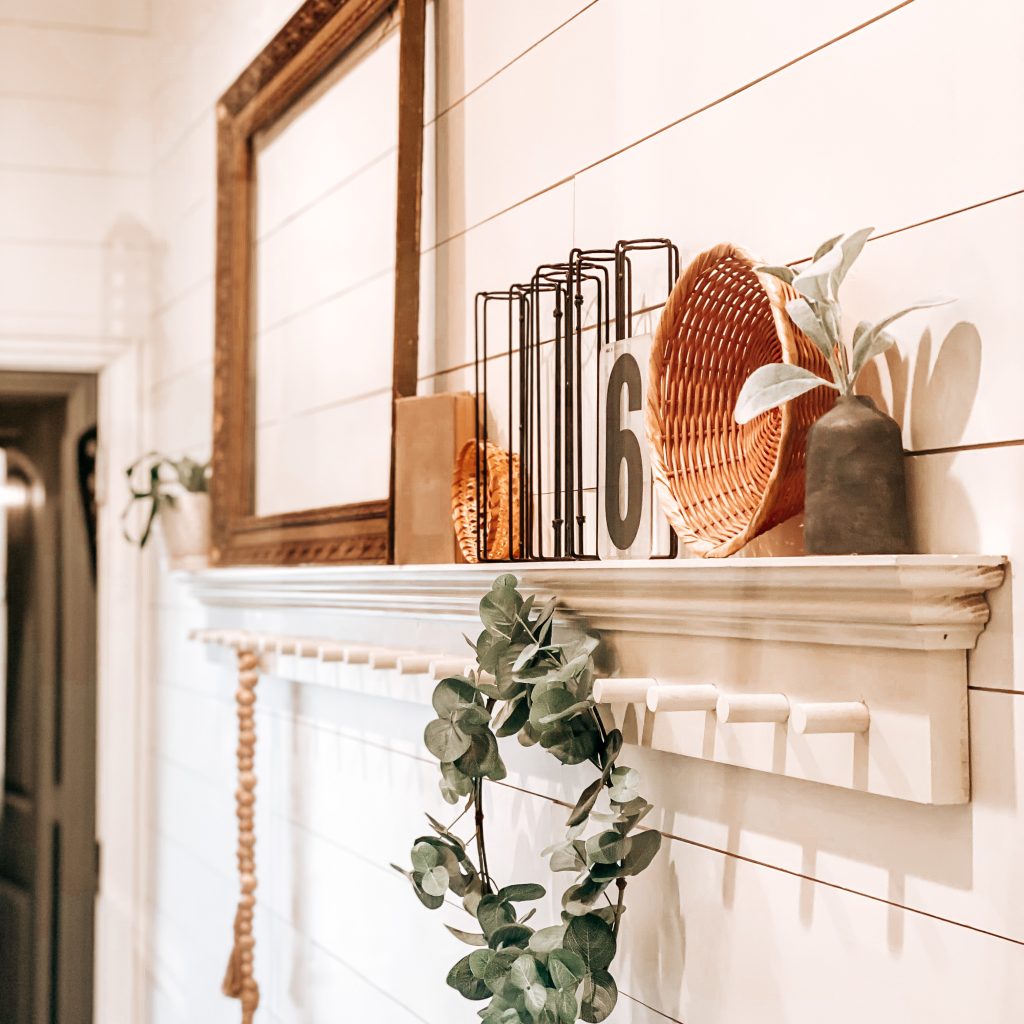
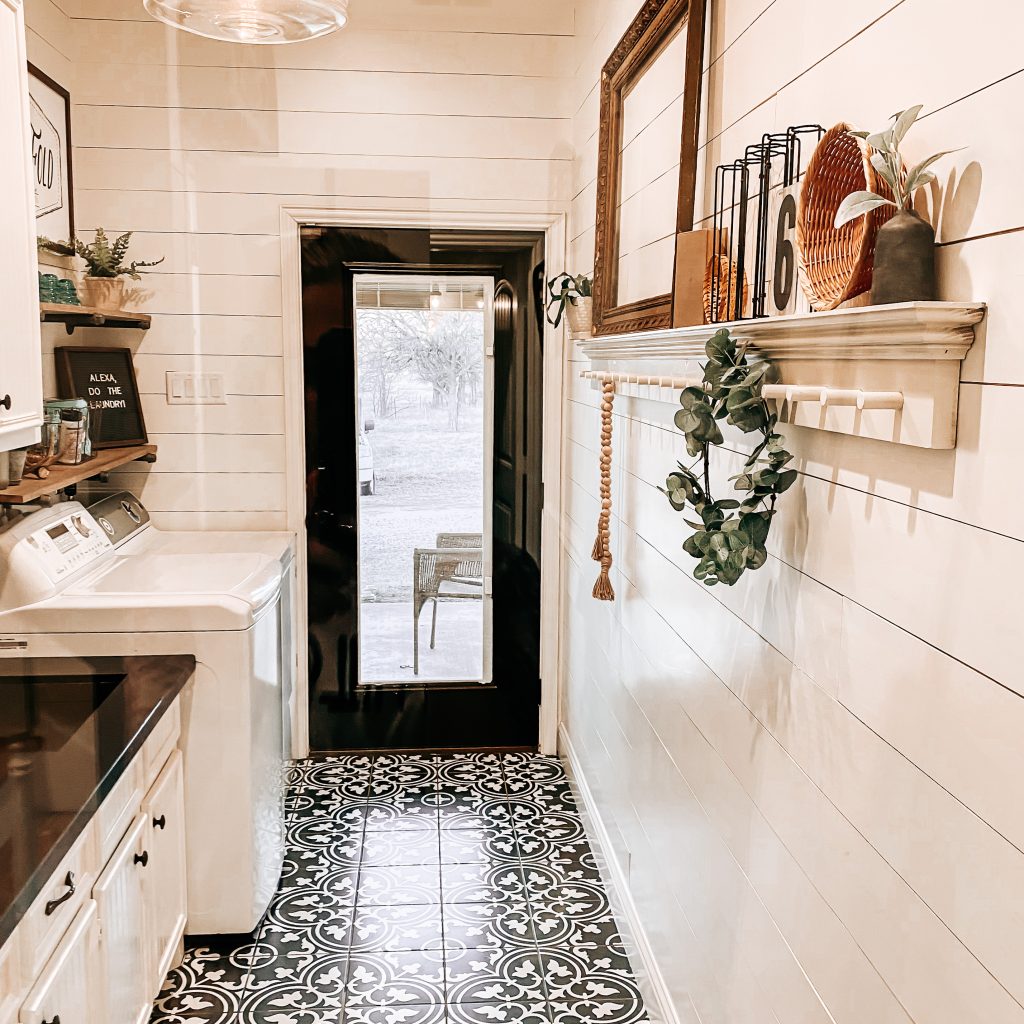
Now that your DIY Peg Shelf is hung and looking flawless, stand back and admire your work! I love that it adds character and functionality to my farmhouse laundry room. Mine is styled with items that I shopped around the house. I added an antique frame for height, some greenery and plants for color and, of course, some old books (books are my favorite) and other vintage finds. I’m thinking of adding some colorful stems to my metal vase stand for spring too. The possibilities are endless!

I hope you enjoyed our DIY farmhouse peg shelf project. I’d love to hear all about your DIY projects! What’s next on your list of projects? Leave me a comment below. Don’t forget to subscribe and follow us on Facebook, Instagram and Pinterest to keep up with our day to day. Thanks for stopping by!
Sources for DIY Peg Shelf Decor & Styling
Eucalyptus Wreath | Wooden Beads | Metal Vase | Black Mini Vase | Lambs Ear Stems | Wicker Baskets | White Ceramic Pot
Our farmhouse kitchen remodel was probably the biggest and one of the most important renovations we made to The Yellow Rose Farmhouse.

*This post contains affiliate links. That means that if you make a purchase after clicking on a link, I may earn a small commission at no extra cost to you.
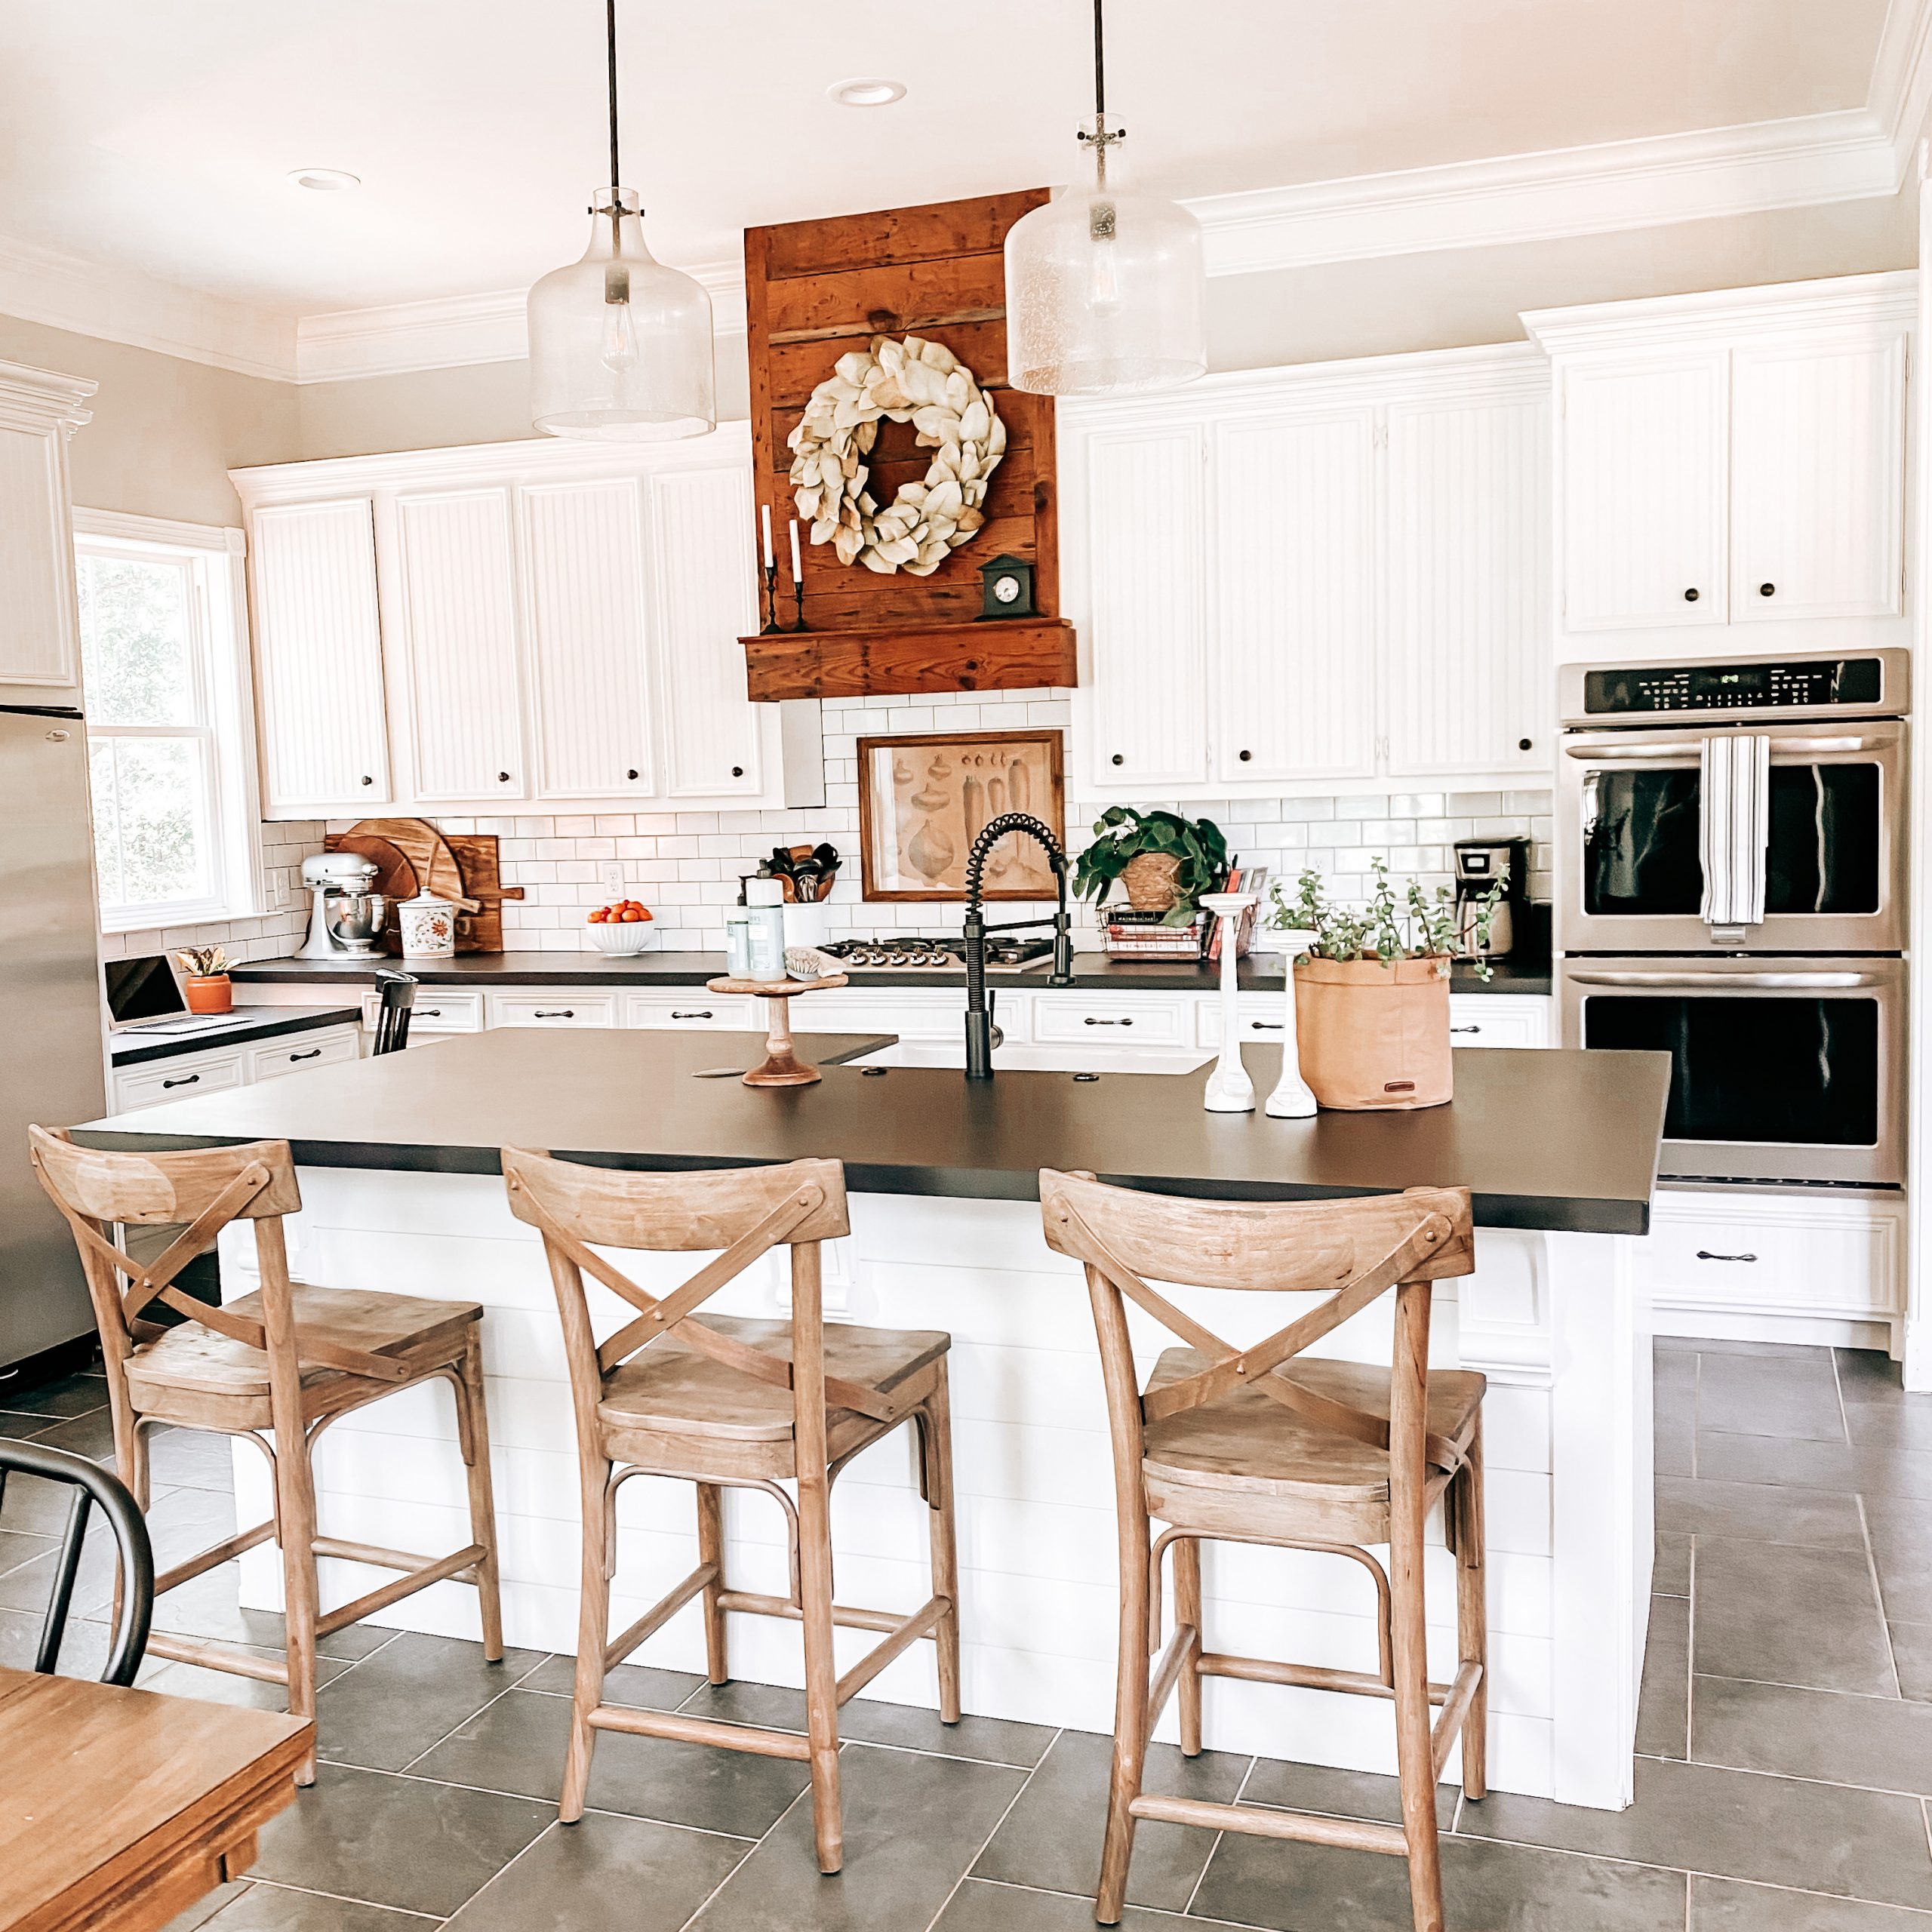
Our kitchen is where life happens! It seems to be the place where everyone gathers to chat, snack and hang. We are so lucky to have a large family and friends group! That also means we need plenty of space for hosting get-togethers. One of the things we loved the most about this house when we were searching for our new home was the large kitchen. For as big as it was though, it felt a little crowded and blocked from the rest of the house. After some thought, we came up with a new floor plan that would open it up and accommodate all our kitchen needs and dreams.
The Demo & Rebuild
The original island and built-ins near the bay windows took up a bunch of space. The island wrapped around the kitchen in a sort of L shape. There were also really low hanging pendant lights all around. This made it feel too stuffy and closed in. I wanted something a little more simple and way more open.

After some measuring and serious Pinterest inspiration, we came up with a way to still have a large island and the open concept farmhouse kitchen I dreamed of. Let the farmhouse kitchen remodel begin! Taking the island out meant adding a bunch of other projects to our list. Once we removed it, we also had to remove the original wood flooring because it wasn’t laid underneath.
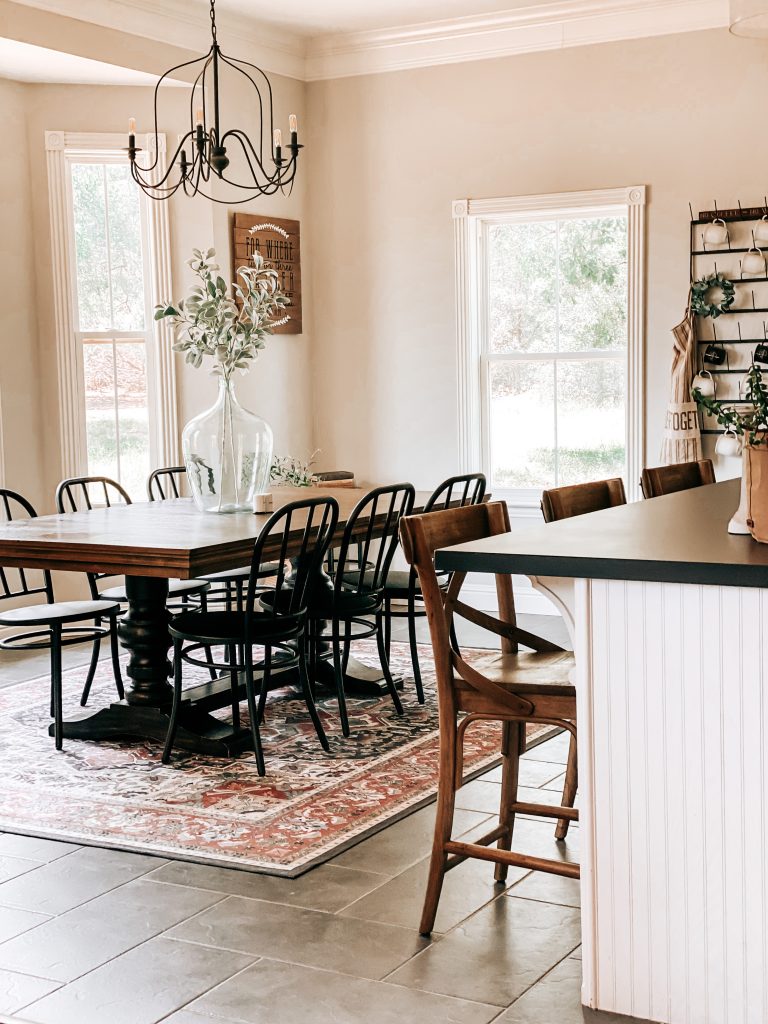
We had to completely change the lighting since the layout didn’t work for us anymore. Then, of course, because I was changing the island and it’s placement, we had to be mindful of water and electricity. I knew I wanted a large island and I wanted to keep it simple. I decided to do a rectangular island with room for seating on one side and a farmhouse sink on the other. It needed to be large for extra seating but I didn’t want it to look bulky which is why I went with the simple shape.
The next thing I wanted to be sure to have was plenty of room to cook. First was the issue of the microwave. Yes, I love to cook but a microwave is a MUST because you never know when Mama just needs a break. We found a space on the side of the island that would be just perfect. It’s in a spot that’s hidden unless you’re looking for it but it’s in reach of the kids. Nailed it!
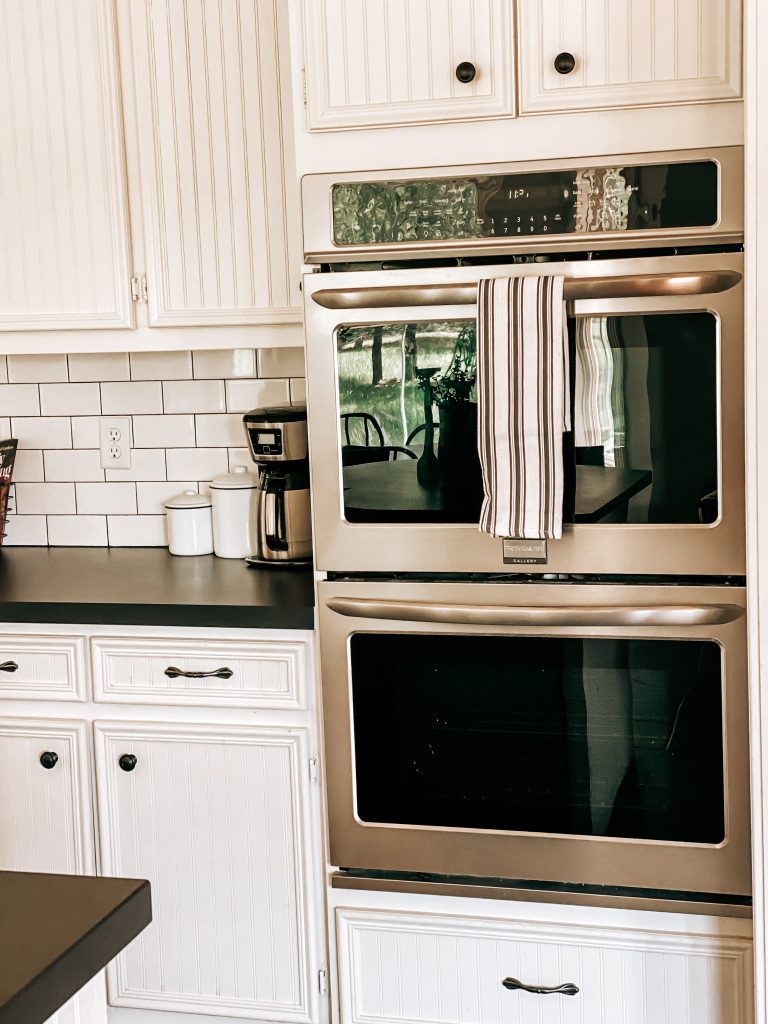
In our previous home, we had a large open-concept kitchen that I loved but the oven and stove top were fairly small. This kitchen had the same problem with the current range oven. I dreamed of hosting a Thanksgiving dinner with a double oven and plenty of room for goodies on a large cooktop. Isn’t that what everyone dreams about?! We took out the range oven and part of the cabinets and started making our cooking dreams come true!
The Layout & Design
With all the major renovations out of the way, it was time to get started on the fun part. The design! The next step was a Pinterest binge (obvi…🙄🤪). I tried to take careful notice of any trends, patterns or similarities in my pins. I learned that I was drawn to simple, neutral, bold color contrasts and wood accents. The first decision I made was the color of the cabinets. I went with Sherwin Williams’ Alabaster. It’s the perfect white and really adds to the bright and airy feel of the kitchen.
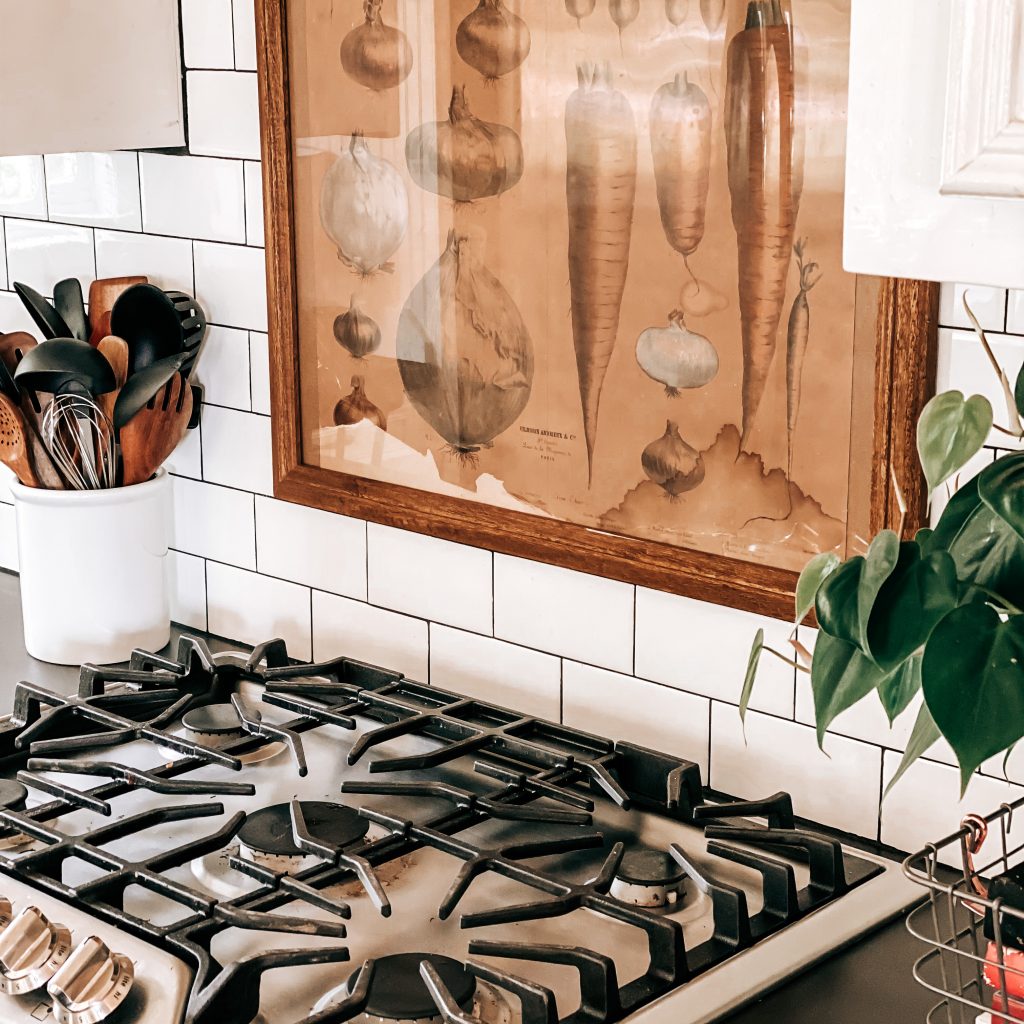
I knew right away that I wanted subway tiles. I didn’t want anything patterned because I was scared I’d want to change my kitchen style in ten years and they’d throw off my vibe. Commitment is hard but subway tiles are neutral and timeless. I love the simplicity and industrial look of subway tiles. They were an easy choice and may just help prevent a style identity crisis later on.
Flooring, countertops and lighting, oh my! I really struggled deciding on these. There are just so many to choose from and it can be hard to visualize what they’ll all look like together. To get started, I took samples of my backsplash and paint and looking at countertops samples at HomeDepot. I knew that we had a really large space and that I’d need them to be affordable and durable. I ended up going with Domoos by Dekton. These countertops are amazing and I loved the contrast of the black countertops with our white subway tile and cabinets. There are a million different styles you can choose from but I really liked the minimalist look of the solid black. Ultimately I chose this material because it doesn’t scratch or stain, it’s heat resistant and super easy to clean. I was sold!


Once I had our countertops, it became a little easier to find flooring. I wanted darker floors because I knew this was going to be a high traffic area. I really loved the herringbone layout with the thin tiles but unfortunately most were out of our budget. So I found some larger rectangular tiles and I was able to lay them herringbone. The layout is not as obvious as it would have been if we’d had the smaller tiles but I think it still looks unique. My only regret on the floors is the grout. We used a light grout and it is so hard to keep clean. If I were to do it all over again, I would use the same colored grout that we used in our laundry room renovation.
Last but not least, the lighting. I love shopping for lighting but it can definitely be overwhelming. Especially when you are as indecisive and as picky as me 😬 I’d had my eye on the chandelier I chose for the dining room for years. It was a no-brainer for me that it would hang beautifully above our table. It is still one of the fixtures I get asked about the most.
The pendant lights above the bar were a bit more difficult to decide on. I had originally purchased black barn lights and thought they’d be the perfect fit for my dream kitchen. However, after they were installed, I felt like they blocked my view of the range hood (one of my favorite parts). I needed to find something a little more dainty. I searched all my usual favorite spots and I ended up finding these beauties at a local lighting store. They were exactly what this kitchen was missing.
Farmhouse Kitchen Decor
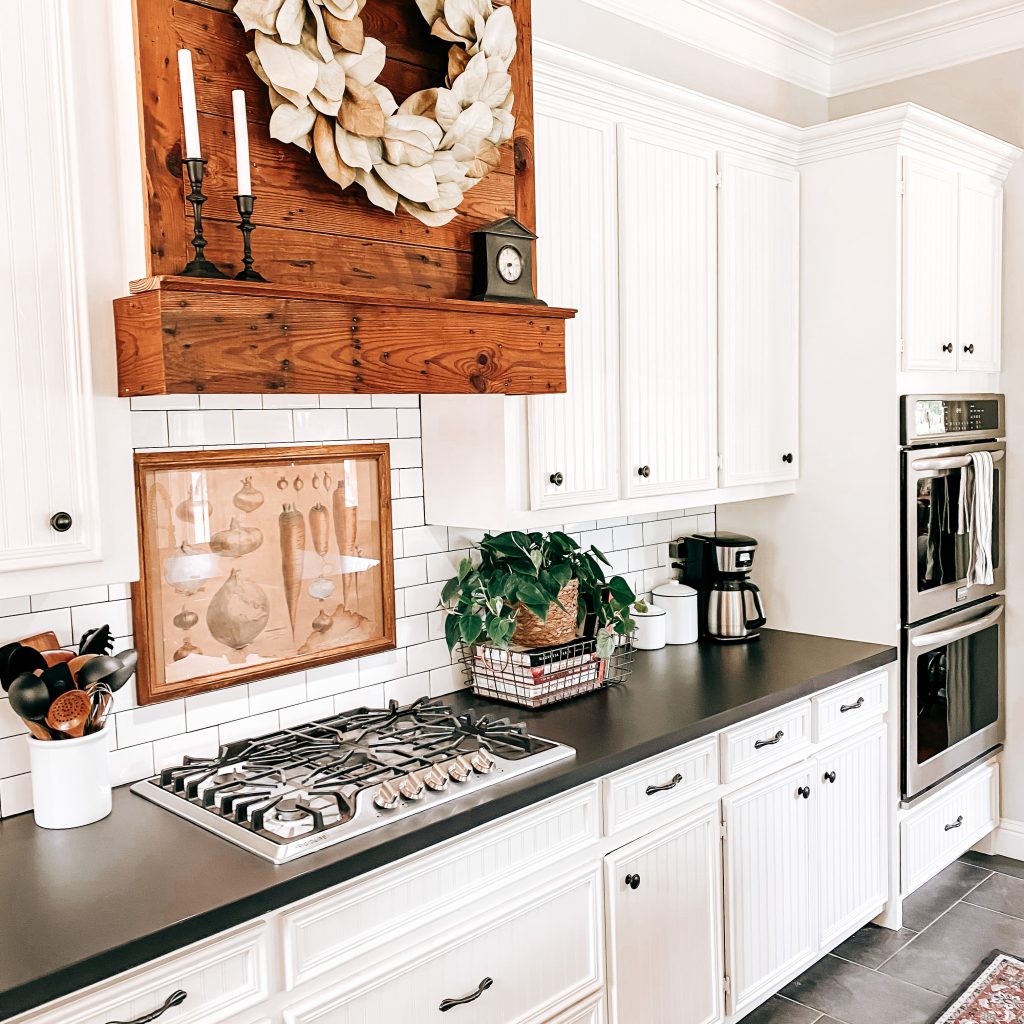
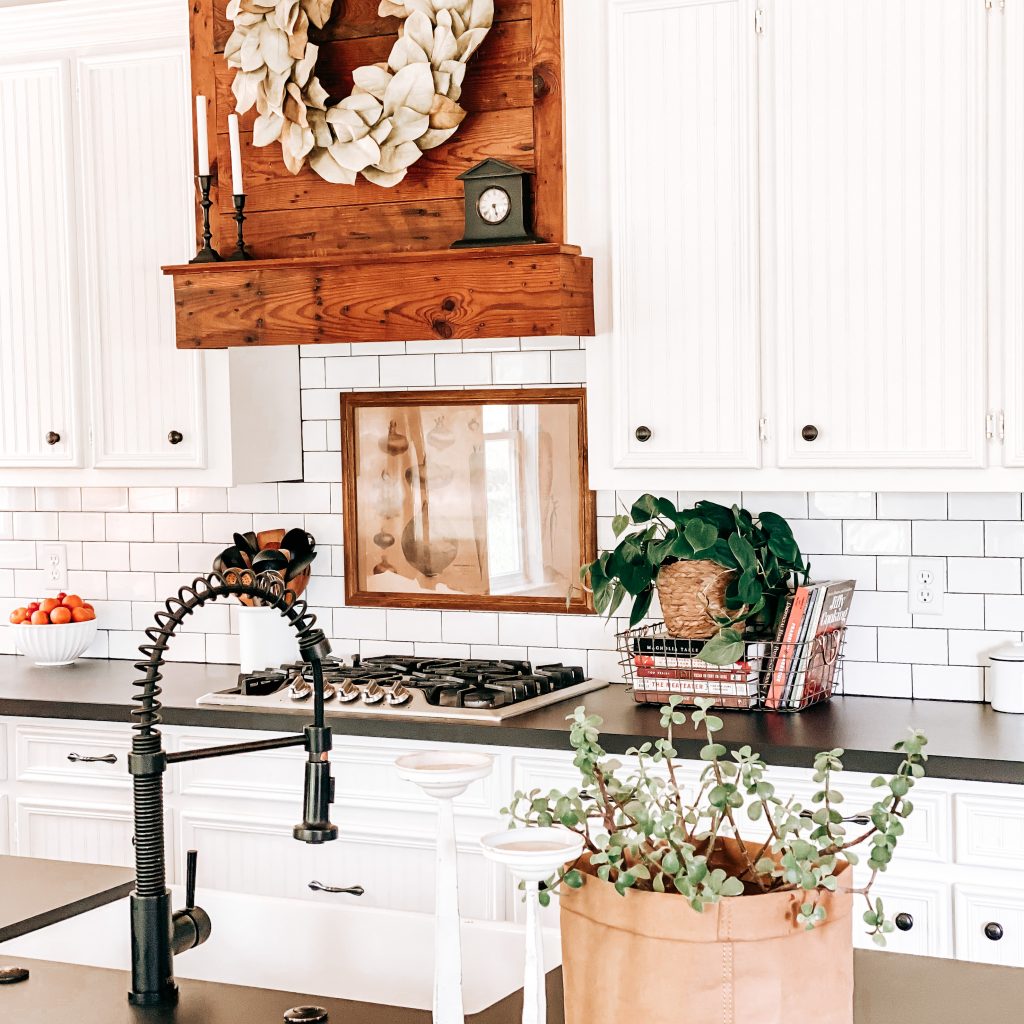
If you’ve followed me for long, you know this is always my favorite part. As I said earlier, I love a simple look, bold contrasts and wood accents. The barnwood range hood is definitely one of my favorite spots in the kitchen and it really stands out from all the white around it. I wanted to add a little greenery and a magnolia wreath just felt right.
I also added some natural wood barstools and some cute wooden cutting boards. There isn’t a lot of wall decor because, again, I really wanted to keep it simple. On the walls next to the table, I have some round shelves styled with plants and old books. I love these shelves so much and you can actually find these same ones in one of the girls’ bedrooms too.They’re just so versatile and a statement piece for sure. The cup rack on the wall next to the refrigerator is also a piece that I knew I had to have to complete the look of my kitchen.


I’ve changed up the decor behind the range a few times but currently I am loving the vintage vegetable print I found at the Round Top Antiques Fair last season. To complete the look of my kitchen, I added a boho patterned area rug and runner. Did I mention that they are WASHABLE?!?! Genius move for moms of kids and dogs, just saying. And they’re super cute! I change out most of the other decorations by season or depending on my mood 😏
I think every remodel is a learning experience but it’s so rewarding once it’s all finished. Our farmhouse kitchen remodel was a success and a huge help in making The Yellow Rose Farmhouse feel like our home. Be sure to check out some of our other remodel projects here.
I hope you enjoyed our farmhouse kitchen remodel. I’d love to hear all about your kitchen remodeling wins! What inspires you? What’s keeping you from having the kitchen of your dreams? Leave me a comment below. Don’t forget to subscribe and follow us on Facebook, Instagram and Pinterest to keep up with our day to day. Thanks for stopping by!
Sources For Our Farmhouse Kitchen Remodel
*Click the items below to shop affiliate links
Area Rug | Runner | Countertops | Subway Tile | Floor Tile | Mixer | Cooktop Range | Double Oven | Decorative Metal Basket | Faucet | Farmhouse Sink | Counter Stools | Farmhouse Table | Dining Chairs | Mug Rack | Round Metal Shelves | Pendant Lights | Chandelier | Light Bulbs for Chandelier | Seagrass Planter | Magnolia Wreath | White Candle Holders | Black Candlesticks | Large Glass Jug | Lamb’s Ear | Pothos Plant | Faux Olive Tree | Table Lamp |
I can’t wait to share some of my favorite Amazon Fall Decor finds with you! Fall is here and I am HERE for it!

*This post contains affiliate links. That means that if you make a purchase after clicking on a link, I may earn a small commission at no extra cost to you.
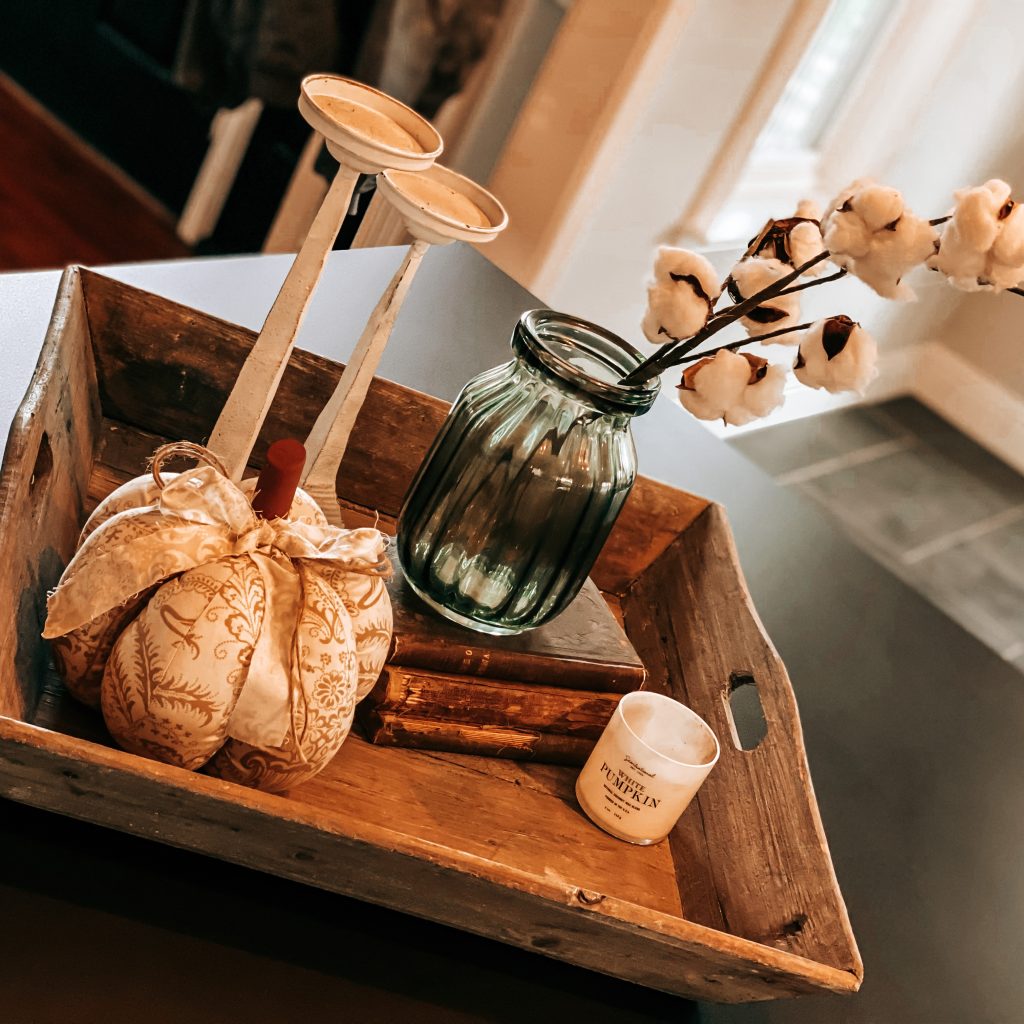
Fall is by far my favorite time of year! I can’t wait for sweaters, cooler weather and all things pumpkin. I also can’t wait to decorate for fall. It seems like I bring all my decor out a little earlier each year in hopes that it will somehow bring fall with it. Fortunately, I always manage to add a little something new each year too.
Almost all of my fall decor is neutral and follows the same color aesthetic. This makes the transition easier and keeps me from spending a ton of money because I have no self control when it comes to fall decor! So that’s why I’m sharing my favorite Amazon Fall Decor from this year. They all stick with my neutral color theme and won’t break the bank. Win-Win!
Fall Entryway
The first thing I wanted to share was what I found for our front door. It’s the first thing you see when you drive up so it NEEDS to make a statement. I was so excited when I found this wreath and door mat because they create such a welcoming, fall entryway. Add a few pumpkins and mums out there and you’re all set!


Fall Dining & Living
Next up, our dining room table. I love switching up the pieces on the table because it’s one of the main focal points in our home. These cute little pumpkins were already apart of my fall stash but I was able to find this neutral table runner on Amazon. I love how it makes the pumpkins stand out and ties everything else together. I can use it all year round too.

Now let’s move onto the living room. I change my mantle 38.4 million times a year. As I’m typing this, I’m considering changing it again. I love how moving around the pieces on your mantle can totally change the way your entire home feels. I decided to use pieces that I already had but it was definitely missing something. As soon as I saw this garland, I knew what it needed! It’s the perfect pop of color and adds all the cozy fall vibes.

You can make fun of me if you want but decorative pillows are my jam! They just make everything look so cozy. I found the cutest buffalo plaid pillow covers on Amazon! Paired with a couple of my mustard or green pillows would be fall perfection! #AddToCart They would look adorable with a rustic Christmas theme too. Just sayin’….

More Amazon Fall Finds
Here are a few other fall finds that I haven’t snagged yet but I’m dying to get my hands on. Amazon for the WIN!
I hope you found a few things you can add to your home from my Amazon Fall Decor list! I’d love to hear how you were able to use them to create a cozy fall space you love. Be sure to leave me a comment below telling me all about it. Don’t forget to subscribe and follow us on Facebook, Instagram and Pinterest to keep up with our day to day. Thanks for stopping by!
Amazon Fall Decor Sources
*Click the items below to shop affiliate links
White Pumpkins | Multicolored Pumpkins | Fall Wreath | Buffalo Plaid Mat | Cozy Door Mat | Hello Fall Sign | Rustic Fall Vase | Neutral Table Runner | Fall Garland | Neutral Garland | Fall Pillow Covers | Buffalo Plaid Pillow Covers | Neutral Fall Blanket | Buffalo Plaid Blanket | Seagrass Planter | Galvanized Olive Buckets