DIY Natural Raw Wood Coffee Table: 5 Easy Steps to Get a Natural Raw Wood Look
I’m so excited to share this DIY natural raw wood coffee table project with you guys!

*This post contains affiliate links. That means that if you make a purchase after clicking on a link, I may earn a small commission at no extra cost to you. You can even shop some of my decor at the bottom of the page.
I love a good DIY project. Especially when they turn out the way I want them to which is always a 50/50 shot for me. I think I may be the reason we have those “Nailed it” memes. Either way, I enjoy them. Lately I’ve been seeing so many pins, insta posts and home decor blogs with beautiful natural raw wood furniture pieces. I love this style and I’ve been dying to find a piece for my own home. After a quick internet search, I realized I’m not the only one into this style right now because everything I found was either really pricey or sold out. I convinced myself that it couldn’t be that difficult to do and thus my DIY natural raw wood project was born!
I have flexible seating in my classroom and I used this coffee table that I found off Facebook Marketplace my first few years of teaching. After having to repaint it every year because of all the student graffiti and damage, I decided to retire it and take it home. I didn’t have the heart to get rid of it because I knew the bones were still good. I had hoped there might be an opportunity such as this in it’s future. I’m so glad I kept it.


I researched and read what felt like a million different articles on how to create the natural raw wood style that I was looking for. So. Much. Information. There were so many great articles out there and they all had different ways of doing it. I felt a little overwhelmed. I’ll admit that I’m a bit of a lazy DIYer. If the project starts looking too complicated, I’ll typically ditch the project and save up for it instead. This time, I stuck to my guns. I decided to try a mix of everything I had learned and hoped for the best.
5 DIY Steps to a Natural Raw Wood Finish
Here’s a quick look at the 5 steps I took to get the natural raw wood look I wanted.
- Strip It
- Scrape It
- Sand It
- Seal It
- Wax It
Step 1: Strip It
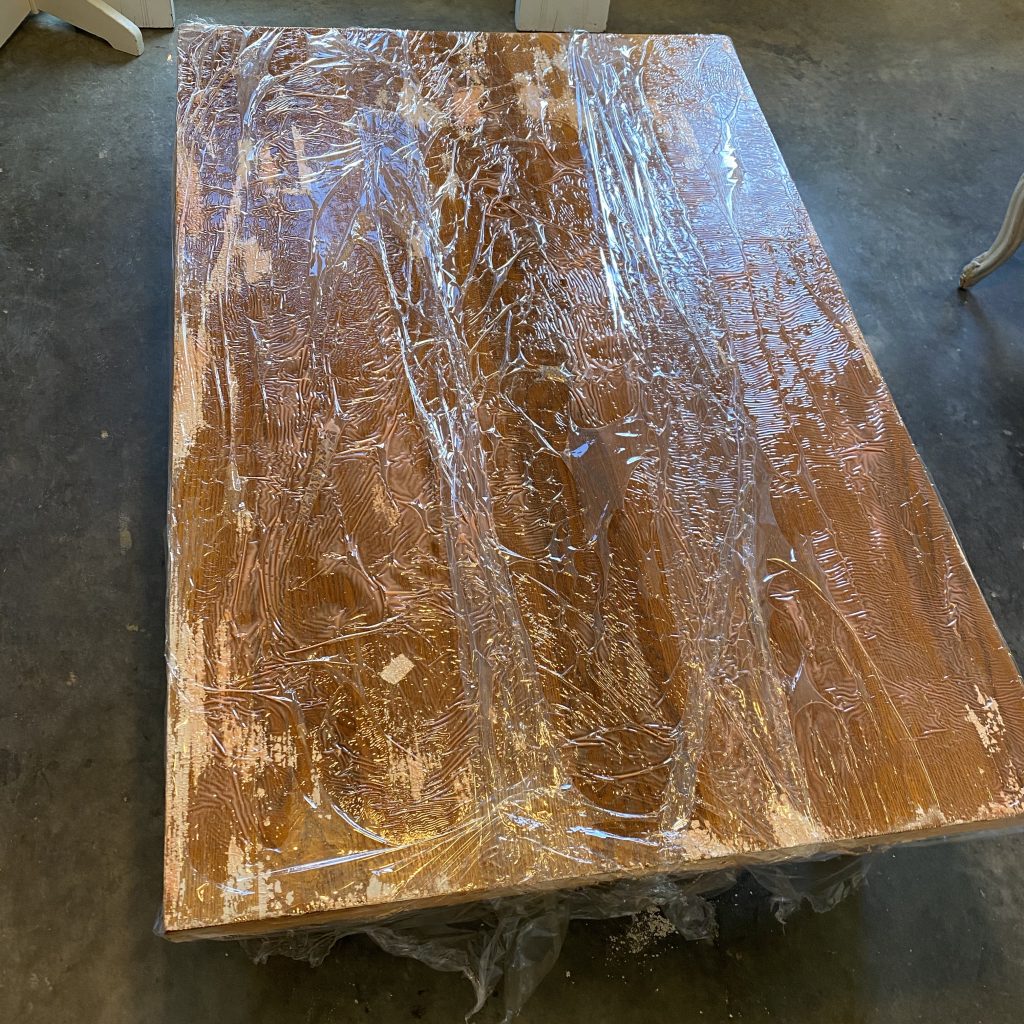
As I mentioned previously, the coffee table had several paint layers because I just spray painted over any flaws the table had and called it good. I knew sanding it at this stage would take forever so I decided to start with a stripper instead. I’ve never used a stripper before but I loved this one that I found at Home Depot. You can also find it on Amazon here. It did the job and the smell wasn’t unbearable. I coated every inch of the table with a thick layer of stripper. For this I used a cheap paint brush that I happened to find in our shop. I actually started out using one of those cheap craft foam brushes but the stripper melted it. Oops.
One of the articles I read said to cover the furniture with saran wrap. A friend of mine confirmed that it would allow the stripper to work a little longer without drying out too fast. I used moving wrap for this. It was actually meant for packing up my classroom. The handle on the ends make it super easy to wrap around larger pieces. I let the table sit overnight and removed the wrap the next afternoon. I was impressed with how well the stripper worked. Some of the paint even came off with the wrap as I was peeling it off.
Step 2: Scrape It
I scraped the remainder of the paint off with plastic scrapers so I wouldn’t scratch the wood. This part was pretty messy. I’m thankful for the concrete floors in our shop. I wouldn’t recommend doing this inside if you can help it. If you do, place some trash bags or newspapers on the floor before you start. The paint was super sticky and I had to clean the gunk off my scraper a few times before I could finish. I also moved one of the used strips of saran wrap on the ground below where I was scraping so that I could scrape the paint directly onto it. This was a game changer and made cleaning up much quicker.
Although I was pleased with the outcome, I decided to paint the stripper on once more because the table was still covered in some of the original golden stain. I repeated this entire step but in hindsight I’m not sure I really needed to.
The next day I finished scraping the last bit of paint and stain. There were still a few spots in the corners and the hard to reach places that had some paint left over but I decided to not worry about it (because lazy DIYer). I think it adds a little character and tells a story. At least that’s how I’m justifying it. The table was pretty tacky so using mineral spirits and the rough side of a dish sponge to wipe it down really helped. This stuff was pretty strong and really soaked into the wood so I let it sit for another day to dry before I started sanding.


Please note that this project took ME a couple days to complete but I honestly don’t think it needed to. With four kiddos, I don’t always have loads of free-time to work on projects. Hopefully that explains my leisurely pace.

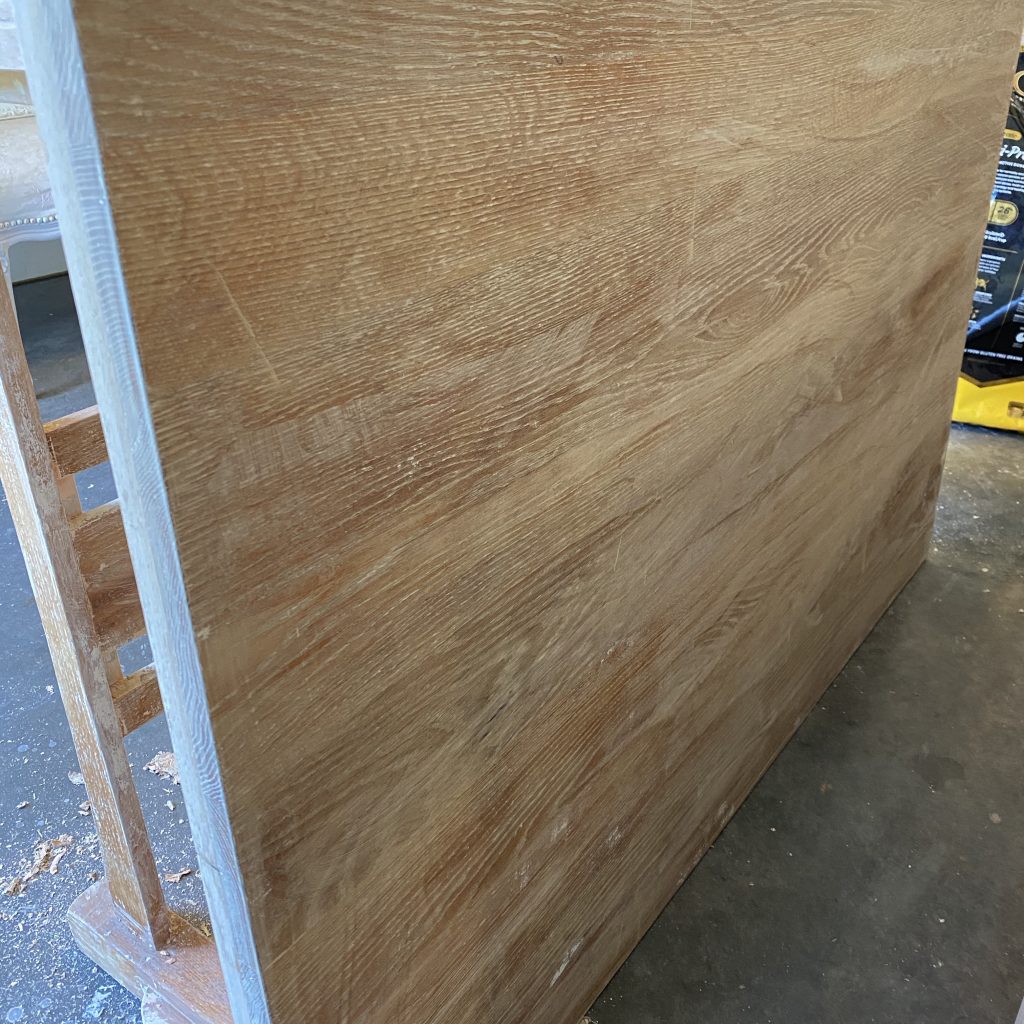
Step 3: Sand It
This was probably my least favorite part of this DIY natural raw wood project. It wasn’t difficult, it was just tedious. I used our sander with 220 grit paper to sand down most of the table. Then I used a fine/medium grit sanding sponge for the corners and places that were difficult to reach with the sander. I vacuumed as much of the dust as I could and then wiped down the rest with a microfiber rag. Tedious or not, this step was a must and so worth it! It looked AMAZING!
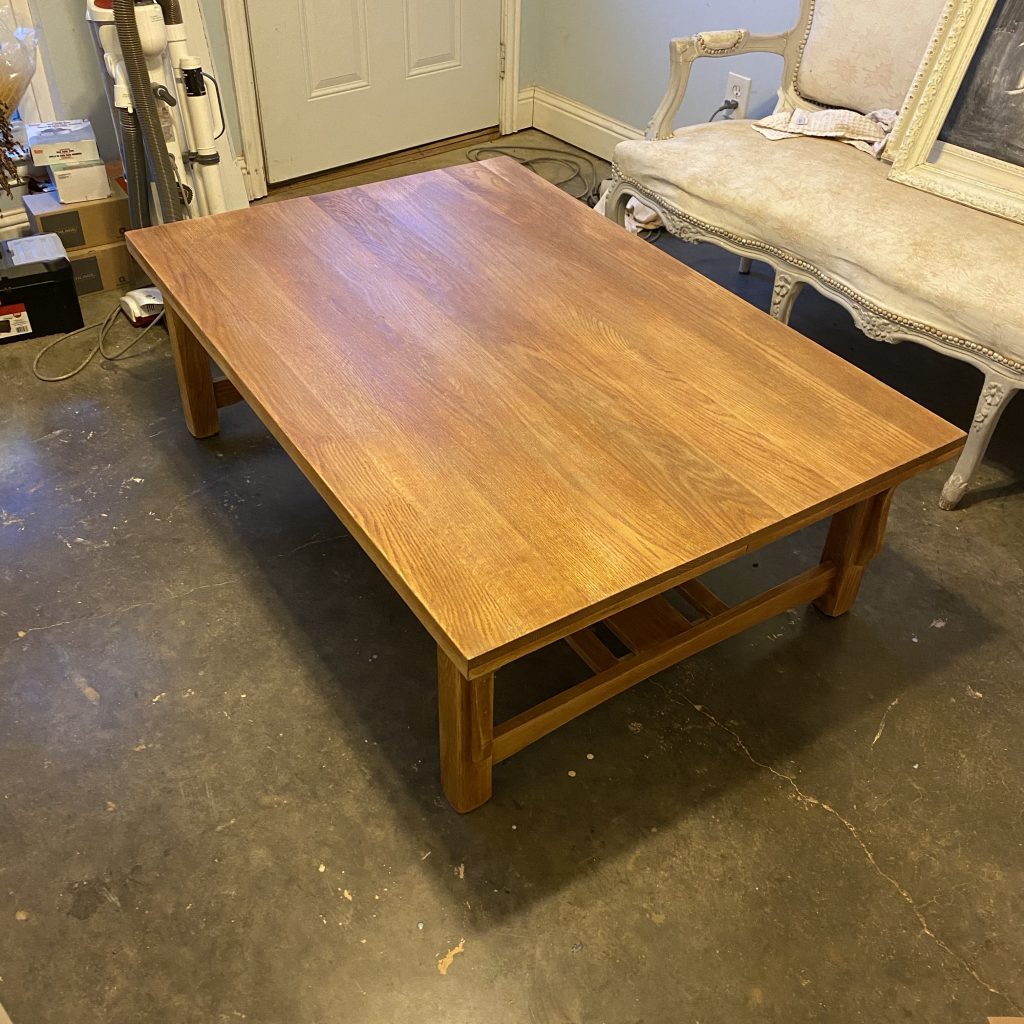
Step 4: Seal It
No more golden yellow color! This was the actual natural raw wood of the table! I probably could’ve left it like this but since it was going in our house with my kids, I thought it best to seal it. I purchased a clear satin finish poly for this. Then, I applied 2 coats of it with a new, higher quality paint brush. I read that spraying the poly would give it a more even coat but because I was in a small room, I chose not to. It appeared well covered after 2 coats to me, but it’s actually recommended by the professionals that you do more. Even though the poly was clear, after drying, I noticed some of the original golden color reappearing. Don’t PANIC! Let the magic liming wax do it’s thang!
Step 5: Wax it
This step was the most important one in getting the natural raw wood look I wanted for my coffee table. I was familiar with liming wax but had never used it before. THIS STUFF IS AWESOME and super easy to work with. I used an old cotton t-shirt to rub the wax over the table. You can also use a waxing brush to get a more grainy look. I applied a thin layer on and then wiped off any excess with the dry side of the shirt. I waited maybe an hour or so for it to dry and then repeated this process twice.


Some of the articles I read said to seal the wood again after you’ve applied the liming wax but I didn’t. Now that the table has been in use for a few months, I see why I probably should have. There are a few places on the table where little hands constantly touching the table have taken some of the wax off. I can see a little bit of that golden color coming through again. However, reapplying some wax and a coat of sealer will be an easy task later on to preserve this beauty.
I love how our DIY natural raw wood coffee table turned out. It has that beautiful natural raw wood look that I was going for. I’m so glad I stuck with this project and I can’t wait to do this to other pieces I have around the house!


Let me know what you think. I’d love to hear about pieces that you’ve redone. What process worked well for you? Leave me a comment below. Don’t forget to subscribe and follow us on Facebook, Instagram and Pinterest to keep up with our day to day. Thanks for stopping by!
Sources
*Click the items below to shop affiliate links
Stripper | Paint Brush | Moving Wrap | Plastic Scrapers | Mineral Spirits | Orbit Sander | 220 Grit Sand Paper | Sanding Block | Microfiber Rags | Clear Satin Finish Polyurethane | Liming Wax | Wax brush | Poly/Paint Sprayer | Wood Beads | Flameless Candles | Chicken Wire Basket | Fern Plant | Area Rug | Amber Vase | Farmhouse Throw | Pillow Covers |
Related Posts
Modern Farmhouse Bathroom on a Budget
Welcome to our Modern Farmhouse Bathroom Remodel on a Budget. Yes, we are remodeling ANOTHER…

Wood Slat Accent Wall with Shelves
I have seen so many different variations of the trendy wood slat accent wall and…