
I have seen so many different variations of the trendy wood slat accent wall and I love them all! You can get really creative with them. That’s why when we started working on my son’s room, I was determined to include my own version of a wood slat accent wall.
*This post contains affiliate links. That means that if you make a purchase after clicking on a link, I may earn a small commission at no extra cost to you.
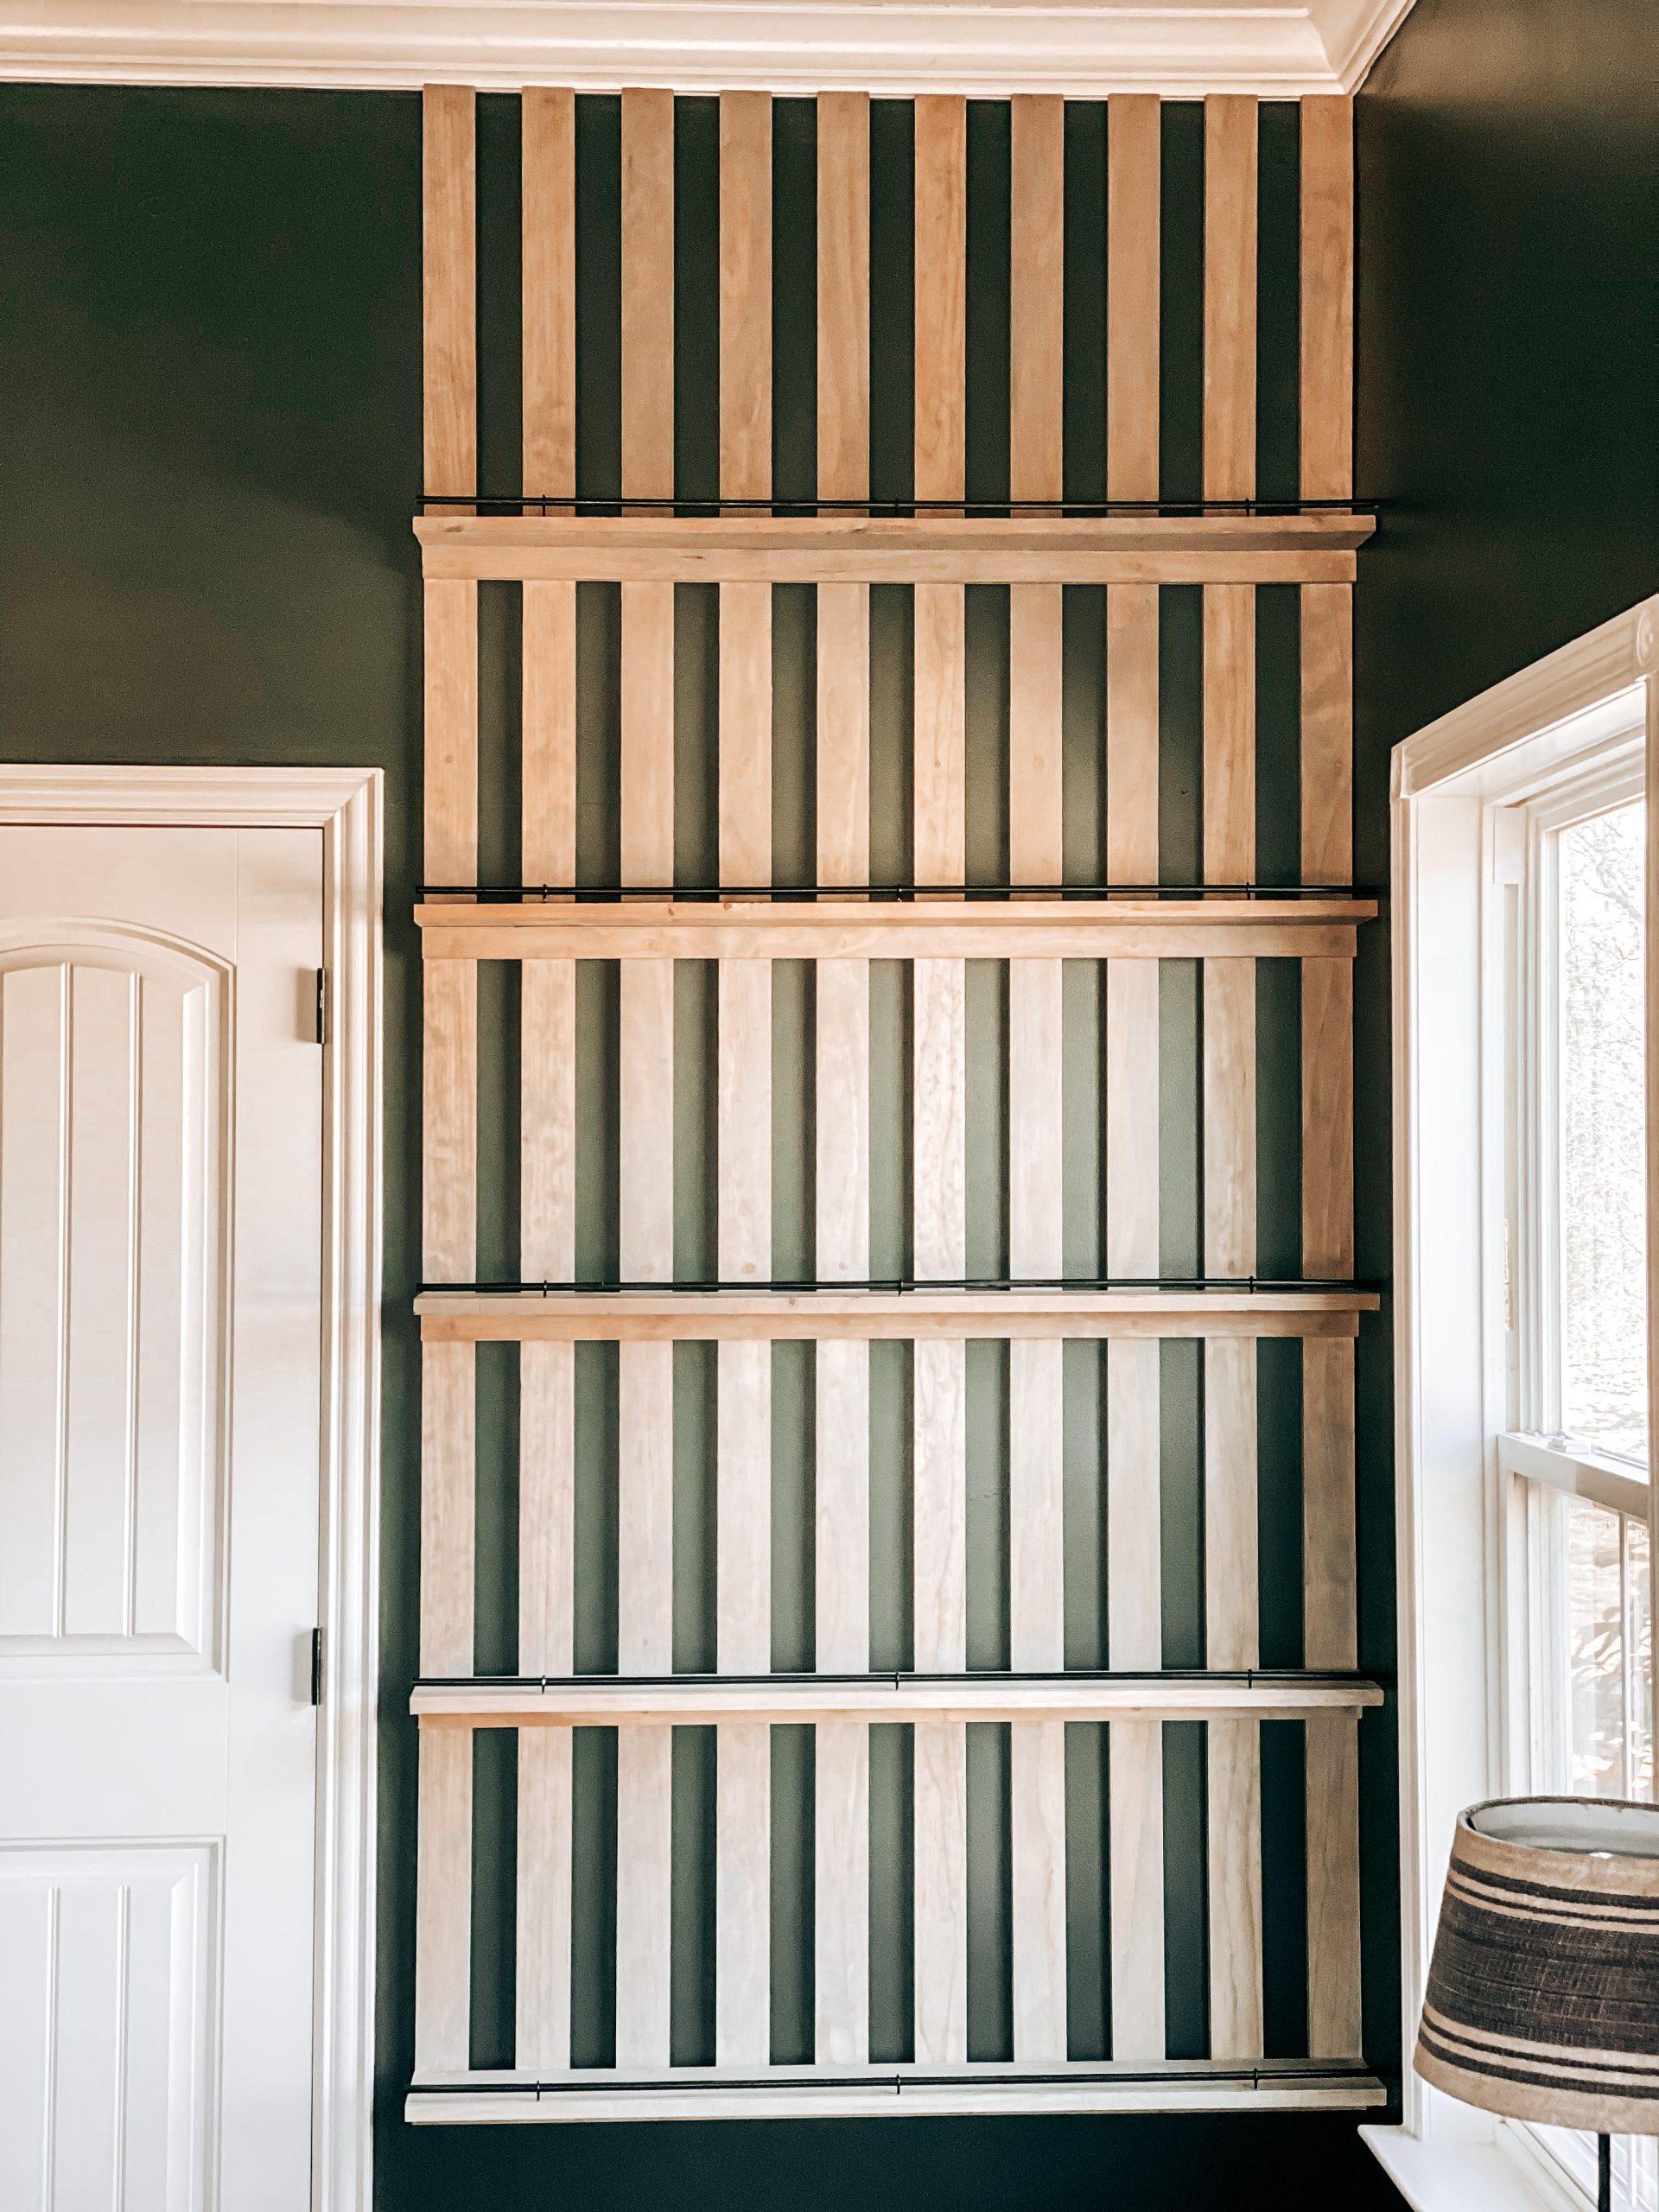
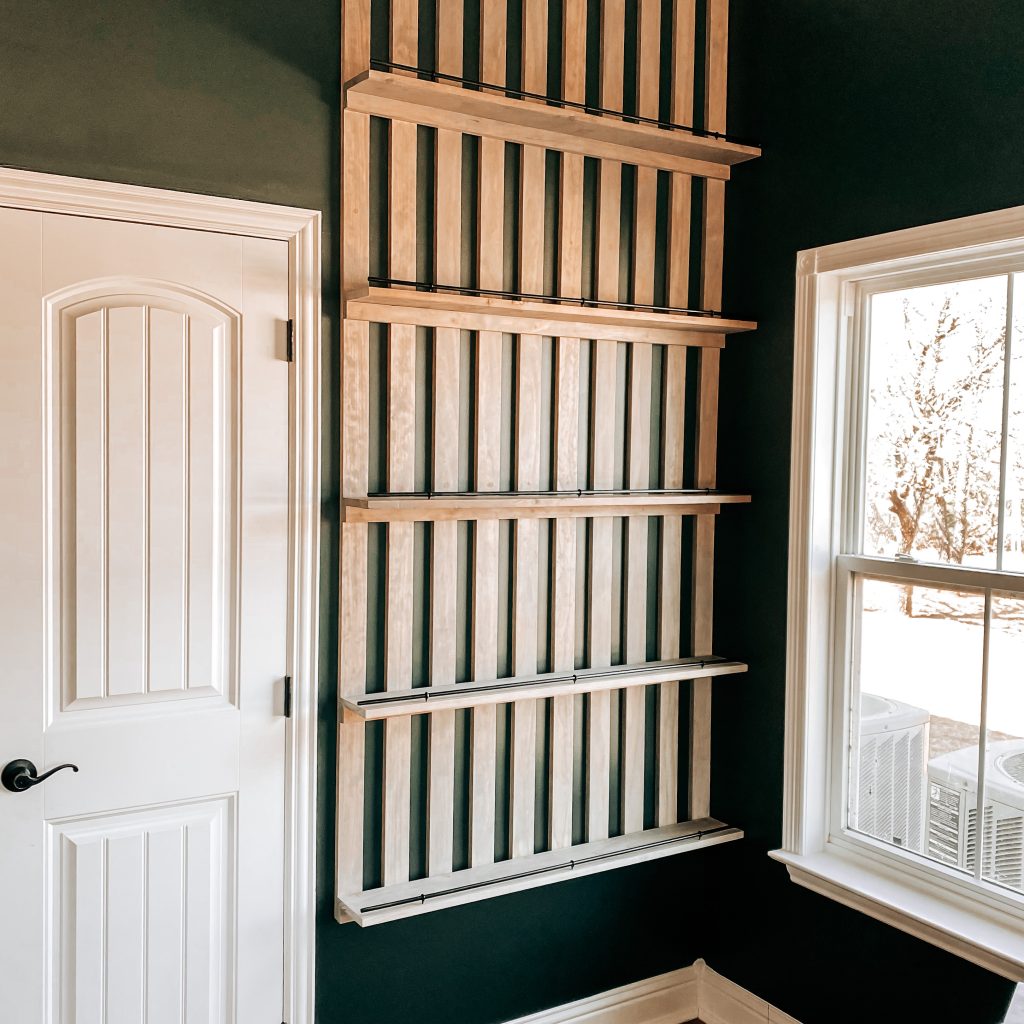
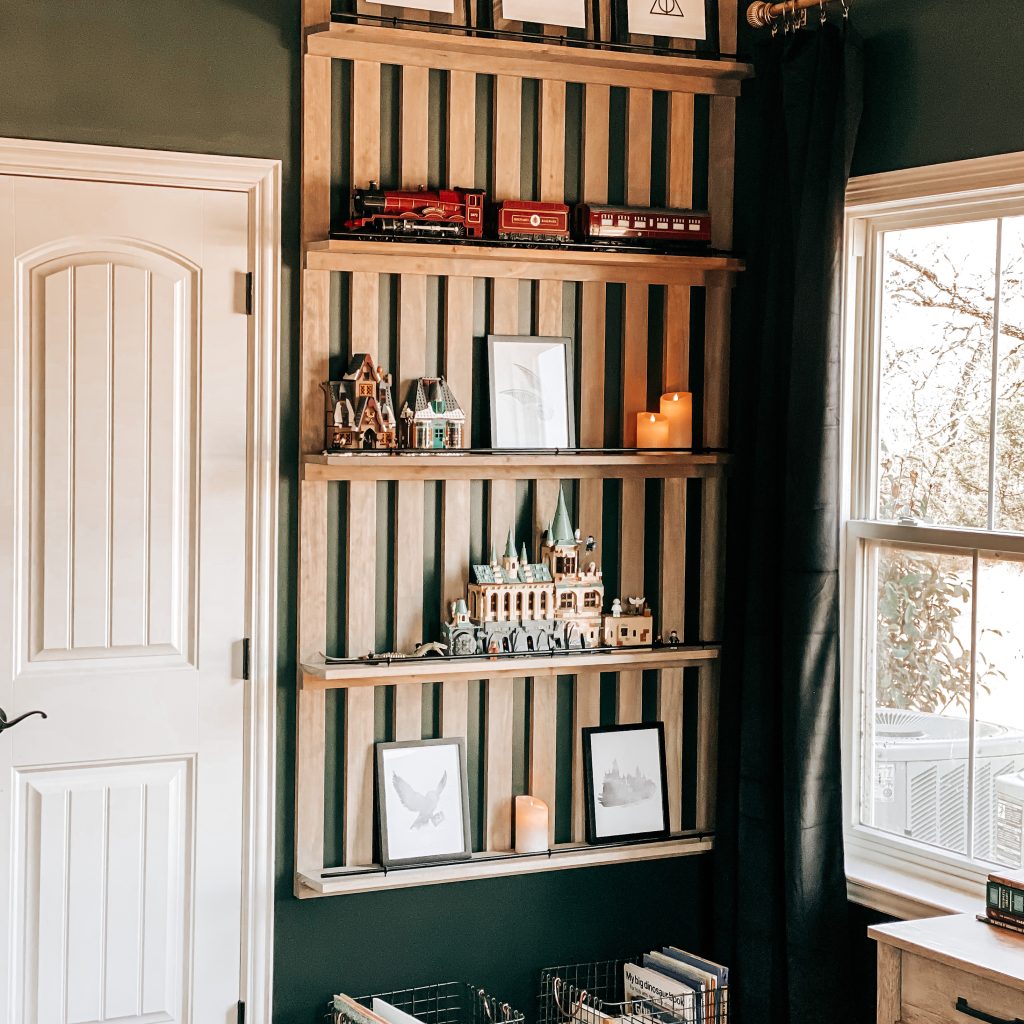
His room is Harry Potter/Slytherin inspired (Read about his Harry Potter Themed Bedroom here), so the accent wall needed to tie into this theme. He loves Harry Potter and Legos and it shows. They are ALL over his room! We decided the best way to add a Wood Slat Accent Wall was to add shelves so that he could use them to store his Legos and any other Harry Potter toys. Style + Function = WINNING! Now that we had the idea of what we wanted, it was time to start building.
First we measured the wall we wanted the shelves to be on. It measured exactly 47” across from the corner to the bathroom door frame. Then we headed out to buy the materials.
Materials:
11 – 1x3x8 pine boards for the wood slat background (We bought one extra just in case we messed up somewhere along the way.)
5- 1x6x8 pine boards for the shelves
5 – 1x2x8 pine boards as our shelf supports
Dowel Rods, Eye Hooks and Black Spray Paint for the shelf rails (Optional)
Tools:
Step 1: Stain
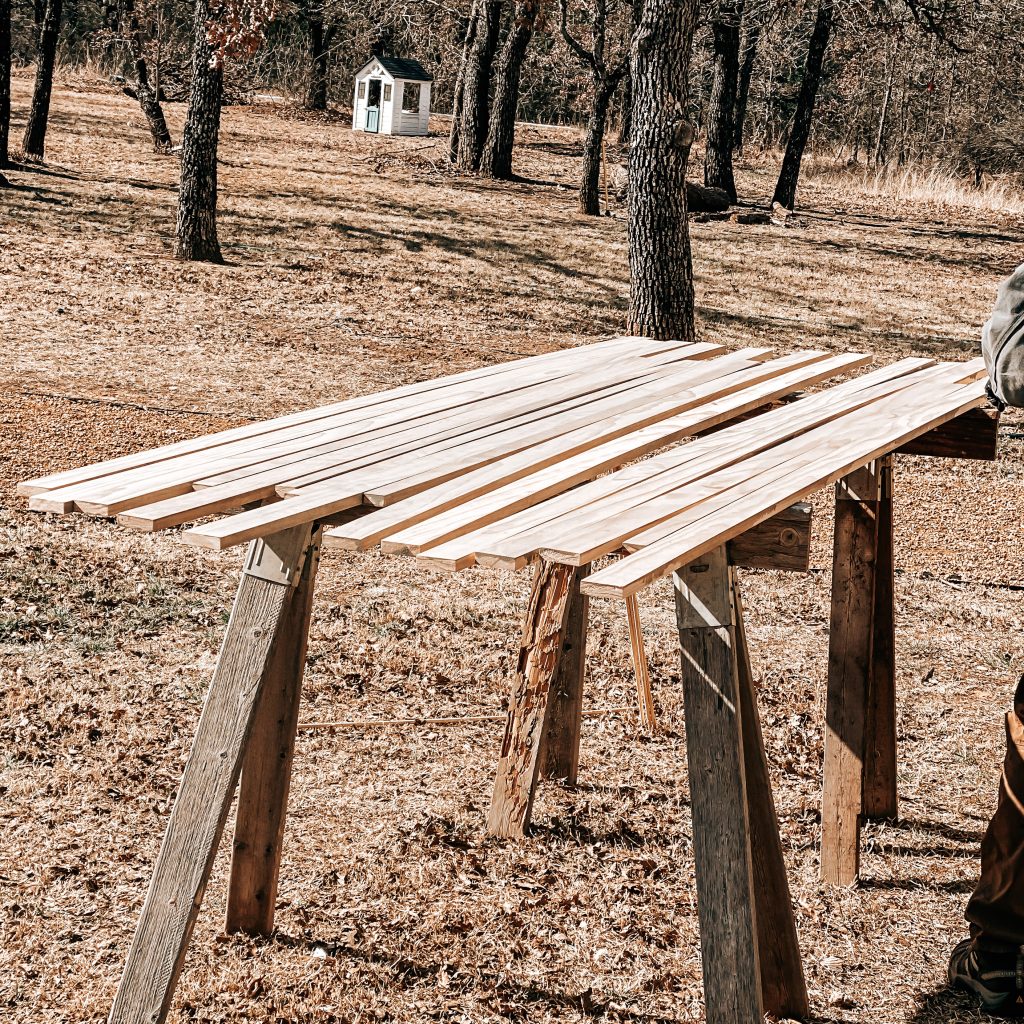
The first thing we did was stain all the wood. I used a stain pad to rub the stain on which is really helpful in getting the stain on evenly across the boards. The stain color I used is Weathered Oak because it matched his existing bedroom furniture and was a really pretty contrast against his dark green walls.
Step 2: The Wood Slat Accent Wall
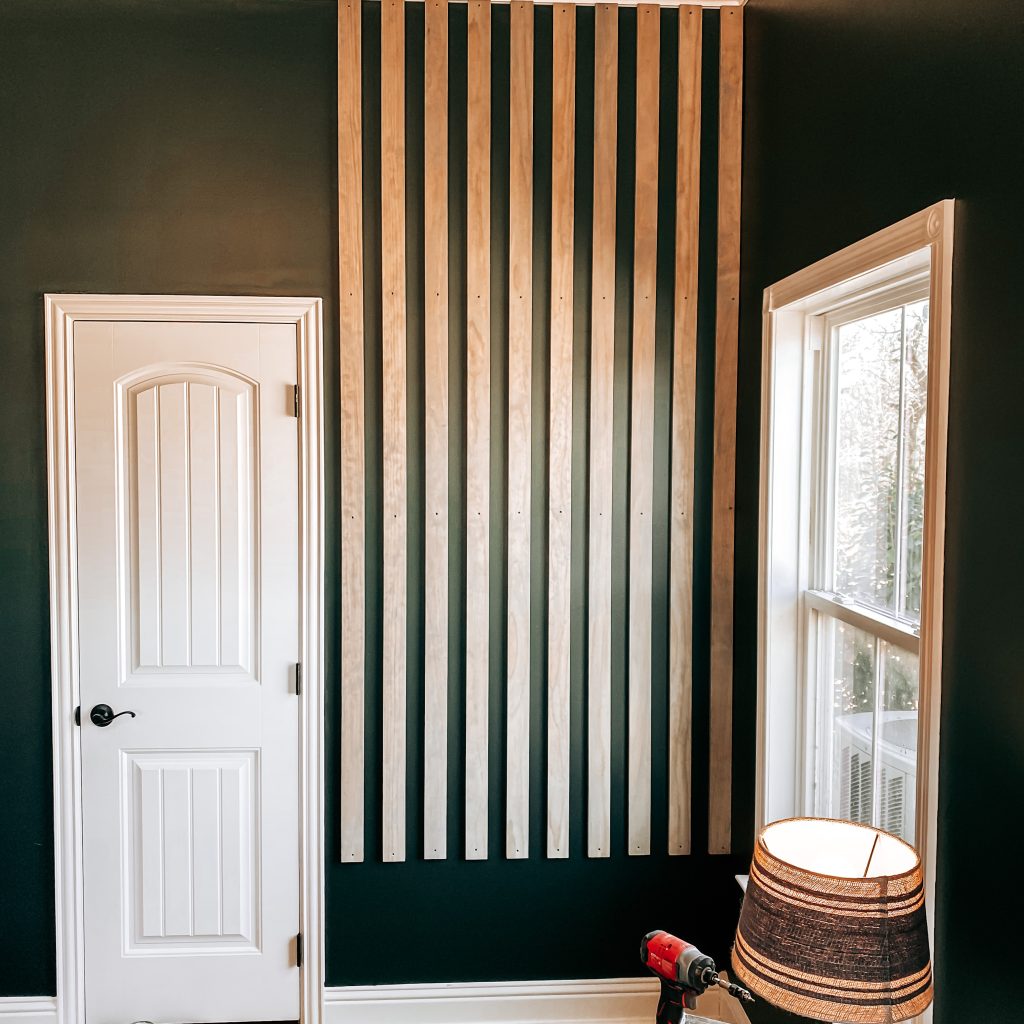
Once the boards were stained and dried, we began lining the 1x3x8 pine boards across the wall to get an idea of the spacing we wanted. We started in the corner and worked our way out. Using the level for spacing made them about 2 inches apart and assured that they were all straight and level. We pushed the boards flush with our ceiling molding and placed the first trim screw at the top. We used the countersink bit to pre-drill 3 holes before placing the trim screws in the slat to prevent splitting. One in the top, one in the middle and one in the bottom. There was no exact measurement on the placement of the screws. We just sort of “eyeballed” it since we knew we were going to fill those spots anyway. Here is what the wood slats looked like once they were all up…
Step 3: The Shelves
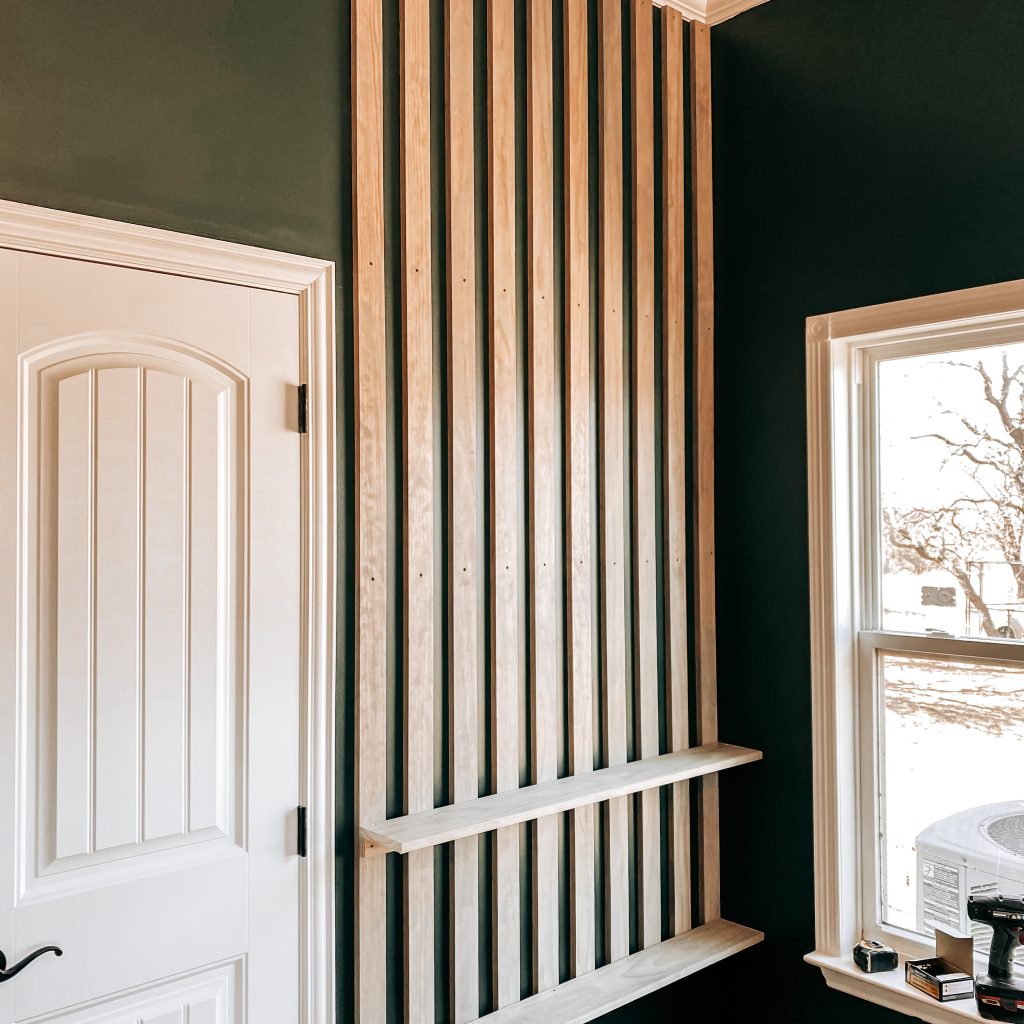
Next, we measured from the wall to the edge of the last slat to get the exact length of our shelves. Then we used the miter saw to cut the 1x2x8s and the 1x6x8s to that length. Starting at the bottom of our wood slats, we placed the first 1x2x8 with a level and then screwed it in. Then we set the first shelf on top and drilled into the shelf support. Here it is after we attached the first two shelves…
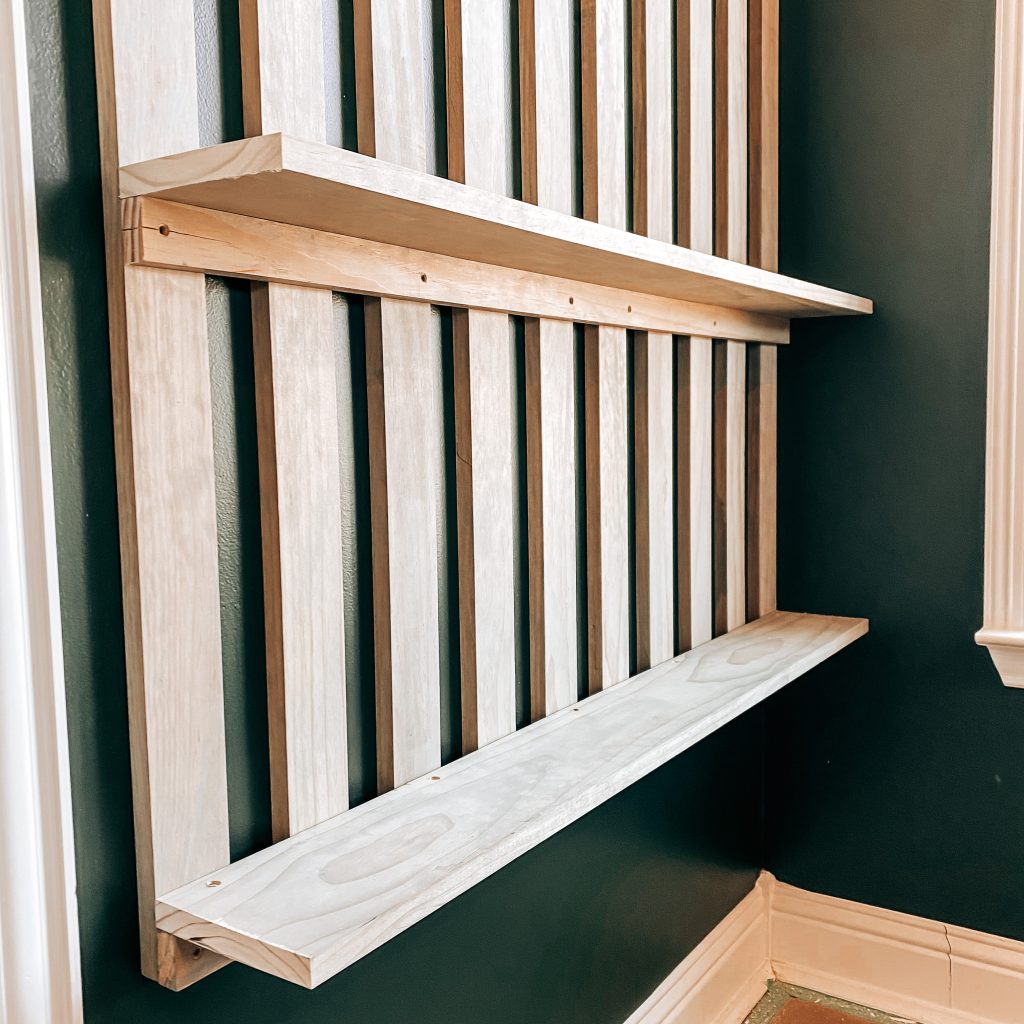
You can see where we drilled straight through the support and the slats into the wall. We tried to make sure we hit the studs for these to make the shelf a little more sturdy. Sturdy is important here because…boys…amirite?!?!
Step 4: Finishing Touches
Once all the shelves were attached, we filled all the holes, sanded them with my micro finishing tool and then touched up the stain.
Finally, it is time for the finishing touches. This last step is totally optional but I think it really adds to the finished look of this DIY wood slat accent wall and shelves. First, cut the dowel rods to match the length of the shelves to make a rail for each shelf.
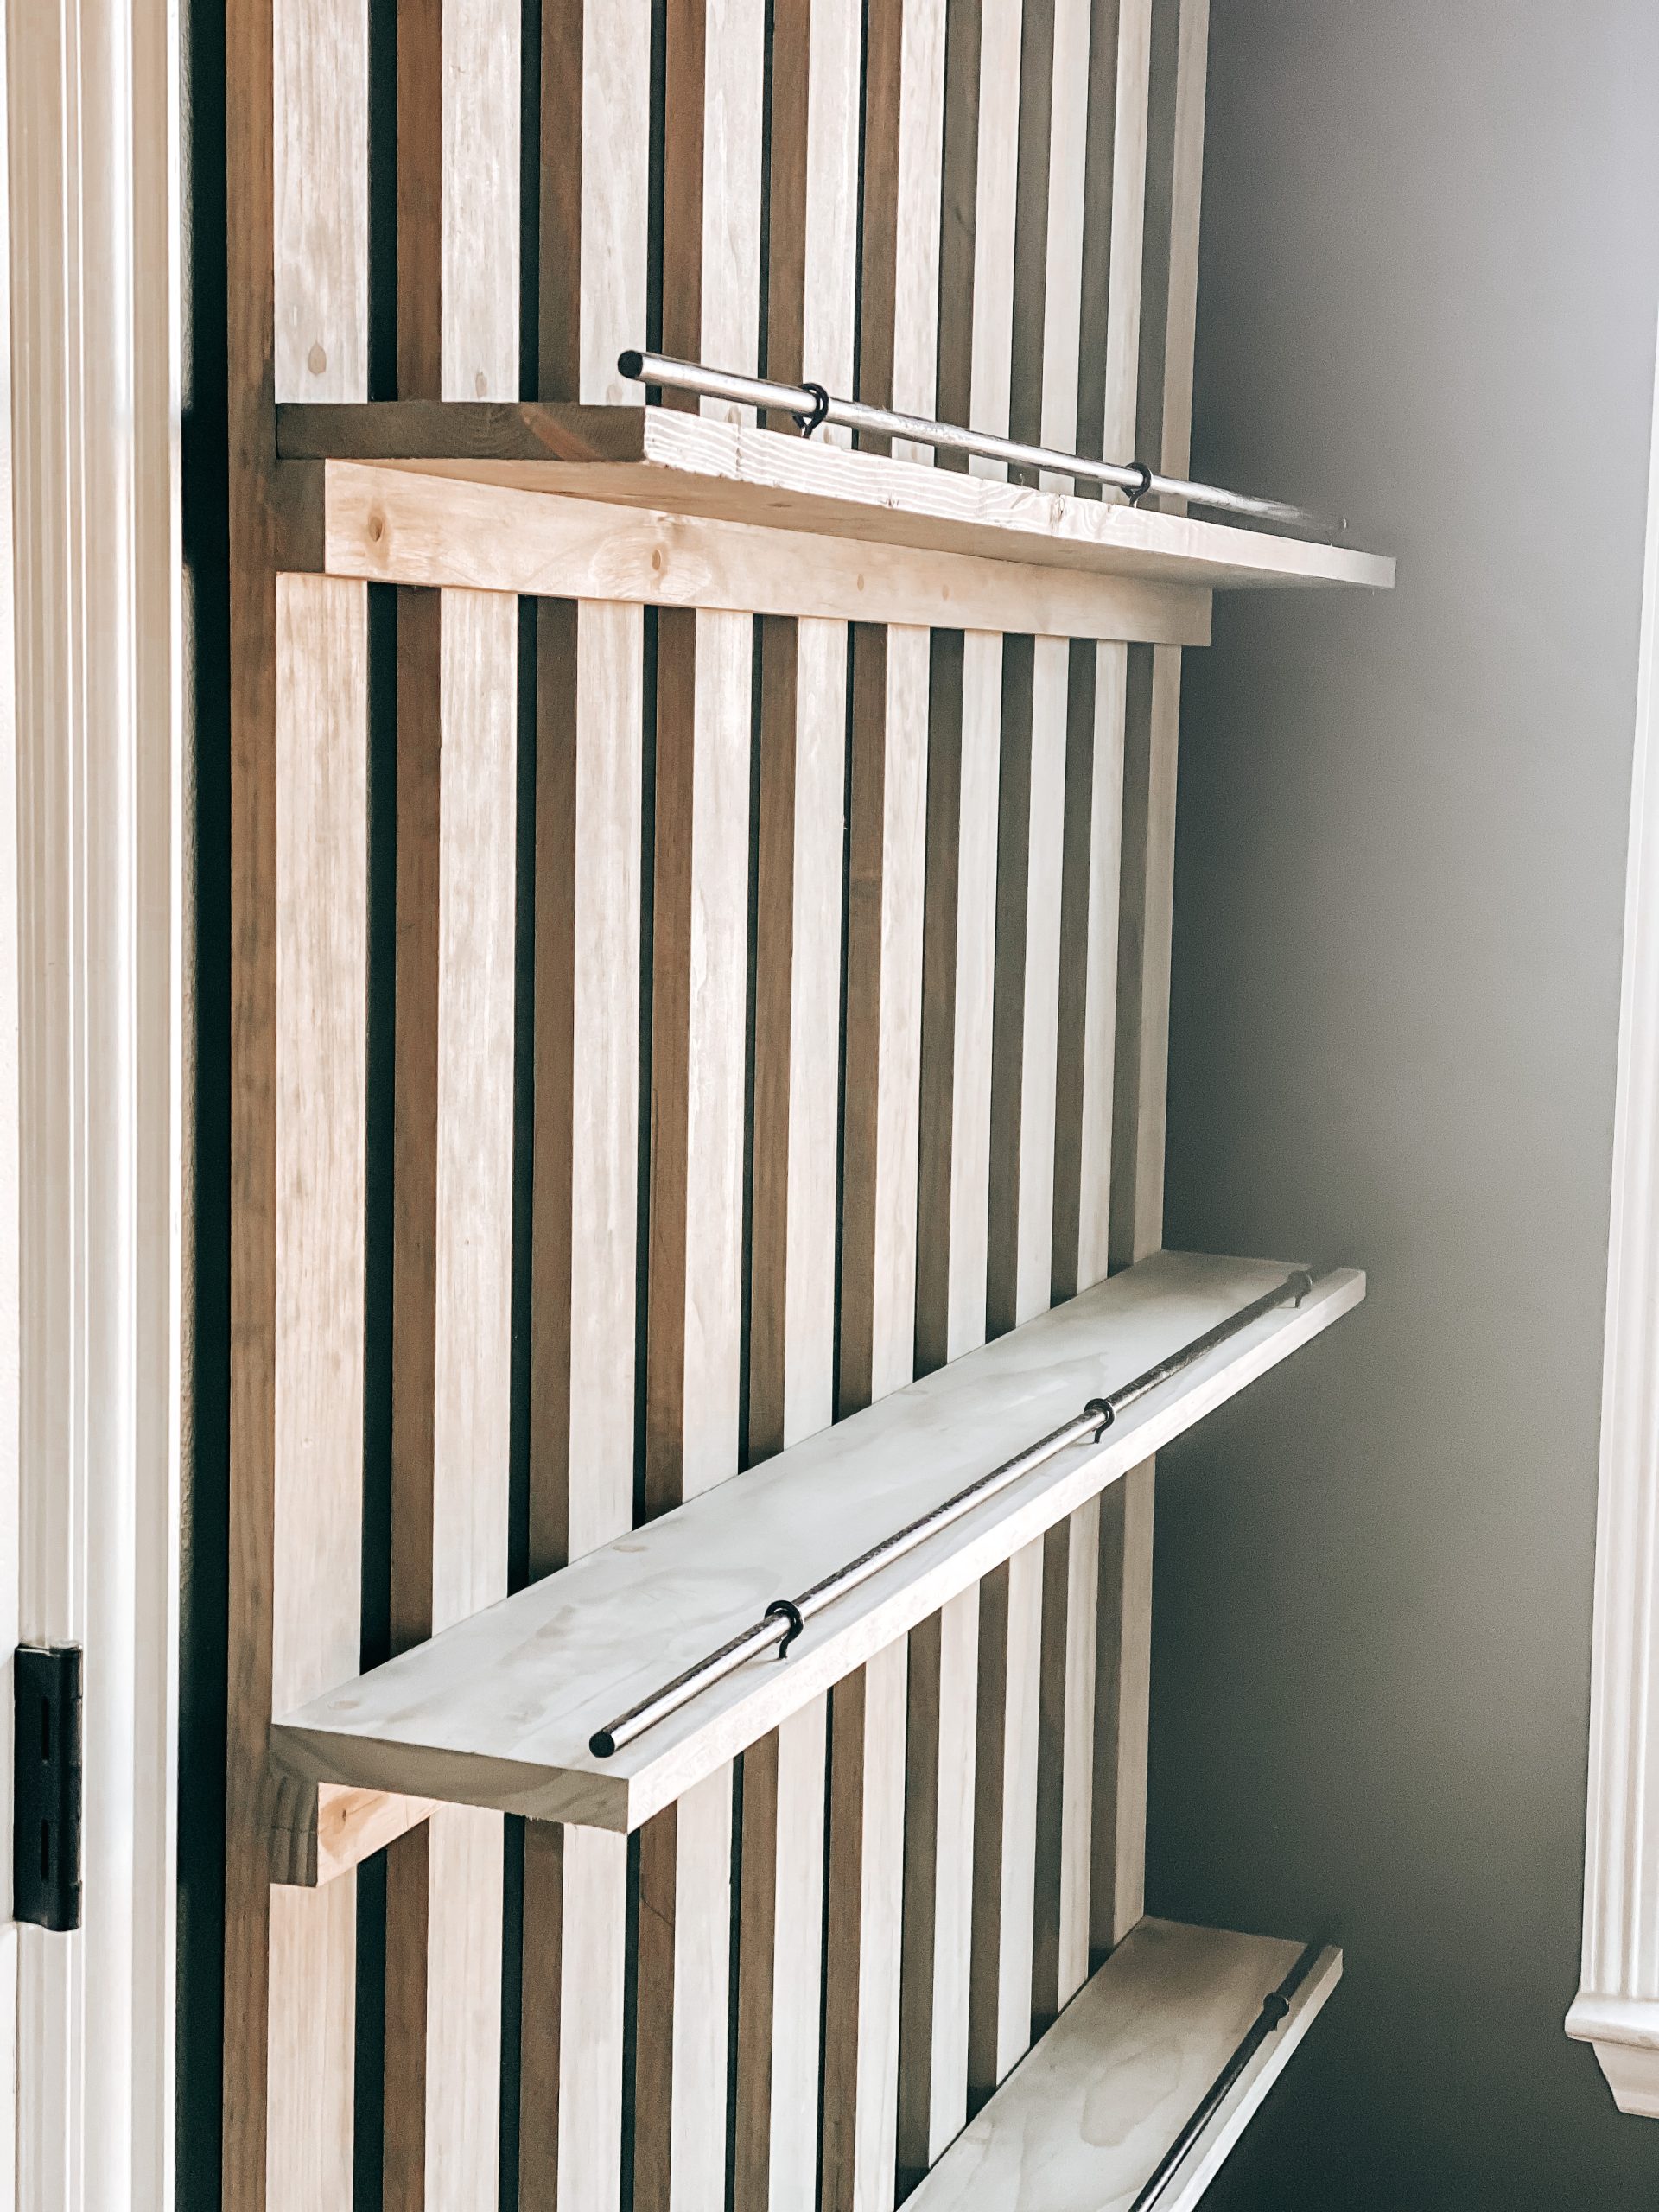
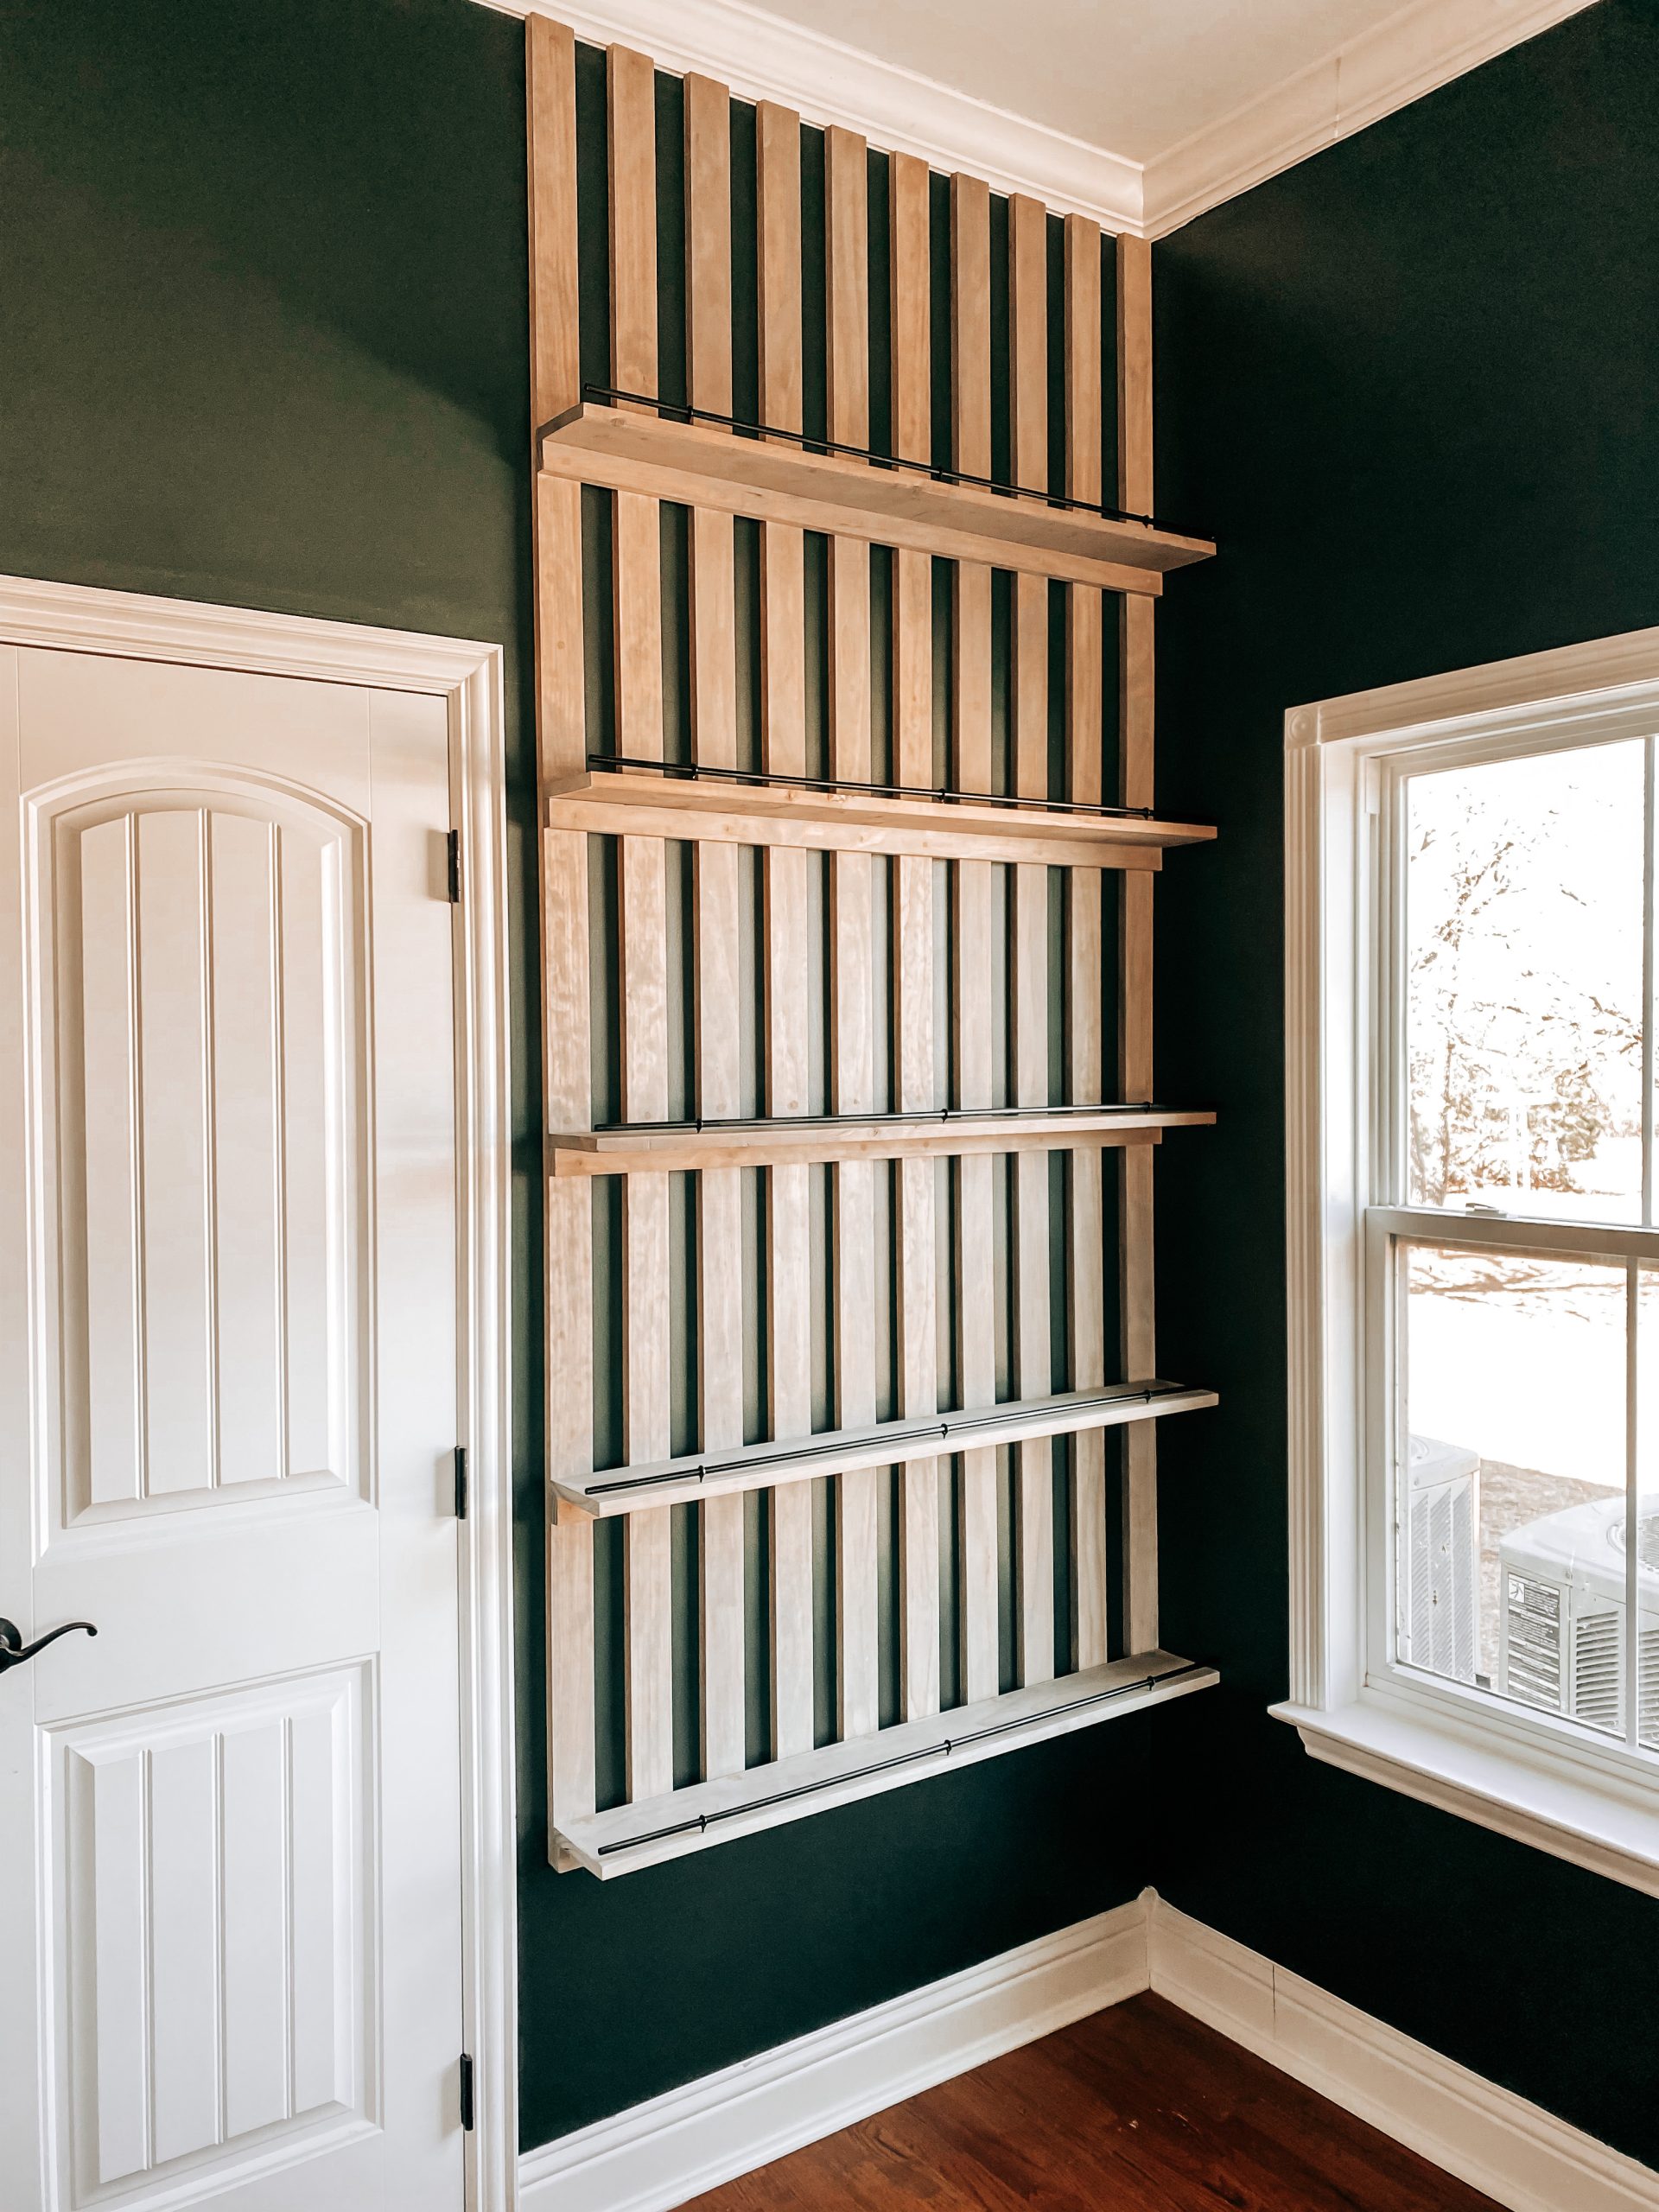
I painted the dowel rods and the eye hooks with glossy black spray paint to give them a metallic look. After they were dry, we used 3 eye hooks on each shelf. We started at the center and then added one to each end. We measured the placements each time to ensure they were all evenly spaced. Lastly, just slide the dowel rods into the eye hooks. Take a look!
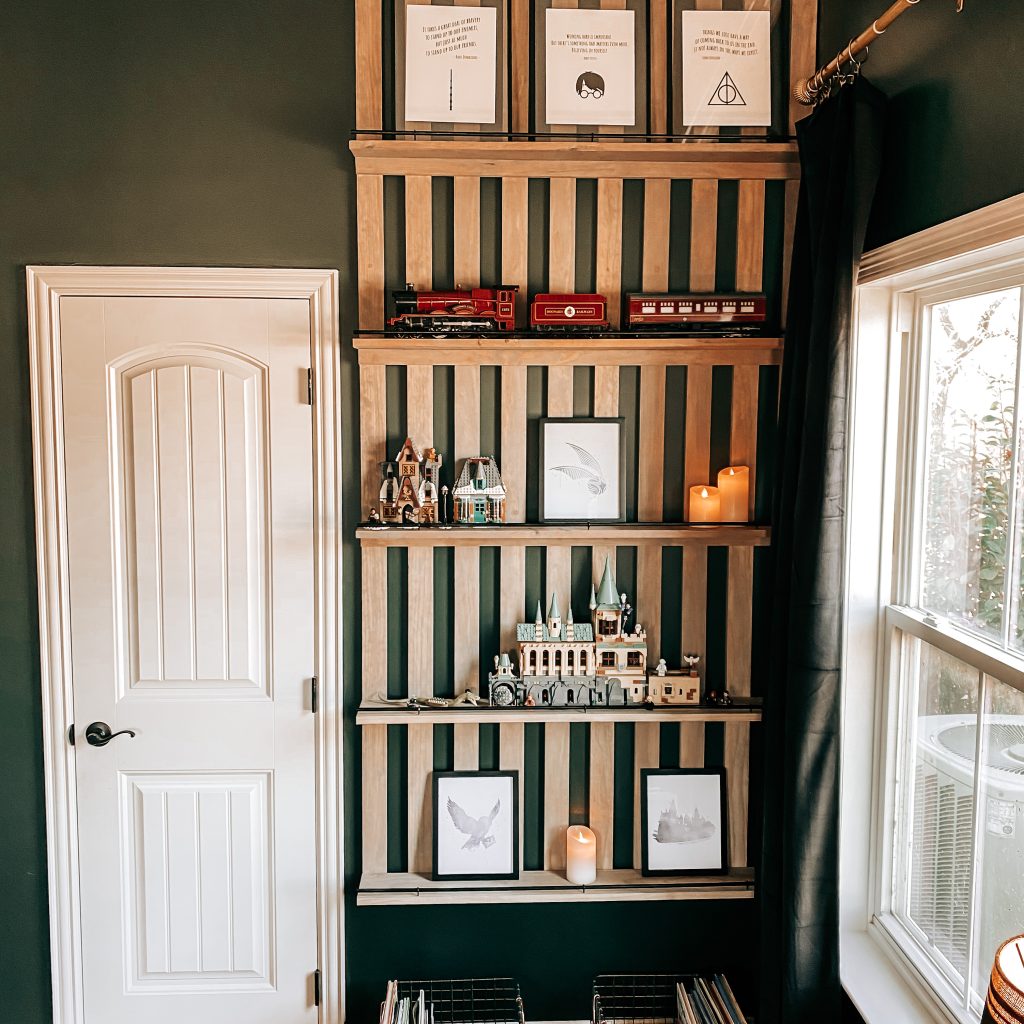
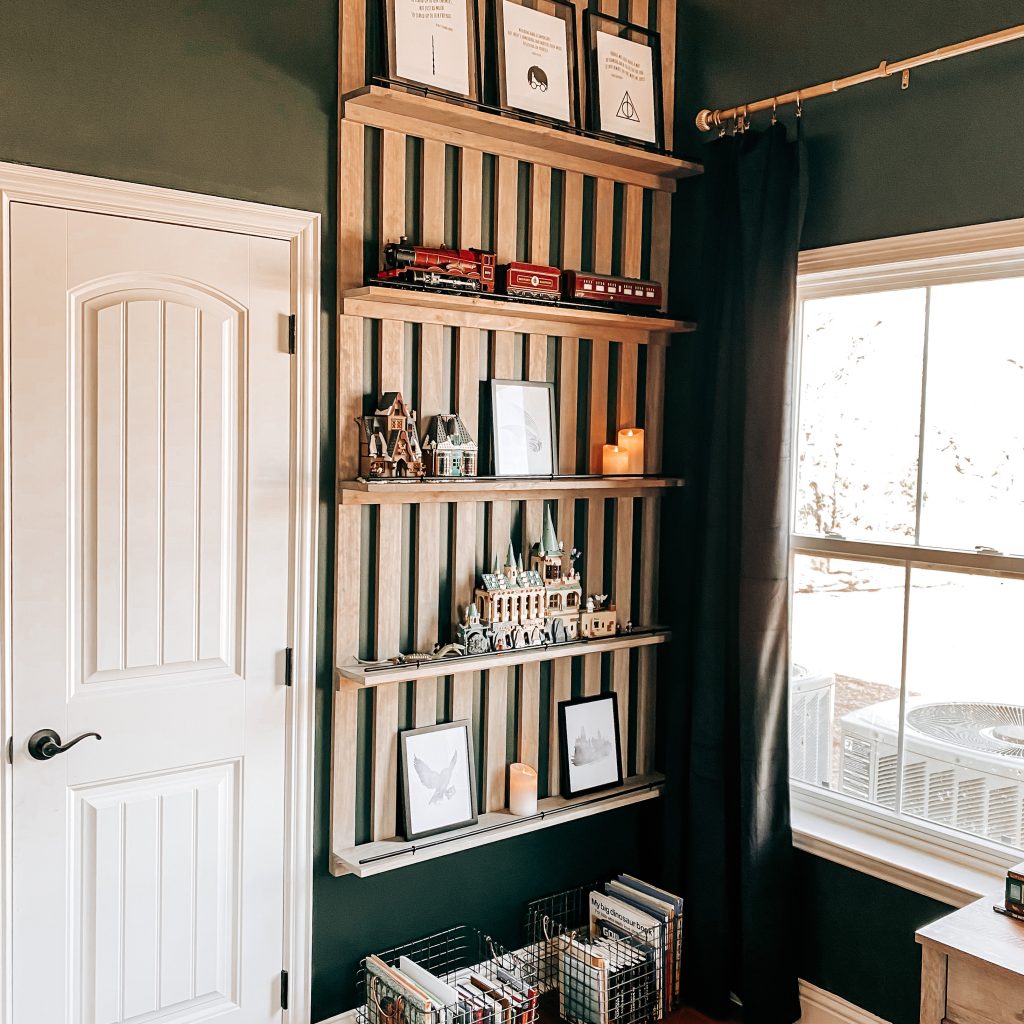
I’m in love! I love the way it combines a trendy, modern style with purpose! It’s also a great space to display Lego masterpieces for my Lego-loving, Harry Potter nerd 😉
I hope you enjoyed our Wood Slat Accent Wall DIY project. You can check out some of our other DIY projects here. I’d love to hear what trending project your wanting to try. Leave me a comment below. Don’t forget to subscribe and follow us on Facebook, Instagram and Pinterest to keep up with our day to day. Thanks for stopping by!
Sources for Our Wood Slat Accent Wall & Styling
Floating Frames | Hogwarts Express Train | Diagon Alley LEGOs | 8×10 Black Frame | Flameless Candles | Hogwarts Castle LEGOs | Wire Book Baskets | Black Velvet Curtains | Gold Curtain Rods | Curtain Clips
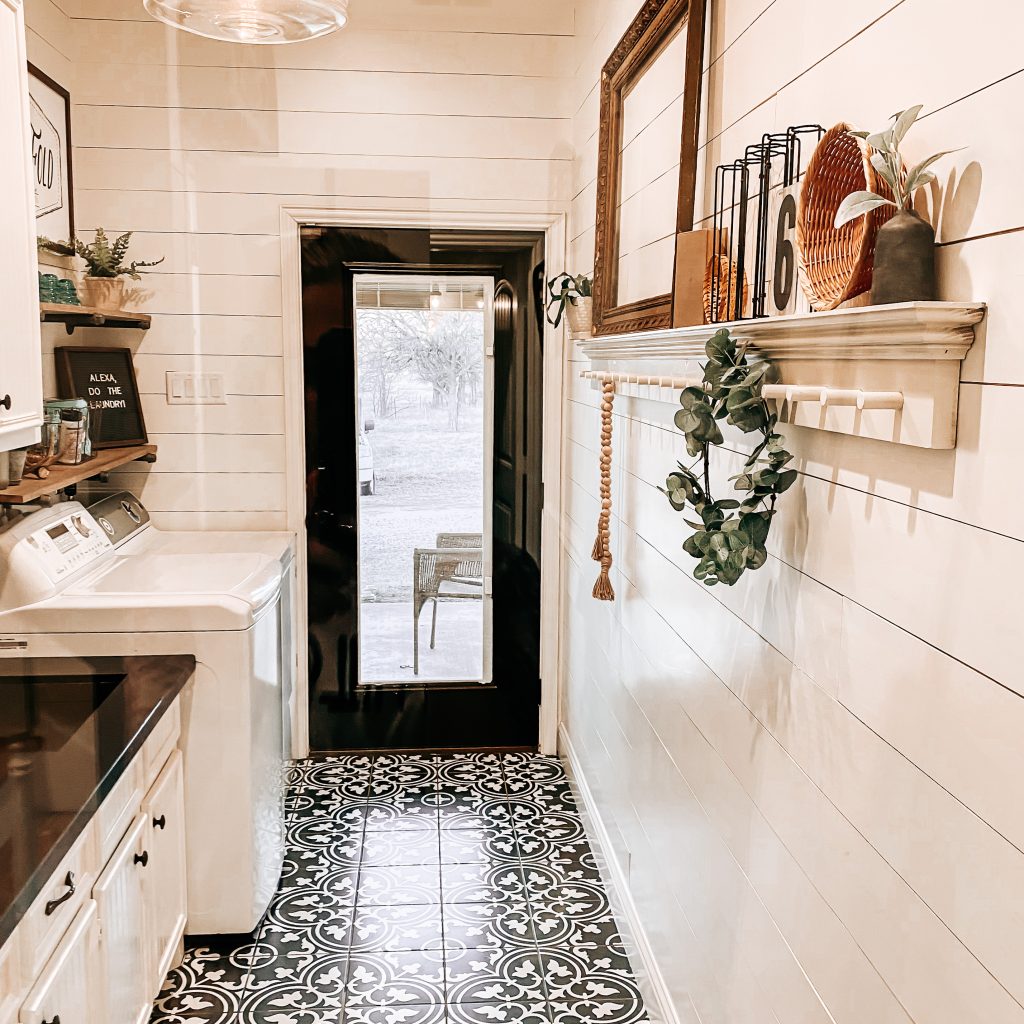
I knew I wanted to start a DIY peg shelf project for my laundry room for a while. What I had just wasn’t functional and I was totally prepared to start a full blown, from scratch, DIY Peg Shelf project.


*This post contains affiliate links. That means that if you make a purchase after clicking on a link, I may earn a small commission at no extra cost to you.
Luckily, this lazy DIYer stumbled across this precious piece at Round Top so I only had to do half of the work. I love Round Top and easy DIY projects so it was a win/win for me!

*This post contains affiliate links. That means that if you make a purchase after clicking on a link, I may earn a small commission at no extra cost to you.
Here is a list of the materials I used for this DIY peg shelf:
- ½ inch dowel rod
- Small level
- Metal ruler and/or measuring tape (I used both but you could just use measuring tape if you didn’t have a ruler and be just fine)
- Wood glue
- Frog tape
- Wood Screws
- Wood filler
- 120 grit sandpaper
- Gator finishing micro tool (this is optional but it made the sanding those small, in between spaces super easy)
- ½ inch forstner drill bit
- Cordless drill
- Rubber mallet
- Tack cloth
- Small angled brush
- Latex primer & paint (I used Valspar Oyster Bar)
- Stud finder ( I did not have one but I could have totally used it. We found the studs the old fashion way, by knocking on the wall 😜)
Step 1: Measure
The first thing I needed to do was determine the placement of the pegs. To do this I laid out the shelf, measured the full length and then marked the center point with a pencil. From there, you can either draw a line down the length of the rail or you could use tape to mark it, which is what I did. The spacing of your pegs is really up to you and what you’re using it for. You will need to make sure that they are spaced evenly and the length from the last peg and the edge are the same on both ends. For example, I spaced each of my pegs 4 ½ inches apart with the last pegs 3 inches from each end.
Step 2: Drill & Cut
The measuring was probably the hardest part of this whole project. Once that was done, I used a cordless drill with the ½ inch Forstner drill bit to bore the holes for each peg. I drilled all the way through my rail but you could also use a backing to make sure they were the same depth.
Next I used the miter saw to cut the individual pegs. I set up a jig to ensure that all the pegs were the same length and to speed up the process a little. They all measured 3 inches long. This length could be longer, if desired, depending on the depth of your shelf. My shelf only stuck out 3 inches so it would have looked odd if the pegs were sticking out further.
Step 3: Paint & Glue
I lightly sanded the rail with 120 grit sandpaper to ensure the paint would go on smooth. Once I finished sanding, I wiped it down with my tack cloth to remove any dust and some of the wood chips from drilling. I painted the first coat before putting the pegs in. I really don’t know why. There is absolutely no logical reason for this but it all worked out so….let’s blame it on my mom brain and move on.
Once the first coat dried, I added a little wood glue to the inside edges of each hole. Then I used a rubber mallet to hammer in each peg until it was flush with the back of my shelf. Make sure to wipe off any excess glue that comes up around the edges of the peg with a cloth and then let dry completely. If you notice any dried glue around the edges, you can quickly sand it using the gator micro tool and wipe away the dust before starting your second coat.
I painted a total of 3 coats of paint. I used Valspar’s Oyster bar and I love it. It looks great in my laundry room with my color scheme. My walls are Sherwin Williams’ Alabaster and I didn’t want the shelf to completely blend into the wall. Oyster bar is the perfect, subtle contrast I was looking for.
Step 4: Hanging the Peg Shelf
Start by measuring the wall and finding the center point and then match the center point of your shelf with the center point of the wall. Next, you will need to find the studs in the wall either using a stud finder or the knocking method (this works about 85% of the time and didn’t fail me this time! Woohoo!). Starting with the center stud, I screwed in the first wood screw through my shelf into the stud. I placed my level on top of the shelf to ensure that the shelf stayed in position while I was fixing it to the wall. I only used 3 wood screws and my shelf is very sturdy but you may want to use more or less depending on the size of your shelf.
After I had the shelf in place, it was time to fill the screw holes and touch up the paint. I used Minwax wood filler. Let it dry completely, sand lightly and then touch up the paint. I have read many tutorials where people wait to paint their shelf after it is hung. This would mean you could skip the touch up but it really didn’t add that much time. I probably won’t be changing this step but you do you!
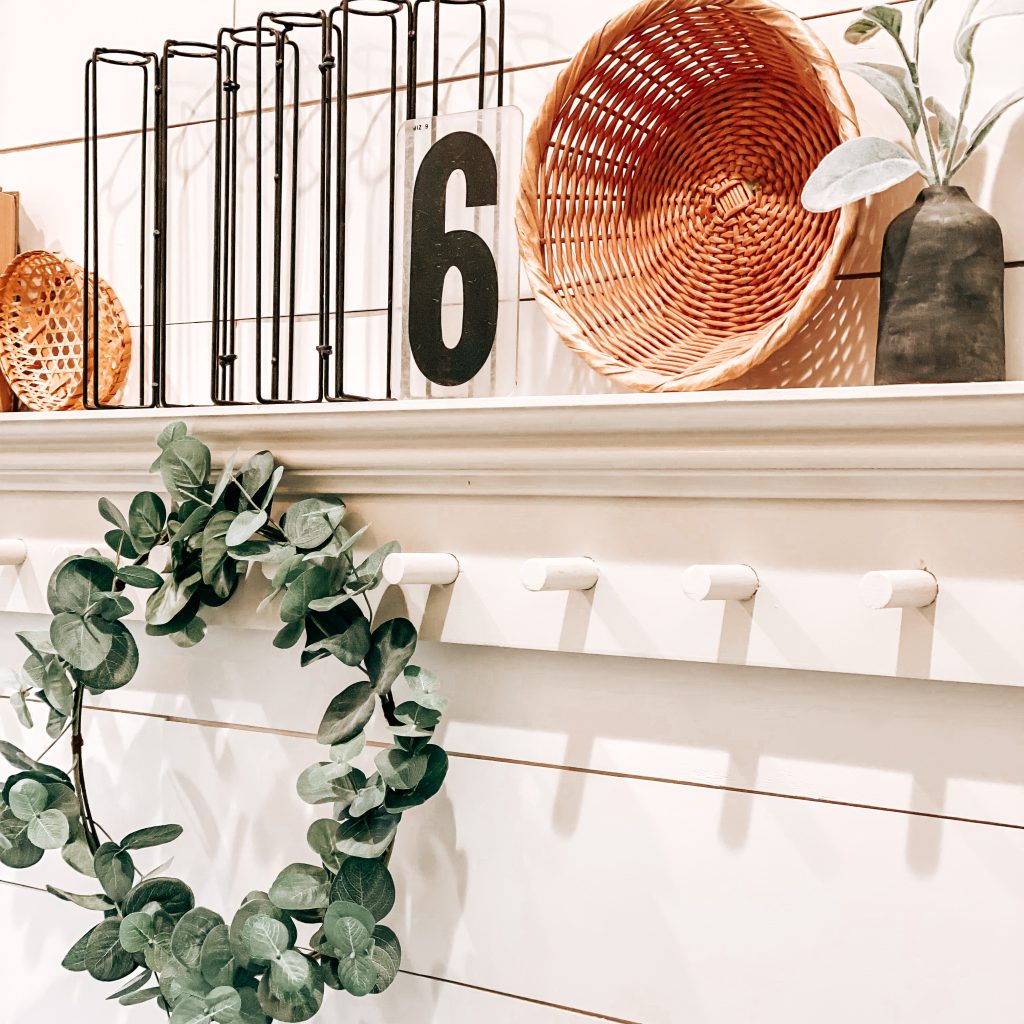
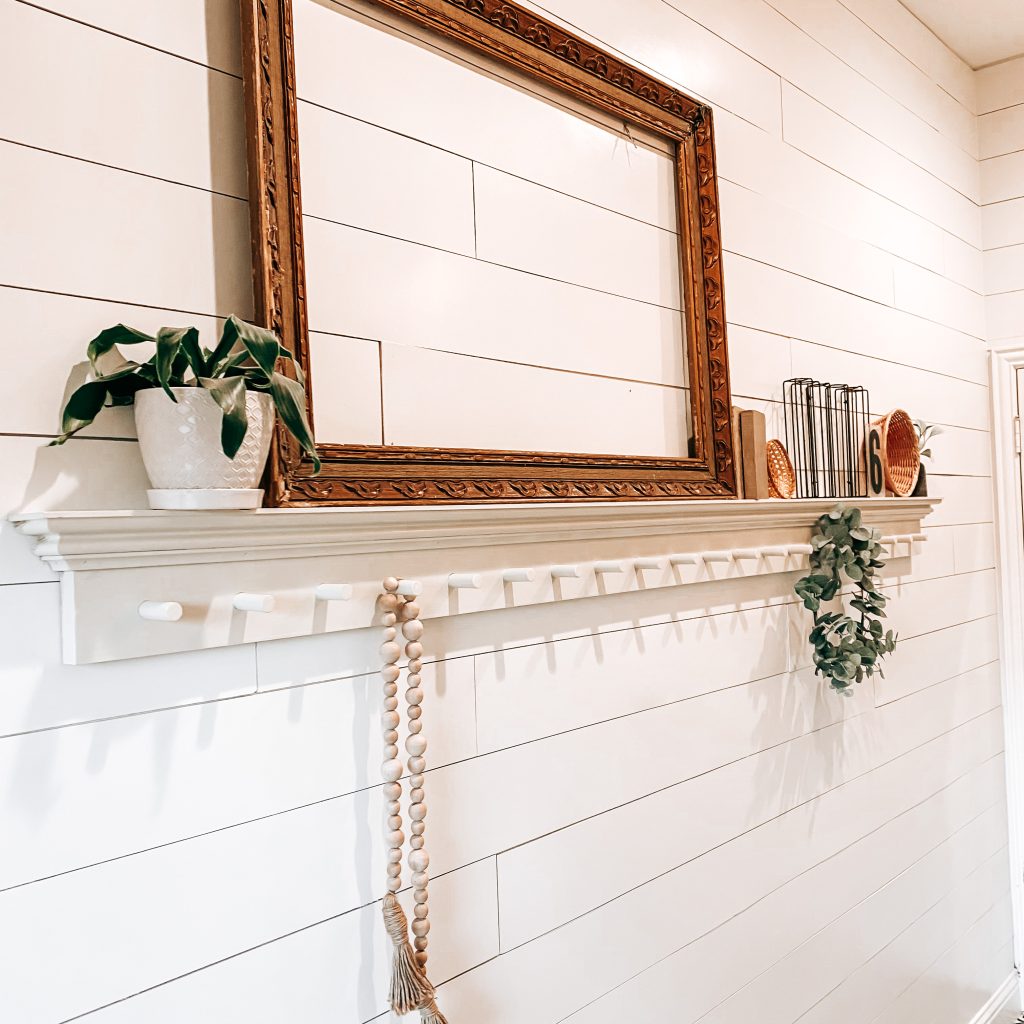
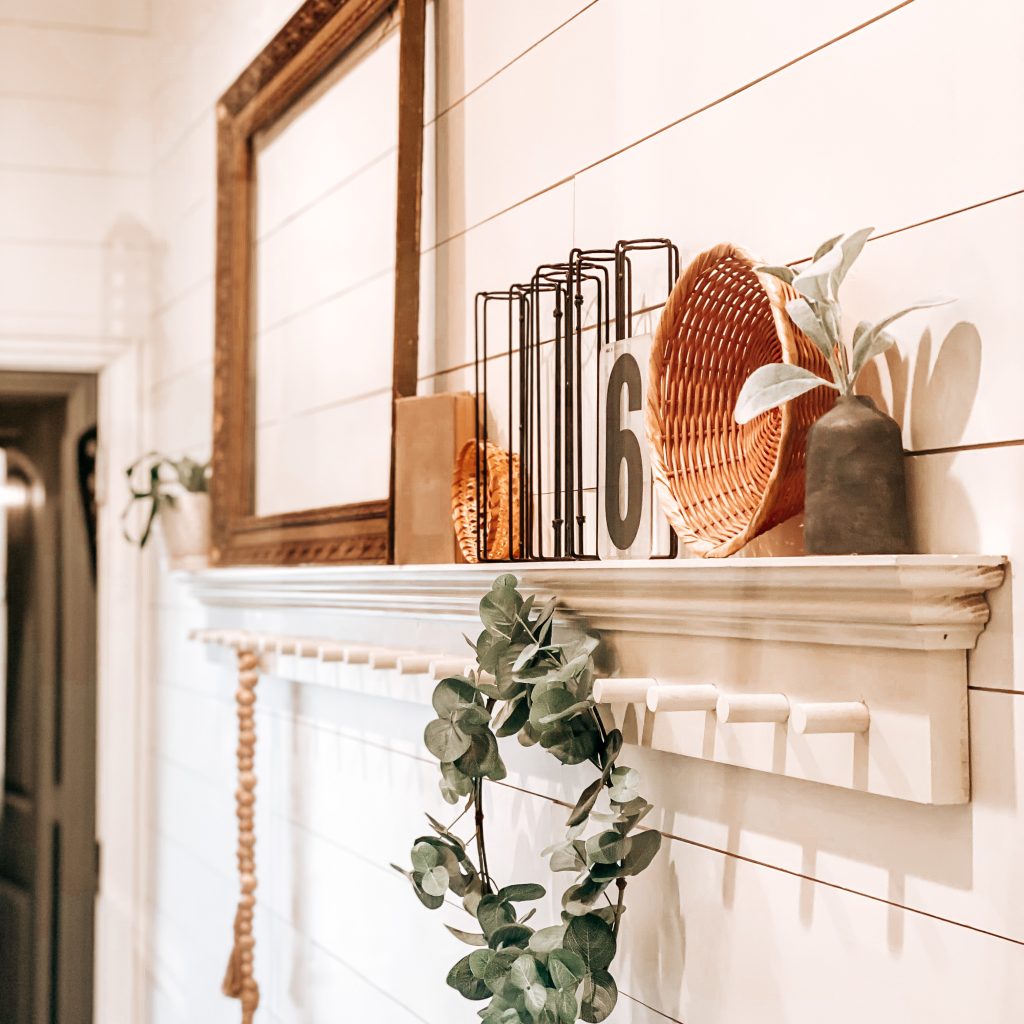
Step 5: Decorate your Peg Shelf
Now that your DIY Peg Shelf is hung and looking flawless, stand back and admire your work! I love that it adds character and functionality to my farmhouse laundry room. Mine is styled with items that I shopped around the house. I added an antique frame for height, some greenery and plants for color and, of course, some old books (books are my favorite) and other vintage finds. I’m thinking of adding some colorful stems to my metal vase stand for spring too. The possibilities are endless!

I hope you enjoyed our DIY farmhouse peg shelf project. I’d love to hear all about your DIY projects! What’s next on your list of projects? Leave me a comment below. Don’t forget to subscribe and follow us on Facebook, Instagram and Pinterest to keep up with our day to day. Thanks for stopping by!
Sources for DIY Peg Shelf Decor & Styling
Eucalyptus Wreath | Wooden Beads | Metal Vase | Black Mini Vase | Lambs Ear Stems | Wicker Baskets | White Ceramic Pot
I’m so excited to share this DIY natural raw wood coffee table project with you guys!

*This post contains affiliate links. That means that if you make a purchase after clicking on a link, I may earn a small commission at no extra cost to you. You can even shop some of my decor at the bottom of the page.
I love a good DIY project. Especially when they turn out the way I want them to which is always a 50/50 shot for me. I think I may be the reason we have those “Nailed it” memes. Either way, I enjoy them. Lately I’ve been seeing so many pins, insta posts and home decor blogs with beautiful natural raw wood furniture pieces. I love this style and I’ve been dying to find a piece for my own home. After a quick internet search, I realized I’m not the only one into this style right now because everything I found was either really pricey or sold out. I convinced myself that it couldn’t be that difficult to do and thus my DIY natural raw wood project was born!
I have flexible seating in my classroom and I used this coffee table that I found off Facebook Marketplace my first few years of teaching. After having to repaint it every year because of all the student graffiti and damage, I decided to retire it and take it home. I didn’t have the heart to get rid of it because I knew the bones were still good. I had hoped there might be an opportunity such as this in it’s future. I’m so glad I kept it.


I researched and read what felt like a million different articles on how to create the natural raw wood style that I was looking for. So. Much. Information. There were so many great articles out there and they all had different ways of doing it. I felt a little overwhelmed. I’ll admit that I’m a bit of a lazy DIYer. If the project starts looking too complicated, I’ll typically ditch the project and save up for it instead. This time, I stuck to my guns. I decided to try a mix of everything I had learned and hoped for the best.
5 DIY Steps to a Natural Raw Wood Finish
Here’s a quick look at the 5 steps I took to get the natural raw wood look I wanted.
- Strip It
- Scrape It
- Sand It
- Seal It
- Wax It
Step 1: Strip It
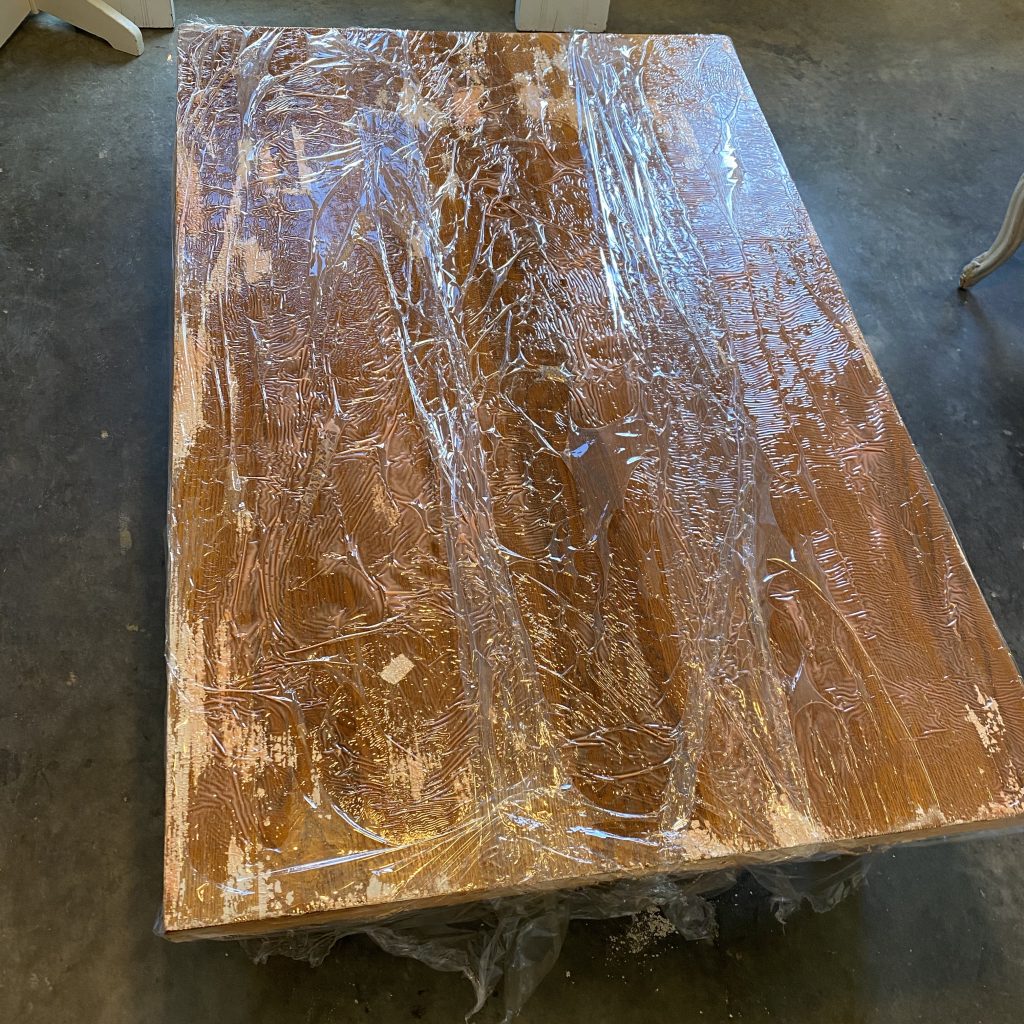
As I mentioned previously, the coffee table had several paint layers because I just spray painted over any flaws the table had and called it good. I knew sanding it at this stage would take forever so I decided to start with a stripper instead. I’ve never used a stripper before but I loved this one that I found at Home Depot. You can also find it on Amazon here. It did the job and the smell wasn’t unbearable. I coated every inch of the table with a thick layer of stripper. For this I used a cheap paint brush that I happened to find in our shop. I actually started out using one of those cheap craft foam brushes but the stripper melted it. Oops.
One of the articles I read said to cover the furniture with saran wrap. A friend of mine confirmed that it would allow the stripper to work a little longer without drying out too fast. I used moving wrap for this. It was actually meant for packing up my classroom. The handle on the ends make it super easy to wrap around larger pieces. I let the table sit overnight and removed the wrap the next afternoon. I was impressed with how well the stripper worked. Some of the paint even came off with the wrap as I was peeling it off.
Step 2: Scrape It
I scraped the remainder of the paint off with plastic scrapers so I wouldn’t scratch the wood. This part was pretty messy. I’m thankful for the concrete floors in our shop. I wouldn’t recommend doing this inside if you can help it. If you do, place some trash bags or newspapers on the floor before you start. The paint was super sticky and I had to clean the gunk off my scraper a few times before I could finish. I also moved one of the used strips of saran wrap on the ground below where I was scraping so that I could scrape the paint directly onto it. This was a game changer and made cleaning up much quicker.
Although I was pleased with the outcome, I decided to paint the stripper on once more because the table was still covered in some of the original golden stain. I repeated this entire step but in hindsight I’m not sure I really needed to.
The next day I finished scraping the last bit of paint and stain. There were still a few spots in the corners and the hard to reach places that had some paint left over but I decided to not worry about it (because lazy DIYer). I think it adds a little character and tells a story. At least that’s how I’m justifying it. The table was pretty tacky so using mineral spirits and the rough side of a dish sponge to wipe it down really helped. This stuff was pretty strong and really soaked into the wood so I let it sit for another day to dry before I started sanding.


Please note that this project took ME a couple days to complete but I honestly don’t think it needed to. With four kiddos, I don’t always have loads of free-time to work on projects. Hopefully that explains my leisurely pace.

Step 3: Sand It
This was probably my least favorite part of this DIY natural raw wood project. It wasn’t difficult, it was just tedious. I used our sander with 220 grit paper to sand down most of the table. Then I used a fine/medium grit sanding sponge for the corners and places that were difficult to reach with the sander. I vacuumed as much of the dust as I could and then wiped down the rest with a microfiber rag. Tedious or not, this step was a must and so worth it! It looked AMAZING!
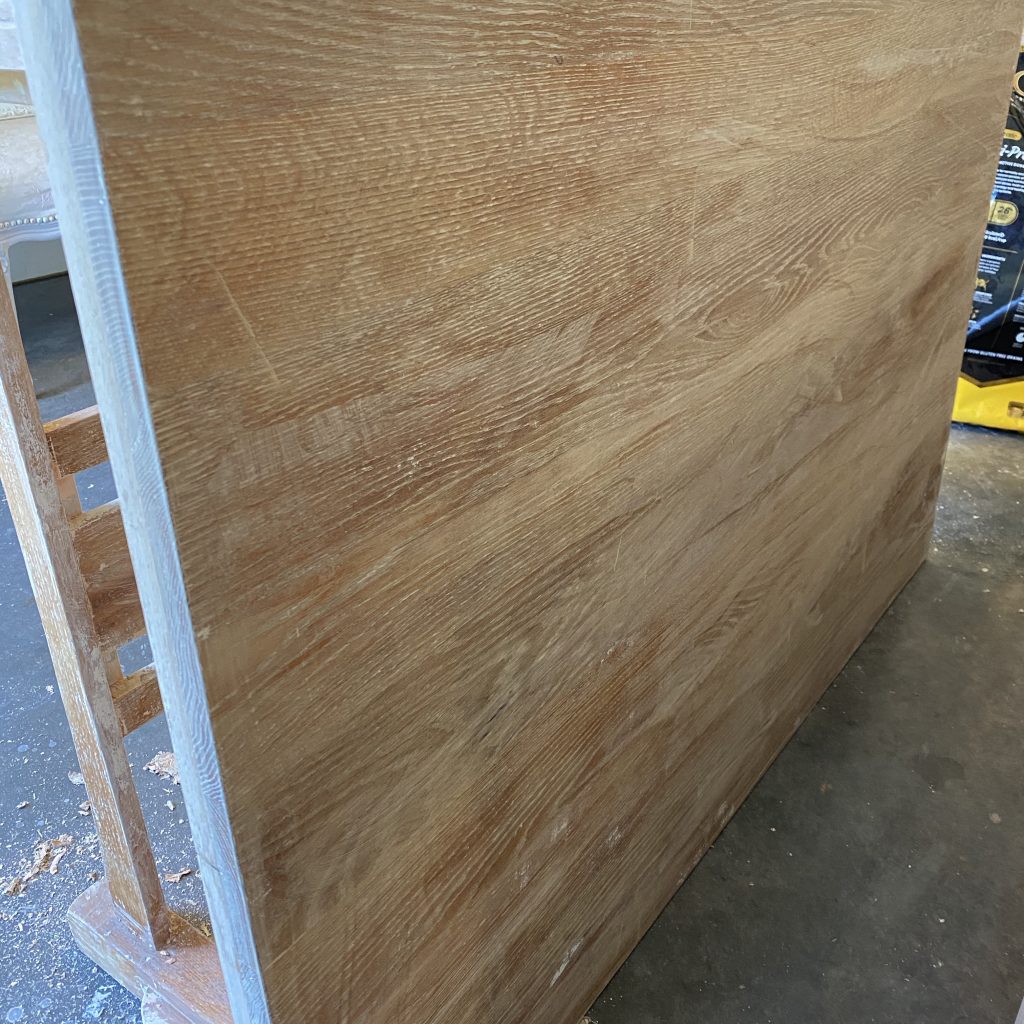
Step 4: Seal It
No more golden yellow color! This was the actual natural raw wood of the table! I probably could’ve left it like this but since it was going in our house with my kids, I thought it best to seal it. I purchased a clear satin finish poly for this. Then, I applied 2 coats of it with a new, higher quality paint brush. I read that spraying the poly would give it a more even coat but because I was in a small room, I chose not to. It appeared well covered after 2 coats to me, but it’s actually recommended by the professionals that you do more. Even though the poly was clear, after drying, I noticed some of the original golden color reappearing. Don’t PANIC! Let the magic liming wax do it’s thang!
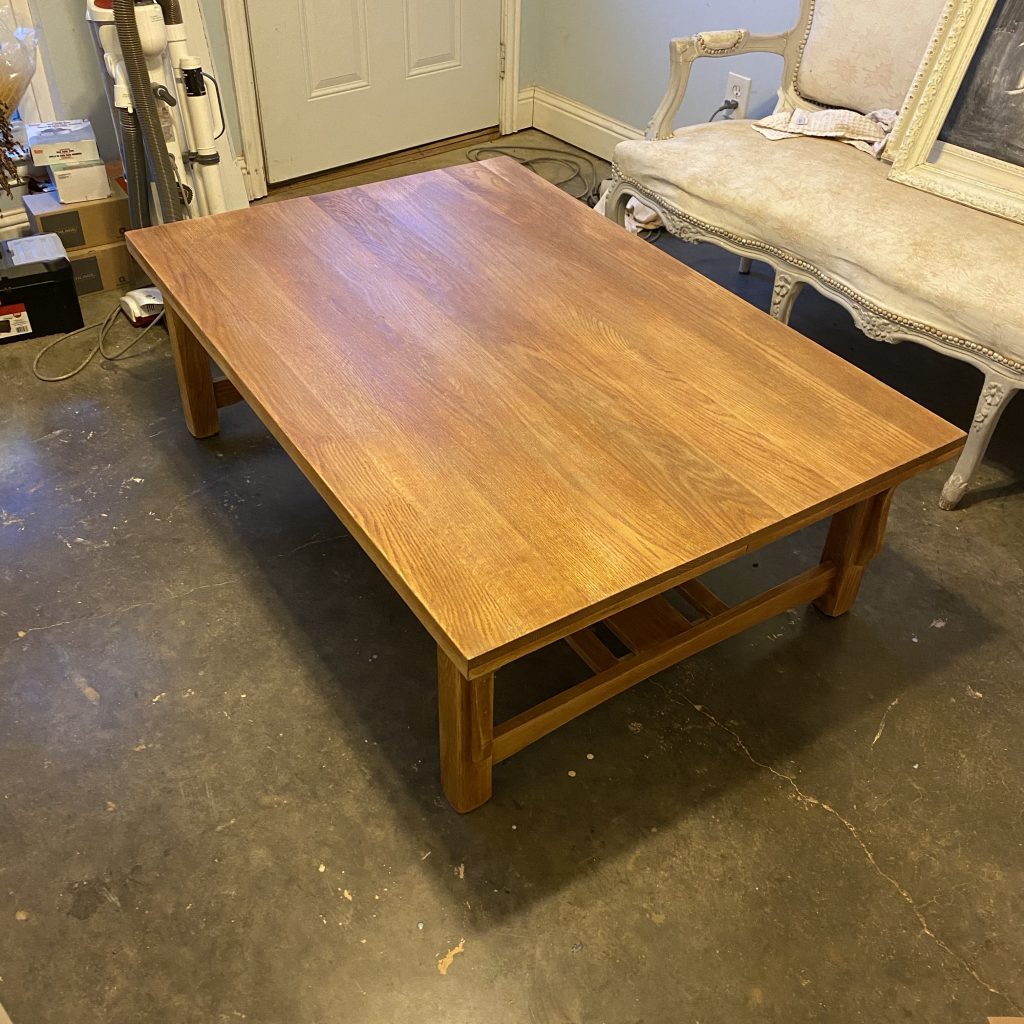
Step 5: Wax it
This step was the most important one in getting the natural raw wood look I wanted for my coffee table. I was familiar with liming wax but had never used it before. THIS STUFF IS AWESOME and super easy to work with. I used an old cotton t-shirt to rub the wax over the table. You can also use a waxing brush to get a more grainy look. I applied a thin layer on and then wiped off any excess with the dry side of the shirt. I waited maybe an hour or so for it to dry and then repeated this process twice.


Some of the articles I read said to seal the wood again after you’ve applied the liming wax but I didn’t. Now that the table has been in use for a few months, I see why I probably should have. There are a few places on the table where little hands constantly touching the table have taken some of the wax off. I can see a little bit of that golden color coming through again. However, reapplying some wax and a coat of sealer will be an easy task later on to preserve this beauty.
I love how our DIY natural raw wood coffee table turned out. It has that beautiful natural raw wood look that I was going for. I’m so glad I stuck with this project and I can’t wait to do this to other pieces I have around the house!


Let me know what you think. I’d love to hear about pieces that you’ve redone. What process worked well for you? Leave me a comment below. Don’t forget to subscribe and follow us on Facebook, Instagram and Pinterest to keep up with our day to day. Thanks for stopping by!
Sources
*Click the items below to shop affiliate links
Stripper | Paint Brush | Moving Wrap | Plastic Scrapers | Mineral Spirits | Orbit Sander | 220 Grit Sand Paper | Sanding Block | Microfiber Rags | Clear Satin Finish Polyurethane | Liming Wax | Wax brush | Poly/Paint Sprayer | Wood Beads | Flameless Candles | Chicken Wire Basket | Fern Plant | Area Rug | Amber Vase | Farmhouse Throw | Pillow Covers |