I knew I wanted to start a DIY peg shelf project for my laundry room for a while. What I had just wasn’t functional and I was totally prepared to start a full blown, from scratch, DIY Peg Shelf project.


*This post contains affiliate links. That means that if you make a purchase after clicking on a link, I may earn a small commission at no extra cost to you.
Luckily, this lazy DIYer stumbled across this precious piece at Round Top so I only had to do half of the work. I love Round Top and easy DIY projects so it was a win/win for me!

*This post contains affiliate links. That means that if you make a purchase after clicking on a link, I may earn a small commission at no extra cost to you.
Here is a list of the materials I used for this DIY peg shelf:
- ½ inch dowel rod
- Small level
- Metal ruler and/or measuring tape (I used both but you could just use measuring tape if you didn’t have a ruler and be just fine)
- Wood glue
- Frog tape
- Wood Screws
- Wood filler
- 120 grit sandpaper
- Gator finishing micro tool (this is optional but it made the sanding those small, in between spaces super easy)
- ½ inch forstner drill bit
- Cordless drill
- Rubber mallet
- Tack cloth
- Small angled brush
- Latex primer & paint (I used Valspar Oyster Bar)
- Stud finder ( I did not have one but I could have totally used it. We found the studs the old fashion way, by knocking on the wall 😜)
Step 1: Measure
The first thing I needed to do was determine the placement of the pegs. To do this I laid out the shelf, measured the full length and then marked the center point with a pencil. From there, you can either draw a line down the length of the rail or you could use tape to mark it, which is what I did. The spacing of your pegs is really up to you and what you’re using it for. You will need to make sure that they are spaced evenly and the length from the last peg and the edge are the same on both ends. For example, I spaced each of my pegs 4 ½ inches apart with the last pegs 3 inches from each end.
Step 2: Drill & Cut
The measuring was probably the hardest part of this whole project. Once that was done, I used a cordless drill with the ½ inch Forstner drill bit to bore the holes for each peg. I drilled all the way through my rail but you could also use a backing to make sure they were the same depth.
Next I used the miter saw to cut the individual pegs. I set up a jig to ensure that all the pegs were the same length and to speed up the process a little. They all measured 3 inches long. This length could be longer, if desired, depending on the depth of your shelf. My shelf only stuck out 3 inches so it would have looked odd if the pegs were sticking out further.
Step 3: Paint & Glue
I lightly sanded the rail with 120 grit sandpaper to ensure the paint would go on smooth. Once I finished sanding, I wiped it down with my tack cloth to remove any dust and some of the wood chips from drilling. I painted the first coat before putting the pegs in. I really don’t know why. There is absolutely no logical reason for this but it all worked out so….let’s blame it on my mom brain and move on.
Once the first coat dried, I added a little wood glue to the inside edges of each hole. Then I used a rubber mallet to hammer in each peg until it was flush with the back of my shelf. Make sure to wipe off any excess glue that comes up around the edges of the peg with a cloth and then let dry completely. If you notice any dried glue around the edges, you can quickly sand it using the gator micro tool and wipe away the dust before starting your second coat.
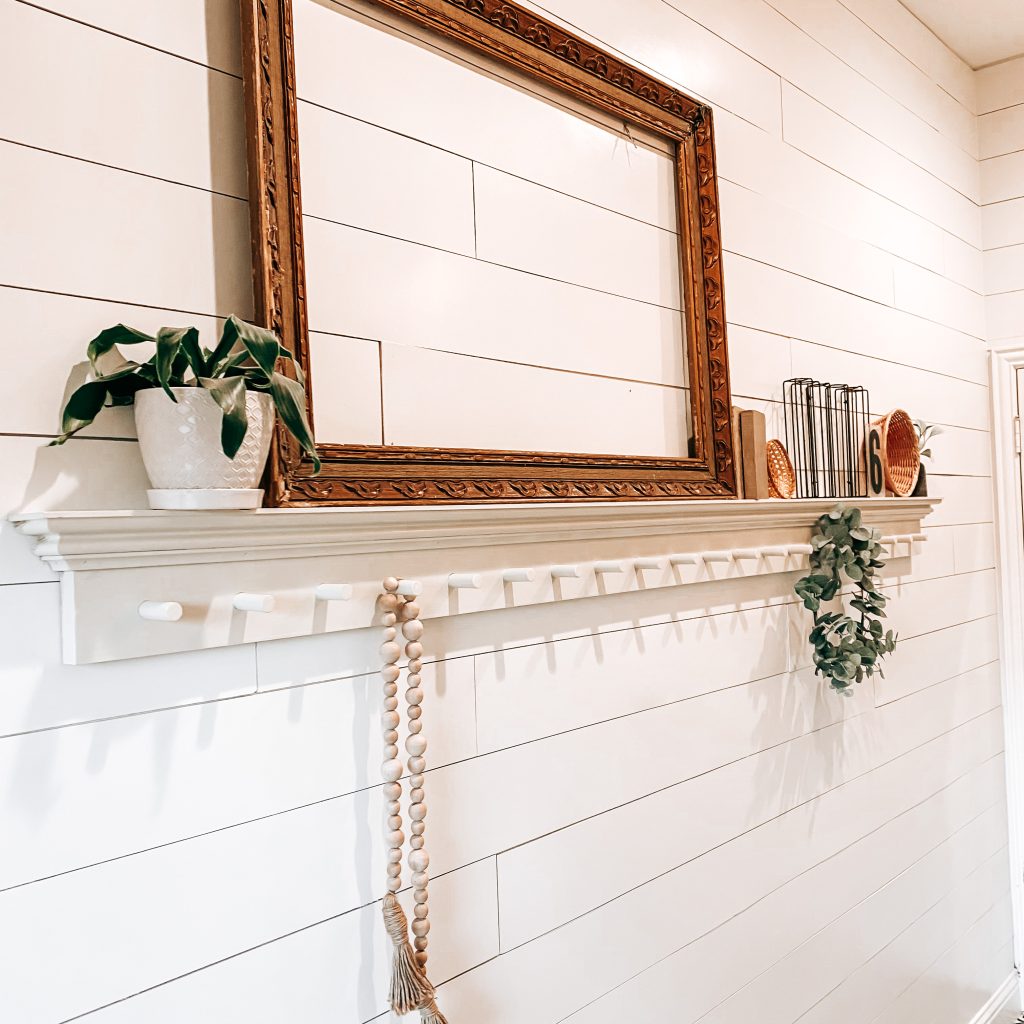
I painted a total of 3 coats of paint. I used Valspar’s Oyster bar and I love it. It looks great in my laundry room with my color scheme. My walls are Sherwin Williams’ Alabaster and I didn’t want the shelf to completely blend into the wall. Oyster bar is the perfect, subtle contrast I was looking for.
Step 4: Hanging the Peg Shelf
Start by measuring the wall and finding the center point and then match the center point of your shelf with the center point of the wall. Next, you will need to find the studs in the wall either using a stud finder or the knocking method (this works about 85% of the time and didn’t fail me this time! Woohoo!). Starting with the center stud, I screwed in the first wood screw through my shelf into the stud. I placed my level on top of the shelf to ensure that the shelf stayed in position while I was fixing it to the wall. I only used 3 wood screws and my shelf is very sturdy but you may want to use more or less depending on the size of your shelf.
After I had the shelf in place, it was time to fill the screw holes and touch up the paint. I used Minwax wood filler. Let it dry completely, sand lightly and then touch up the paint. I have read many tutorials where people wait to paint their shelf after it is hung. This would mean you could skip the touch up but it really didn’t add that much time. I probably won’t be changing this step but you do you!
Step 5: Decorate your Peg Shelf
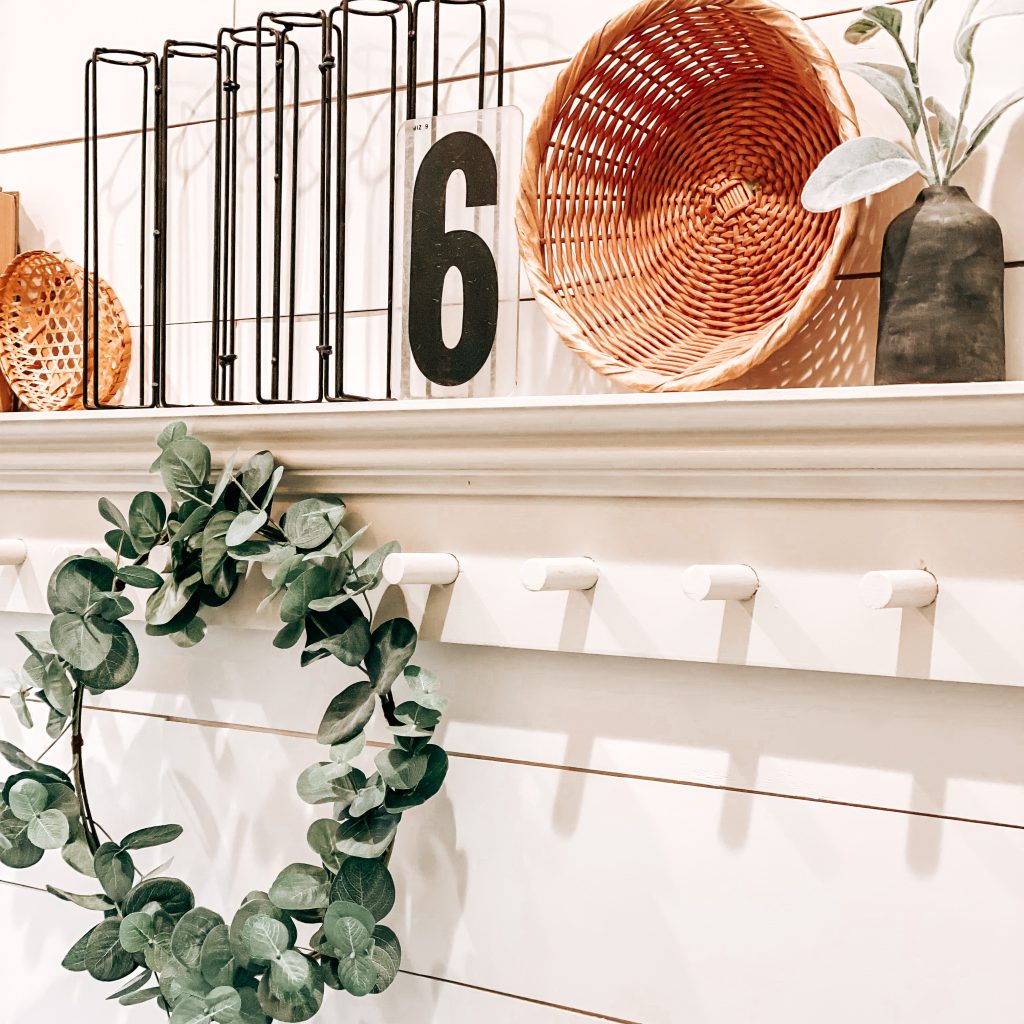
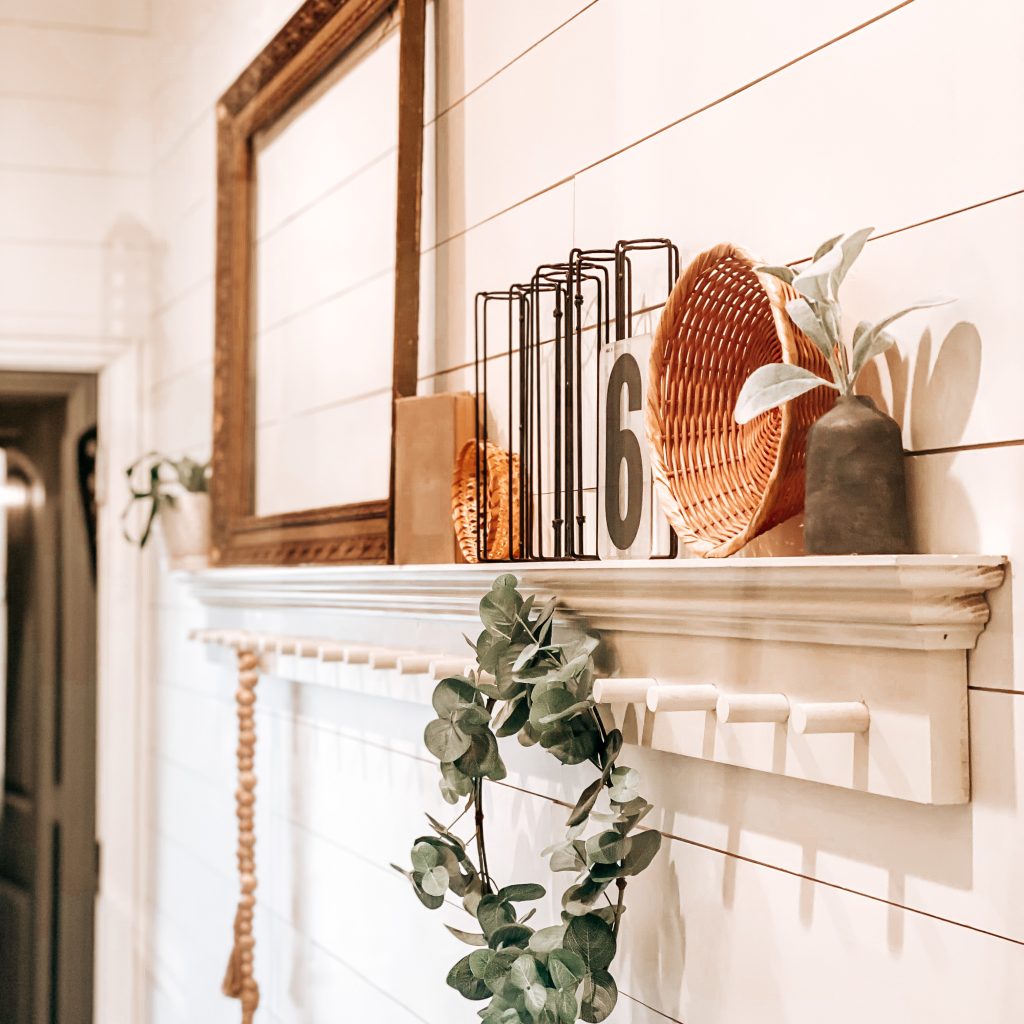
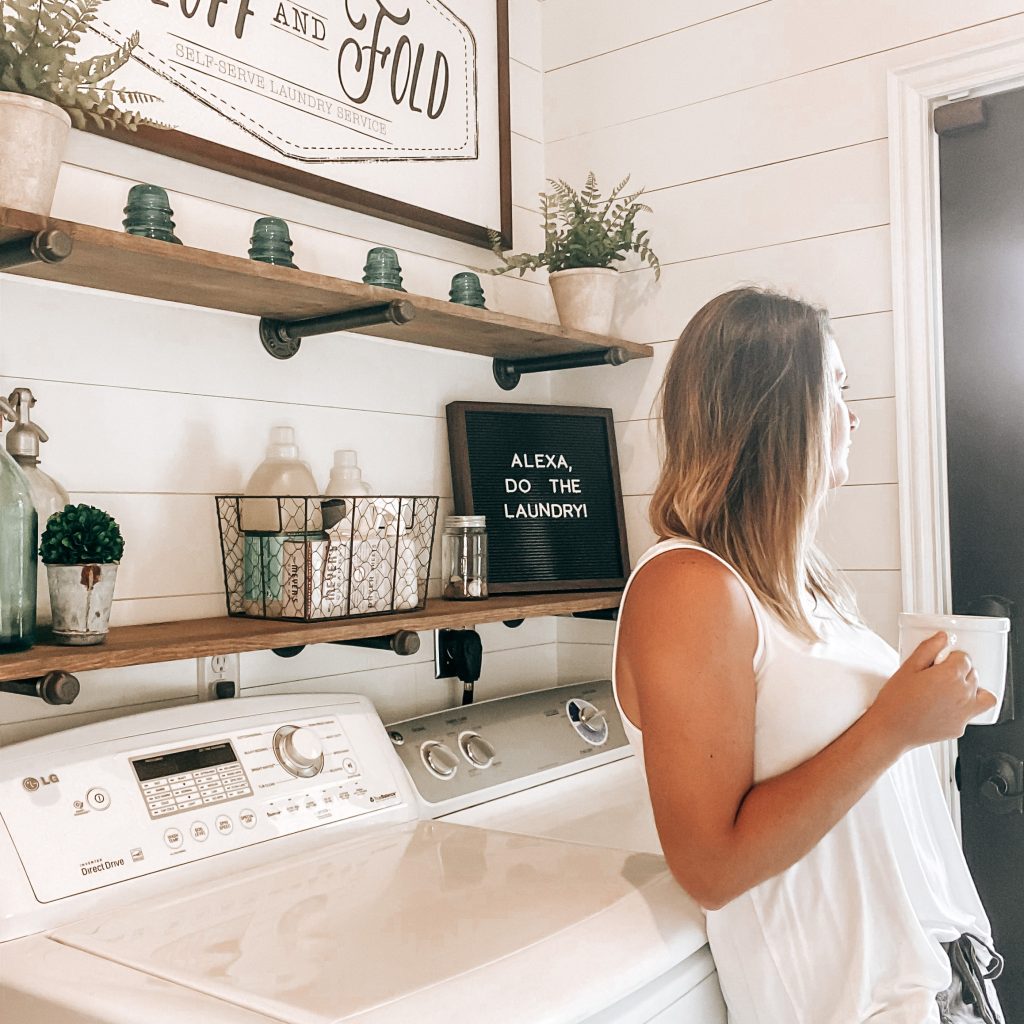
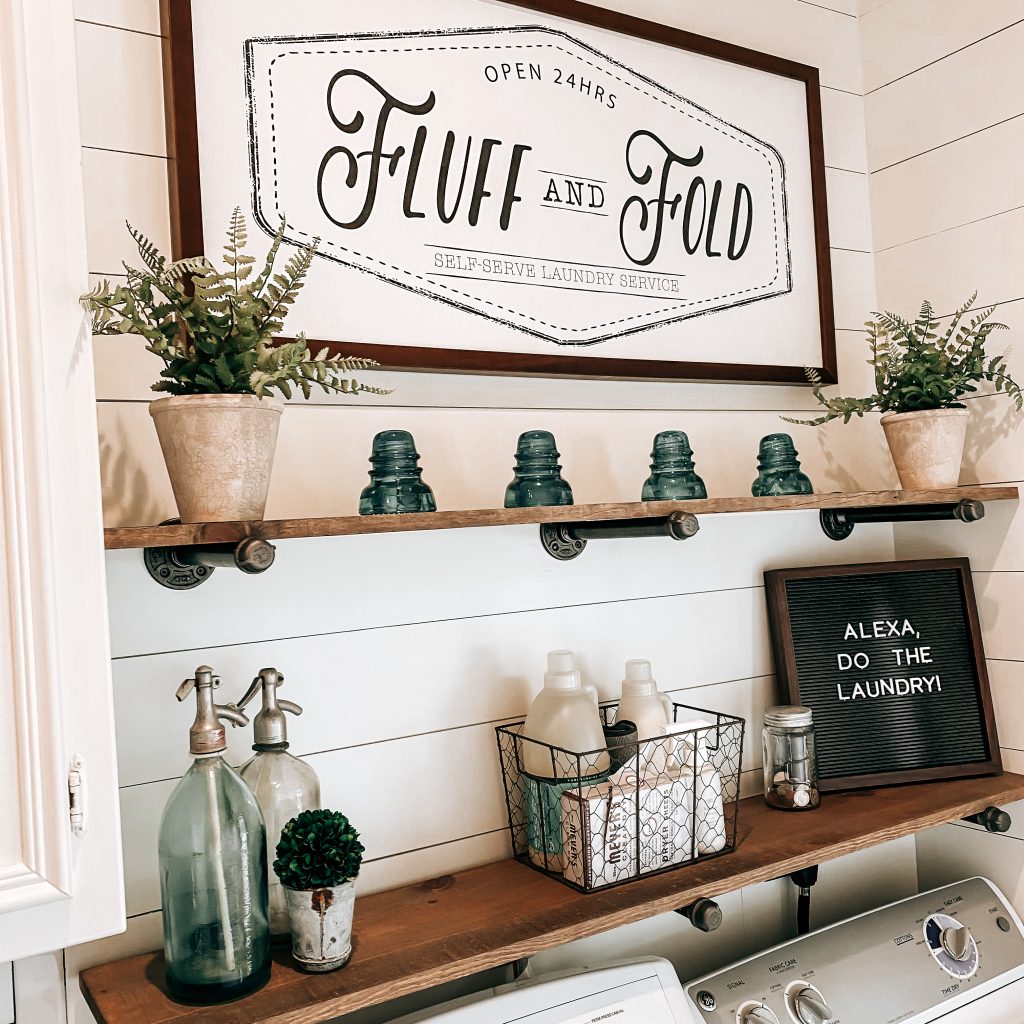
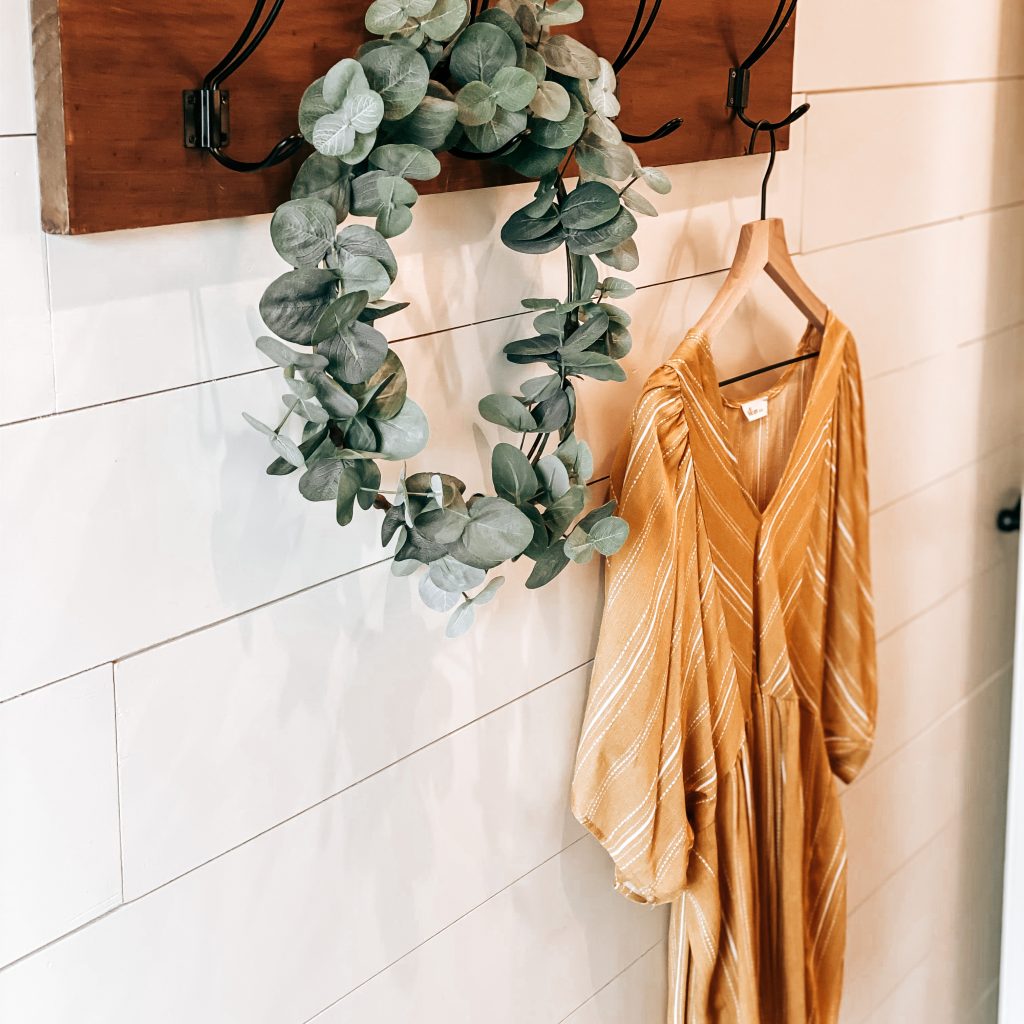
Now that your DIY Peg Shelf is hung and looking flawless, stand back and admire your work! I love that it adds character and functionality to my farmhouse laundry room. Mine is styled with items that I shopped around the house. I added an antique frame for height, some greenery and plants for color and, of course, some old books (books are my favorite) and other vintage finds. I’m thinking of adding some colorful stems to my metal vase stand for spring too. The possibilities are endless!

I hope you enjoyed our DIY farmhouse peg shelf project. I’d love to hear all about your DIY projects! What’s next on your list of projects? Leave me a comment below. Don’t forget to subscribe and follow us on Facebook, Instagram and Pinterest to keep up with our day to day. Thanks for stopping by!
Sources for DIY Peg Shelf Decor & Styling
Eucalyptus Wreath | Wooden Beads | Metal Vase | Black Mini Vase | Lambs Ear Stems | Wicker Baskets | White Ceramic Pot
Welcome to The Yellow Rose Farmhouse Laundry Room Reveal!
*This post contains affiliate links. That means that if you make a purchase after clicking on a link, I may earn a small commission at no extra cost to you.
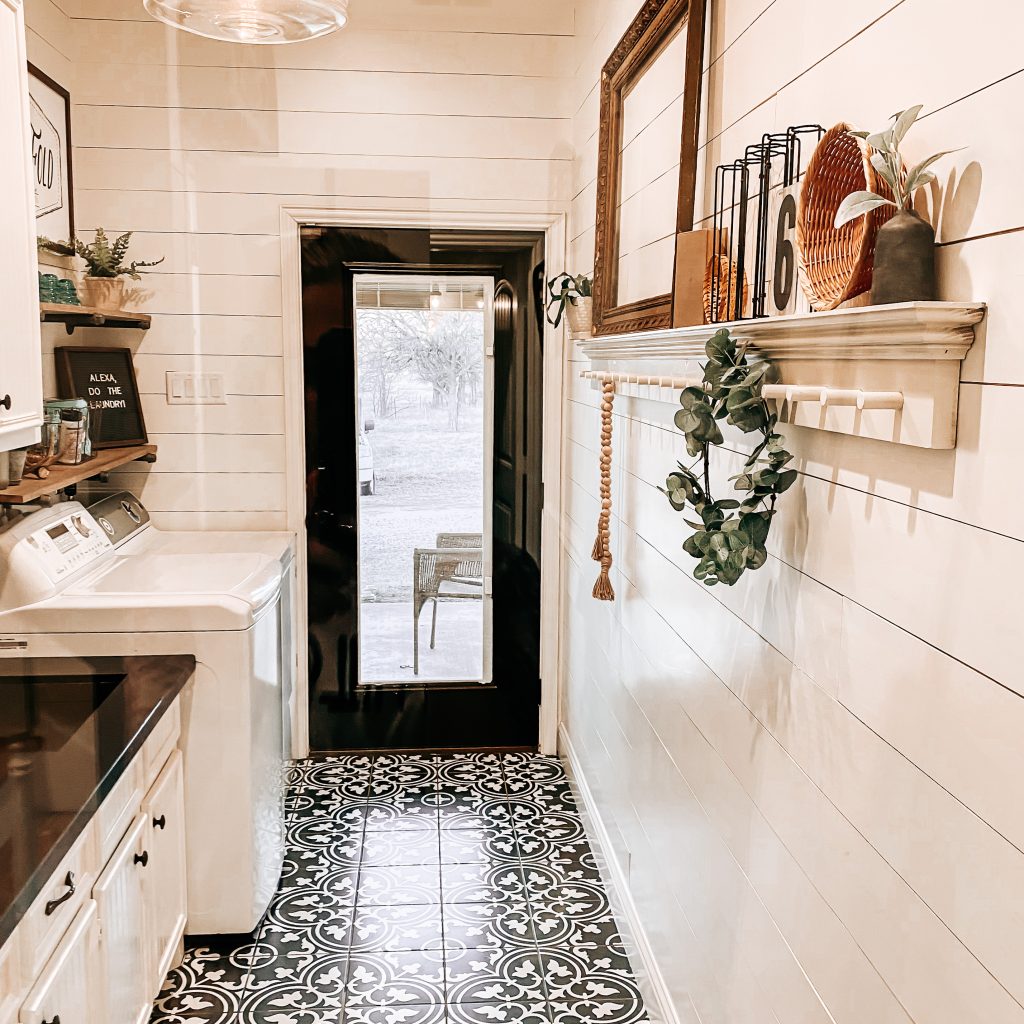
Our laundry room was one of the first rooms to be renovated. I really wanted a bold transformation that included all my favorite farmhouse inspiration. I also need it to be functional since I spend most of my life in this room. Laundry really is a never ending cycle in our house!
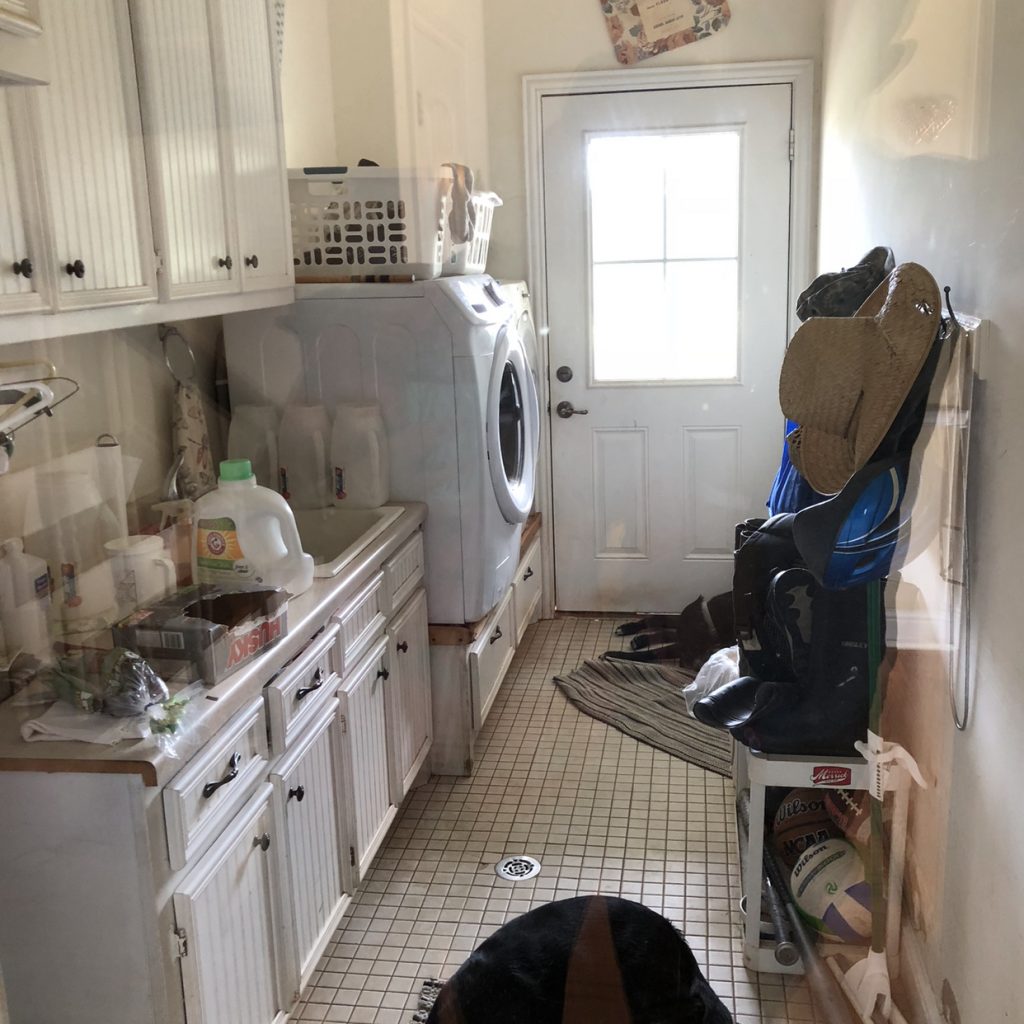
This is the only “Before” shot that I have but you’ll still be able to see most of the changes.
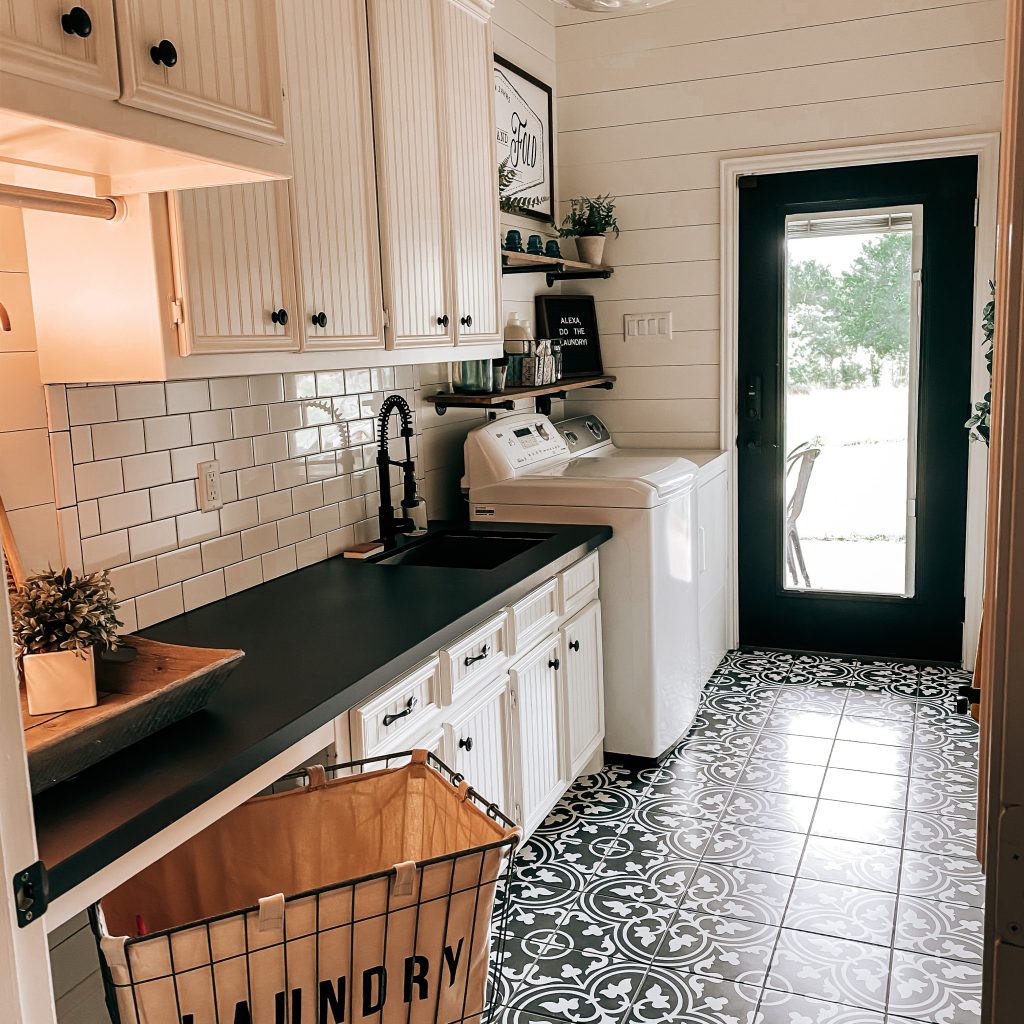
A large folding space is a must for me to separate out everyone’s clothes as I fold. So one of the first changes we made was removing the space where the refrigerator had been.
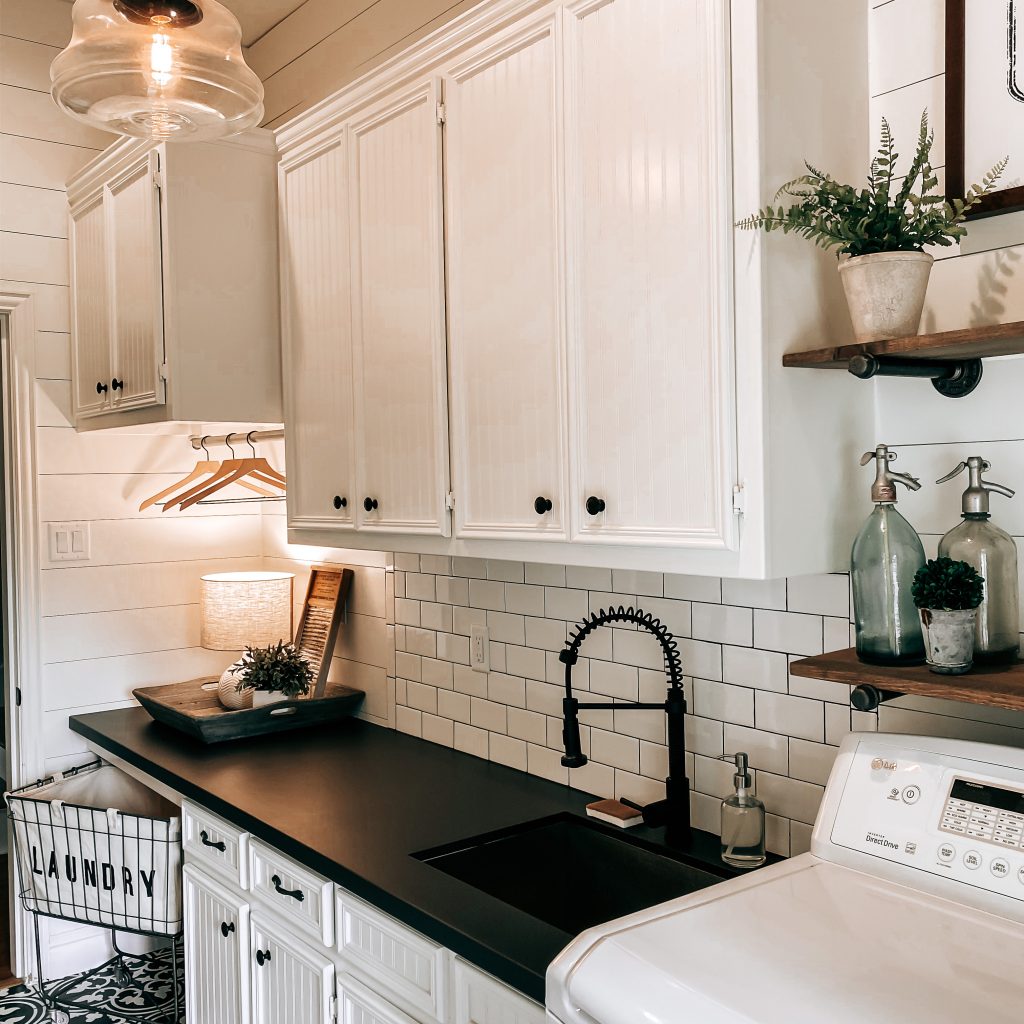
Luckily, we were able to leave the cabinets the way they were. We extended the countertop to the wall and then added a clothes rack under the cabinets. We left the space under this section open for storage. I found this adorable rolling laundry cart and it fit perfectly. It was meant to be!

The next thing that I knew we would have to change was the washer/dryer pedestal. I don’t have front loaders and I didn’t plan on buying new ones so we had to remove the pedestal. I feel like it made the laundry room look so much bigger. That may all be in my head but I’m going with it!
The tile that we chose for our laundry room might just be my favorite tile in the whole house. I almost didn’t choose it because I thought it might look too busy. I also didn’t want it to clash with our bathroom and kitchen. I’m glad I got over that and just went for it. It really makes this room stand out. Bonus: It doesn’t show dirt! Yay!!!
Even though I wanted a bold transformation, I also really wanted all our rooms to flow well together. The shiplap and countertops do this for our home. We have the same countertops in the laundry room, the kitchen and all of our bathrooms. They’re so pretty and super durable. You can check out our Farmhouse Master Bathroom Renovation to see how everything looks together in there.
We also have shiplap in all the bathrooms and around the fireplace. So adding shiplap in here just seemed right. I love how these details and our paint colors really make our house feel like it all fits together.
Because functionality is so important, the sink was a nonnegotiable. I did look into cute farmhouse sinks like the one in our kitchen but I didn’t really think those would stand up to everything we would subject this one too. This sink is used for washing everything under the sun! You name it and it’s probably been washed in our laundry room sink. Dogs, kittens, kids, husbands, and the list goes on…. All I’m saying is, I don’t regret not getting the pretty sink.


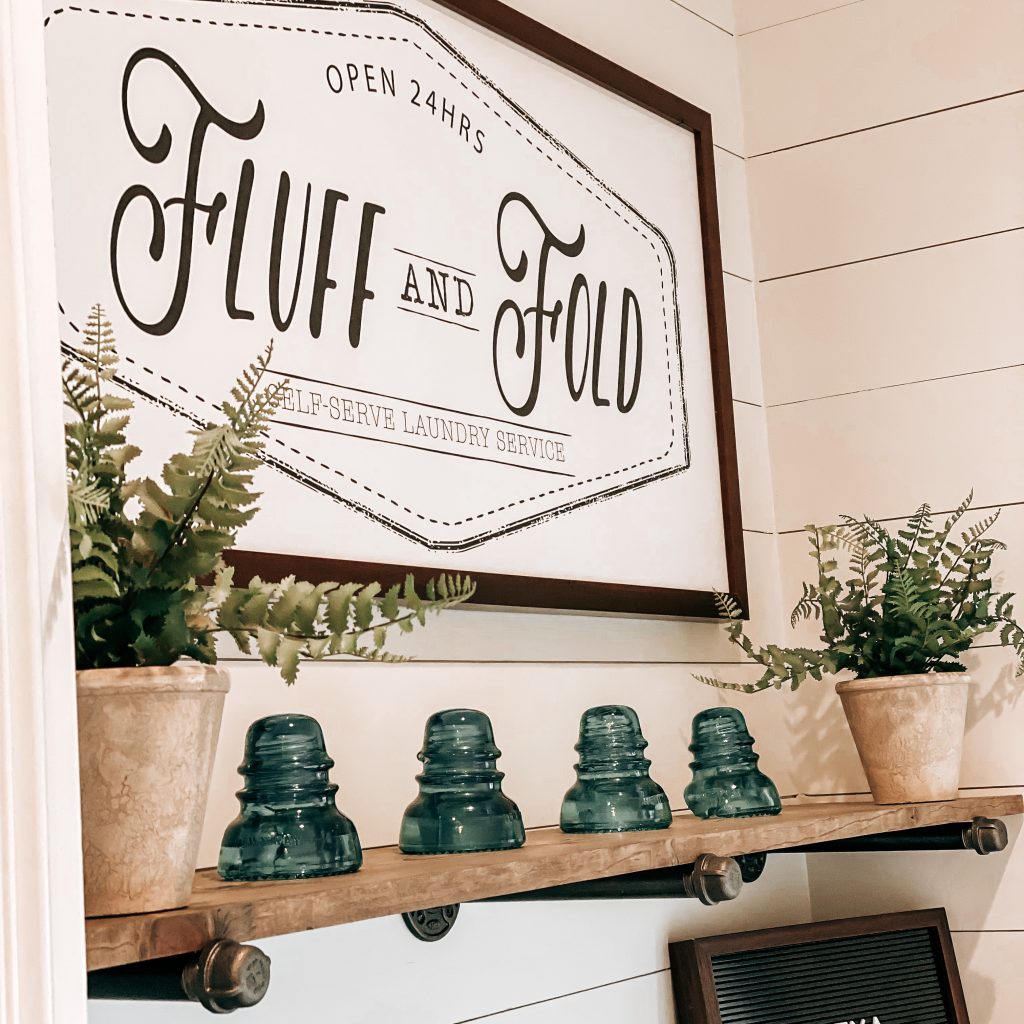
Once all the renovations were complete and we got everything moved in, it still felt a little bare. The space above the washer and dryer in particular looked really naked. We had talked about continuing the cabinets but decided against it. Instead we decided on open shelves. Chad took on this little DIY project on his own. I’m so in love with how they turned out. They are the perfect contrast to the white shiplap and cabinets. I will probably paint the hardware black later on but Mama’s done for now. I’ve also already restyled the shelves several times and I can assure you that I probably will again. Listen, I can accept that I have a problem 😜
The open shelves are exactly what this space needed. I think I could get used to doing laundry here everyday…maybe.


I hope you enjoyed The Yellow Rose Farmhouse Laundry Room Reveal! I’d love to hear what you think. Leave me a comment below. Don’t forget to subscribe and follow us on Facebook, Instagram and Pinterest to keep up with our day to day. Thanks for stopping by!
Sources
*Click the items below to shop affiliate links
Floor Tile | Backsplash | Countertops | Pendant Light | Fluff & Fold Sign | Rolling Laundry Cart | Sink | Faucet | Table Lamp | Seltzer Bottles | Letter Board | Wire Basket | Wood Tray | Galvanized Washboard | Fern Plant | Eucalyptus Wreath | Mrs. Meyers Detergent |
So, why The Yellow Rose Farmhouse? I just want to start by saying thanks for even reading this far. I’d love to tell you what my intentions are for this blog but I honestly don’t even know myself. I love to write but it’s always been just for my own enjoyment. I have kept a journal of some form for as long as I can remember. It’s always been a way for me to capture my thoughts, concerns, hopes and dreams. I enjoy going back and reading some of my old entries and reflecting on where my heart was. I’m usually humbled because I’m able to see, with a different perspective, the things God was working out all along. I can see how it all tied into who and where I am today.
The two things that bring me the most joy in life, of course, are my family and my home. They will be the topics I discuss the most but everyday is a new adventure here so you never know.

*This post contains affiliate links. That means that if you make a purchase after clicking on a link, I may earn a small commission at no extra cost to you. You can even shop some of my home decor and other items at the bottom of the page.
Home
I am a homebody. I love people and adventures but I am usually anticipating getting home where I can find my true rest. There are few things that make me happier than sitting in my comfiest clothes, drinking coffee and enjoying a peaceful view.
I’ve discovered over the years that decorating my home is my creative outlet and truly does bring me joy. There’s something about turning inanimate objects into sentimental pieces to feel more like us that makes my heart so happy. My style seems to constantly evolve and grow just like my family and I. I feel as though my decor style and life are somehow a symbolic metaphor. I’ve learned from mistakes, laughed off poor choices and grown to appreciate the present just a little more.

Chad and I’s favorite topics to discuss are parenting wins/fails and our adoption process. So many thoughts and emotions! Seriously, I have enough to say about being a wife and mom of four that I could write a book. I’ll try to explain as briefly as possible a little about our family and choice to adopt. Chad and I would’ve never believed that we’d be living on a farm in Millsap (our hometown) with four children all under the age of eight but here we are. As cliche as it may sound, I wouldn’t trade a minute of it! We are chaotic and offbeat but also full of love, laughter and joy.

Family is Forever
Although we had always talked about adopting, it seemed so far off until it wasn’t and we were in the trenches of paperwork, interviews and home studies. It’s funny to try and remember what our lives were like before because it all just seems so “normal” now. We have one biological daughter, Clancy, who is 7 and we adopted a sibling group out of foster care a few years ago. Now there’s Luke, 7 (He and Clancy are only 8 days apart. We stayed in birth order which was something that, foolishly, we were really stressed about. Yay us!), Evie, 6 and last but certainly not least, Joon, 4.
We are living out what we were called to do and we believe this was the plan for our family all along.

One of my main reasons for starting The Yellow Rose Farmhouse is to educate others on how awesome adopting children can be. Don’t get me wrong, it is also extremely hard and emotionally exhausting but isn’t parenting just like that??? There are more than a few misconceptions out there about adopting and hopefully we’ll clear a few of those up.
We get told a lot that we are “special people” for being the parents of our four kiddos. Please believe me when I say we are not special at all and we are far from perfect! I’m just like every other mom out there who has absolutely no clue what I’m doing and our kids are just like any other kids. If you follow this journey with us for long, I’m sure you’ll be able to see that for yourself.
My “Why”
So there you have it. My “why” for The Yellow Rose Farmhouse in a nutshell. Although it makes me feel a little vulnerable, I hope my thoughts and experiences will encourage you and perhaps lead to personal reflection and inspire a little bit of joy.
Subscribe at the bottom of the page to get updates on our latest posts and follow along with us on Facebook, Instagram and Pinterest to keep in touch.
Shop Our Home
*Click the items below to shop affiliate links
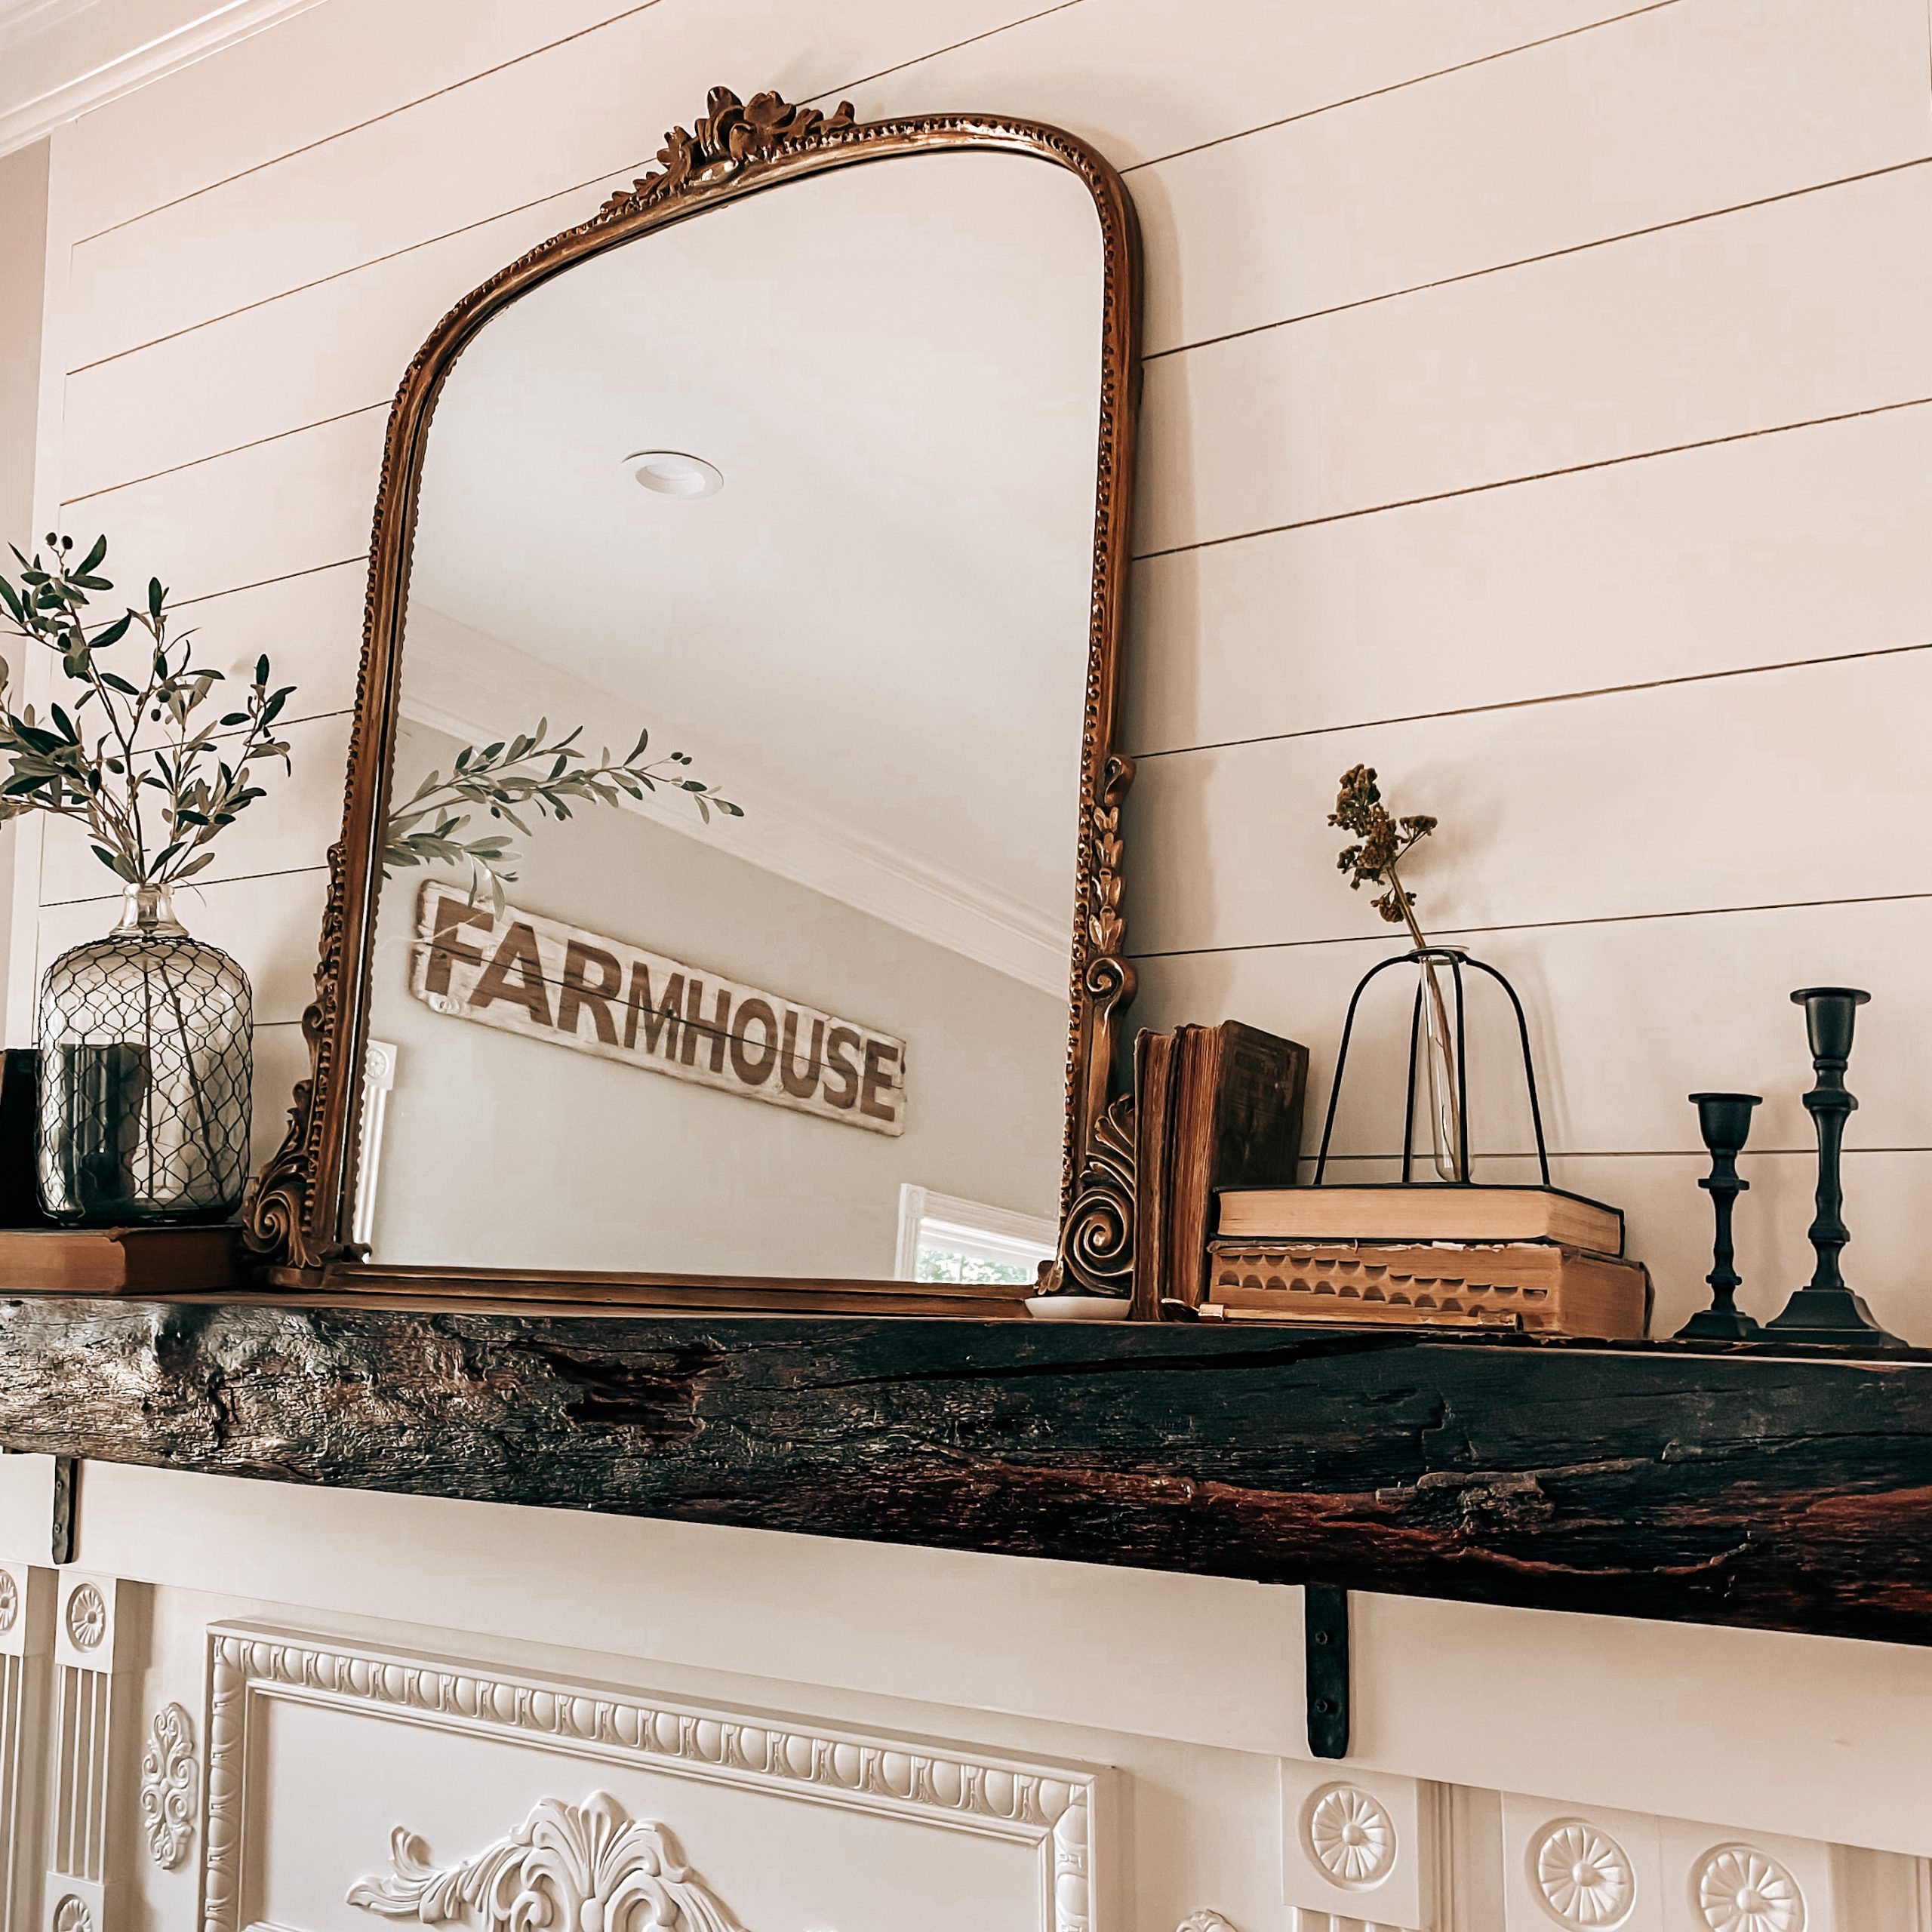
| Farmhouse Throw | Candle Holders | Blanket Ladder | Eucalyptus Wreath | Throw Pillows | Pillow Covers | Floor Lamp | Mirror | Olive Stems | Oversized Sleeper Chair | Glass Vase | Bud Vase | Rustic Farmhouse Sign | Half Windmill | Church Pew Bench | Old Navy Outfits for the Kids |